System Requirements Specification
In this chapter, we cover the phase of developing and refining system requirements. We demonstrate how to create the System Requirements Specification document for the UNEX project in ReqView.
Avy Strominger
- From Stakeholder Requirements to System Requirements
- Create System Requirements Specification Document
- Transfer Stakeholder Requirements to System Requirements
- Develop System Requirements
- Refine System Requirements into “Good Requirements”
- Identify Missing System Requirements
- Annotate System Requirements
- Complete System Requirements
- Finalize System Specification Document
- Create Baseline of System Specification Document
- Publish System Specification Document
From Stakeholder Requirements to System Requirements
The System Requirements Specification (SyRS) document is the first technical document written by the project team during a new project development phase. It is also the most important since it is the basis for most subsequent development activities. Over-specification, omissions, and/or errors introduced at this early project stage are usually the most expensive and time-consuming to fix later.
In this tutorial, we will call this document the System/Subsystem Specification (SSS), according to the MIL-STD-498 standard we chose in Section Selection of Development Model of Chapter 3.
The main goal of the SSS document is to provide a complete, accurate, and concise definition of all project capabilities. The requirements specified in the SSS should be “good requirements”, and the whole set of requirements should be consistent, non-redundant, and complete. For more information, see the INCOSE Guide for Writing Requirements.
The external sources for the SSS document are Stakeholder Requirements Specification (StRS) documents and obligatory standards that the project must adhere to. However, the requirements provided by these sources usually need considerable work to become “good requirements”. Usually, Stakeholder requirements emphasize the most critical required aspects of the new project. These requirements may be partial, some may be contradictory, many may be missing, and others may not be feasible or verifiable. We covered the phase of documenting stakeholder requirements in Chapter 5: Stakeholder Requirements Specification. The obligatory standards are usually general and meant to cover many projects and cases, requiring subset selection, adjustments, and tailoring to the project.
It is the work of system engineers to create complete, accurate, and concise SSS documents out of these sources. The resulting SSS document is presented for customer approval in the System Requirements Review (SRR). When approved, the SSS becomes the binding requirement document for the project.
No tool can replace system engineers in constructing SSS documents. However, ReqView can provide invaluable help in assuring the quality of the various requirements and the completeness and accuracy of all the requirements in the SSS document. For example:
-
Completeness: You can (and should) reuse requirements specification templates, which serve as a structured checklist for issues that must be addressed. To guarantee adherence to stakeholder requirements and mandatory standards, set up consistent traceability links from system requirements to stakeholder requirements and standards.
-
Requirements Optimization: You can rank the priority, estimate the difficulty (cost and complexity), and assess the compliance of each requirement. Use this information to optimize requirements, negotiate with stakeholders, and support processes like Quality Function Deployment (QFD) and House of Quality.
-
Interface Definition: You can clearly mark interface requirements and allocate them later to the designed entities.
-
Safety Regulatory Compliance: As a base, you can mark safety requirements to quickly check that all safety-related requirements are treated accordingly during design and testing.
-
Risk Management: You can mark requirements that are difficult to implement, comply with, and/or not correctly defined. This serves as a basis for a comprehensive Risk Management and Mitigation Plan.
-
Validation and Verification (V&V): You can specify the V&V method required to verify each requirement. This serves as the basis for a Validation and Verification Plan. It also helps identify risks resulting from gaps between required V&V methods and testing abilities. These risks should be addressed in the Risk Management and Mitigation Plan.
In this chapter, we will go over the process of constructing the SSS document for the UNEX example project and demonstrate how ReqView supports all these tasks:
-
Create a system requirements specification document
-
Transfer stakeholder requirements and standards to system requirements
-
Complete missing project requirements
-
Annotate requirements properties
-
Implement requirements workflow checks (V&V, Regulatory Compliance, etc.)
-
System Requirements Review Preparation
As we walk through these stages, we want to remind you that our objective is to demonstrate the usage and support of ReqView during this process. Please note that the resulting SSS document will be a practical demonstration, and will not be a fully completed document.
Create System Requirements Specification Document
Creating a ReqView document is described in the first part of the Section Create Document Template for System Requirements of Chapter 4. We will carry out the same procedure with several modifications:
-
Open ReqView project UNEXsys created in Section Create ReqView Project for System-level Documents of Chapter 5.
-
Select Project->Add Document from the main menu to open the Add Document dialog.
-
Base the new document on the custom document template SSS-DID.reqw, which we created in Section Create Document Template for System Requirements of Chapter 4 and published in the Templates Area.
-
Set the name of the new document to “UNEXsss” and the description to “UNEX System/Subsystem Specification”.
-
Finally, click OK.
We have an empty UNEXsss document based on the MIL-STD-498 SSS-DID template.
You can clone the result from the GitLab repository ReqView > Starter Guide > UNEXsys ch6_s1_create_sss_doc or download the project folder unexsys-ch6_s1_create_sss_doc.zip.
Transfer Stakeholder Requirements to System Requirements
The next step is to take care of all stakeholder requirements and standards and transfer them to system requirements, which involves the following steps:
-
List unsatisfied stakeholder requirements. Unsatisfied requirements are stakeholder or standard requirements not yet copied to the UNEXsss document.
-
Copy stakeholder requirements to the appropriate section in the UNEXsss document and create traceability links from the system requirements to the original stakeholder requirements.
Let us see how we handle these steps in ReqView.
1. List Unsatisfied Stakeholders Requirements:
We will use the ReqView flexible filtering capability to display all unsatisfied stakeholder requirements in the UNEXcreq document to be copied to the UNEXsss document. Since we will create a Satisfaction traceability link from each copied system requirement in the UNEXsss document to the original requirement in the UNEXcreq document, we can use the absence of such a link to discover unsatisfied stakeholder requirements. To do that, we will construct a filter matching all document objects where the custom attribute Type equals "Requirement" and have no incoming Satisfaction links.
Recall that the attribute Type was defined in Section Create Bare Document Template of Chapter 4 to identify every object that is a requirement. We set it for all qualified stakeholder requirements in Section Annotate Stakeholder Requirements of Chapter 5.
To create the filtered list of unsatisfied stakeholder requirements, use the following steps:
-
Open the UNEXcreq document and select the Requirements Prioritization view in the Table Views left pane.
-
Show the Links column (select View->Columns and check “Links” in the list). Then, drag the Links column from the rightmost position to the position on the right of the Description column.
-
Select the Filter input box at the top right corner of the screen or press CtrlShiftF.
-
In the Filter input box, press Down to open the dropdown, and select the Type attribute from the list. Then, press Down again and select • Requirement from the list. As a result, only the objects with the type attribute set to Requirement will now appear.
-
Still in the Filter input, press Down again and select ƒ AND (this will not show in the filter description). Then, Press Down again and select ƒ NOT. Finally, press Down again and select Is satisfied by. As a result, only the objects with no incoming Satisfaction link will now appear.
The filter is now complete: Type: Requirement NOT Is satisfied by. We will save the filtered view as “Requirements to Copy” for easy future use. To save the filter as a new table view:
-
Enable editing of the UNEXcreq document (select Document->Start Editing Document) if not enabled already.
-
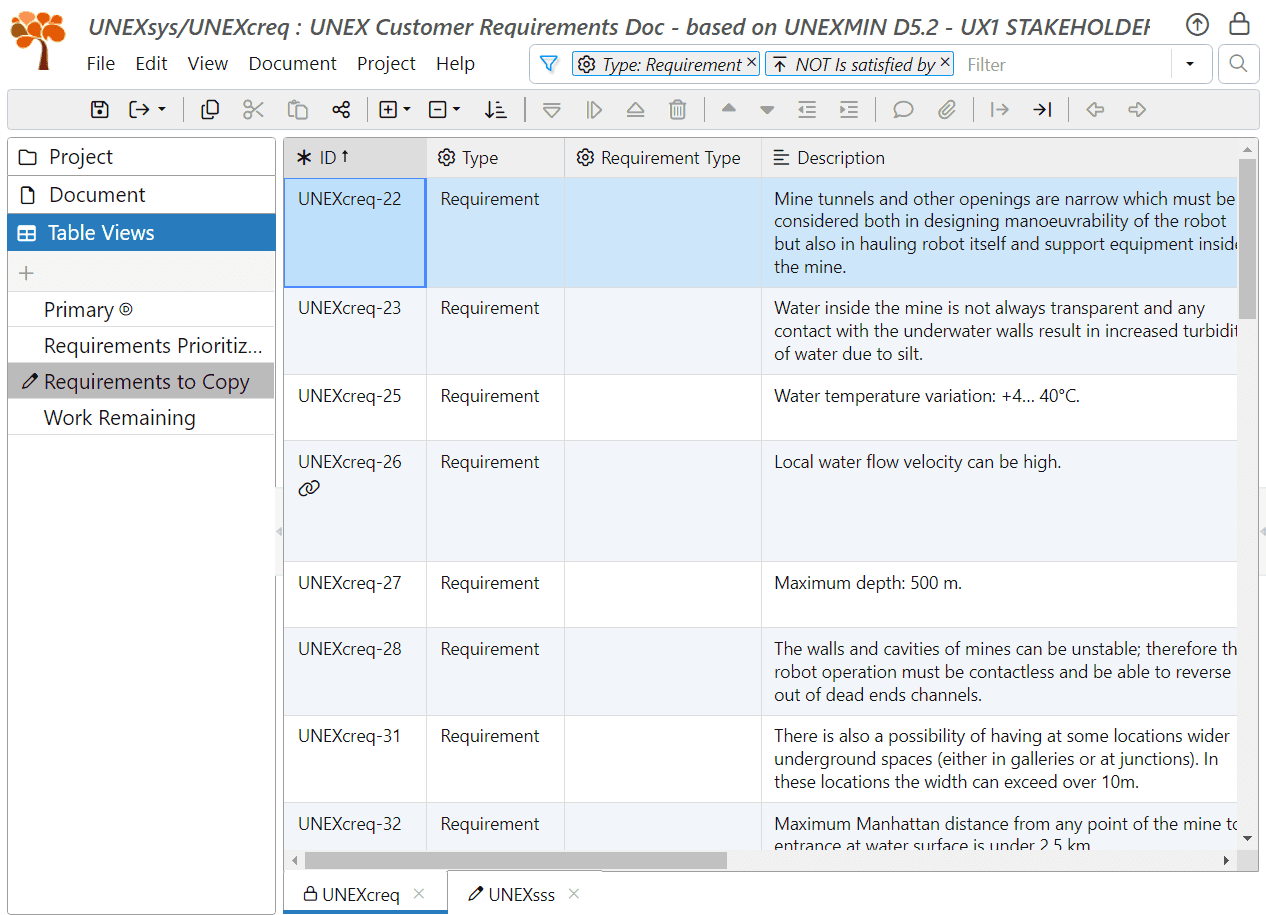
Click the toolbar button in the Table Views pane. In the Create Table View dialog, enter “Requirements to Copy” as the table view name, check the Duplicate current document view checkbox, and press OK. Your screen should look like this:
![Create table view Requirements to Copy in ReqView Create table view Requirements to Copy in ReqView]()
-
Finish editing of the UNEXcreq document (select Document->Finish Editing Document). In the Commit Changes dialog, enter “Adding the “Requirements to Copy” table view” as the commit comment and hit OK.
You can clone the result from the GitLab repository ReqView > Starter Guide > UNEXsys ch6_s2_filter_reqs_to_copy or download the project folder unexsys-ch6_s2_filter_reqs_to_copy.zip.
2. Copy and Link Stakeholder Requirements:
In this step, we will distribute UNEXcreq stakeholder requirements to the most appropriate sections of the UNEXsss document and link the created UNEXsss requirements to the original stakeholder requirements.
Choosing the right section of the UNEXsss document for stakeholder requirements improves the document's readability and helps with the document's completeness check. However, if a stakeholder requirement potentially fits into more than one section, we suggest limiting the effort of locating the most appropriate section. All system requirements should be satisfied regardless of location in the UNEXsss document.
Let us demonstrate this process on some real stakeholder requirements:
-
Open the UNEXsss document and familiarize yourself with its topics and structure. To aid your decisions, the Instructions pane on the right provides guidelines for the required contents of each document section from the SSS-DID document template; see Section Create Document Template for System Requirements of Chapter 4.
-
Enable the editing of the UNEXsss document if editing is locked (select Document->Start Editing Document).
-
Select section “3.9 System environment requirements” (UNEXsss-35). The content of the Instructions pane will advise:
“This paragraph shall specify the requirements, if any, regarding the environment in which the system must operate. … Examples for a hardware-software system include the environmental conditions that the system must withstand during transportation, storage, and operation, such as conditions in the natural environment (wind, rain, temperature, and geographic location), the induced environment (motion, shock, noise, electromagnetic radiation) …“.
Thus, we should copy all environmental requirements from applicable stakeholders or standards into this paragraph.
It is worth noting that starting with this section is arbitrary; we could start with any other.
-
Open the UNEXcreq document and select the table view Requirements to Copy displaying all the stakeholder requirements that still need to be copied to the UNEXsss document. Requirements UNEXcreq-24, UNEXcreq-25, UNEXcreq-26, UNEXcreq-27 and UNEXcreq-32 are clearly environmental requirements.
-
Let us copy requirement UNEXcreq-24 first:
-
Right-click the object UNEXcreq-24 and select Copy from the context menu (or select Edit->Copy from the main menu, or click on the toolbar, or just press CtrlC). The object will be marked as the copy origin in the ID column.
-
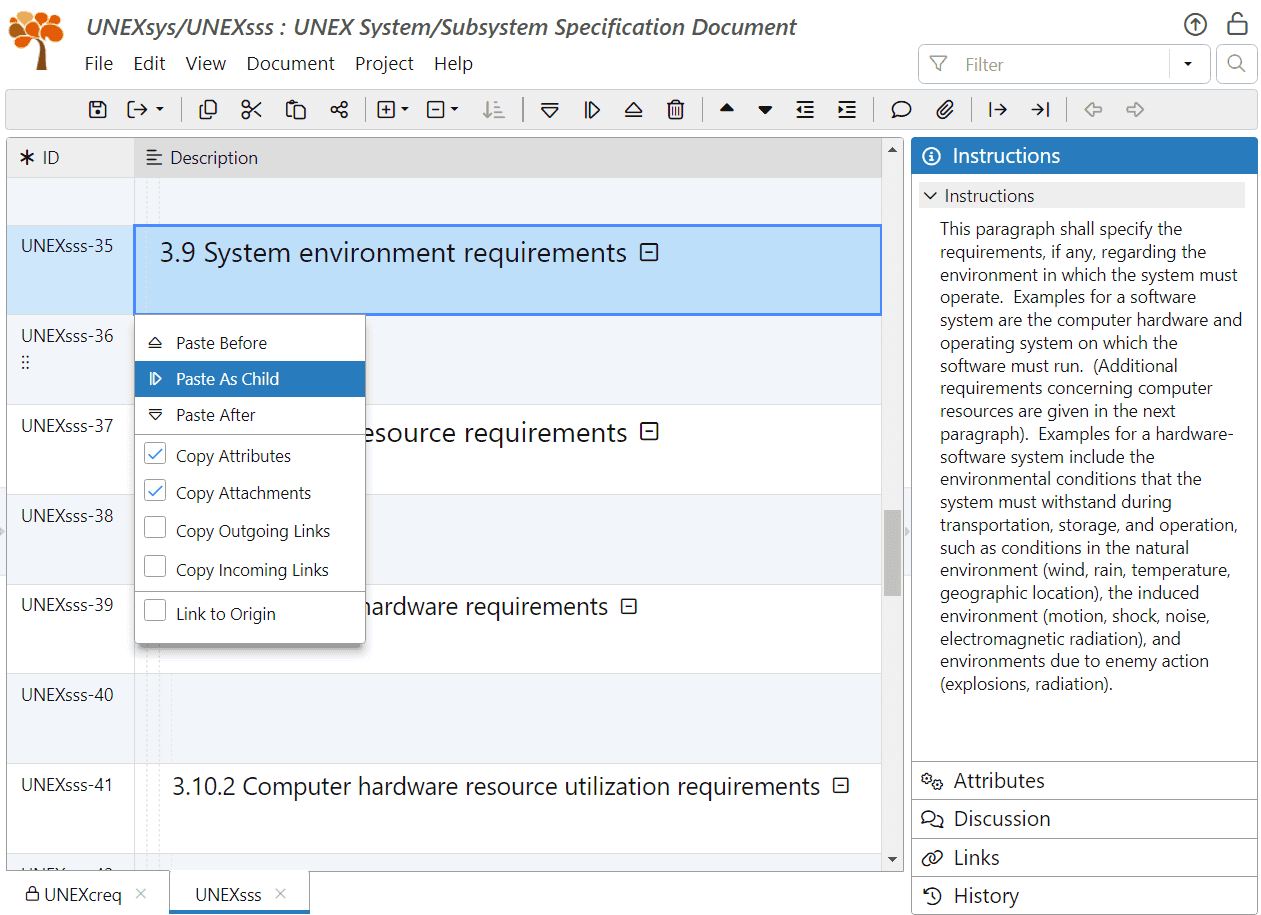
Switch to UNEXsss, right-click the object UNEXsss-35, and select Paste from the context menu (or select Edit->Paste from the main menu, or click on the toolbar, or just press CtrlV), and finally select Paste as Child from the paste options popup.
![Paste a stakeholder requirement in the System Specification in ReqView Paste a stakeholder requirement in the System Specification in ReqView]()
As a result, the copied requirement is pasted as a new object UNEXsss-71 located under the object UNEXsss-35, and the new object is automatically selected.
-
-
Now, we will link the new object UNEXsss-71 to its source stakeholder requirement UNEXcreq-24:
-
Right-click the object UNEXsss-71 and select Start Link from the context menu (or select Edit->Start Link from the main menu, or click on the toolbar or just press CtrlL).
-
Switch to the UNEXcreq document, right-click the object UNEXcreq-24, select Place Link from the context menu (or select Edit->Place Link from the main menu, or click on the toolbar or just press CtrlShiftL).
-
In the Create Links dialog, select “Satisfaction” as the link type from the dropdown list and hit OK.
-
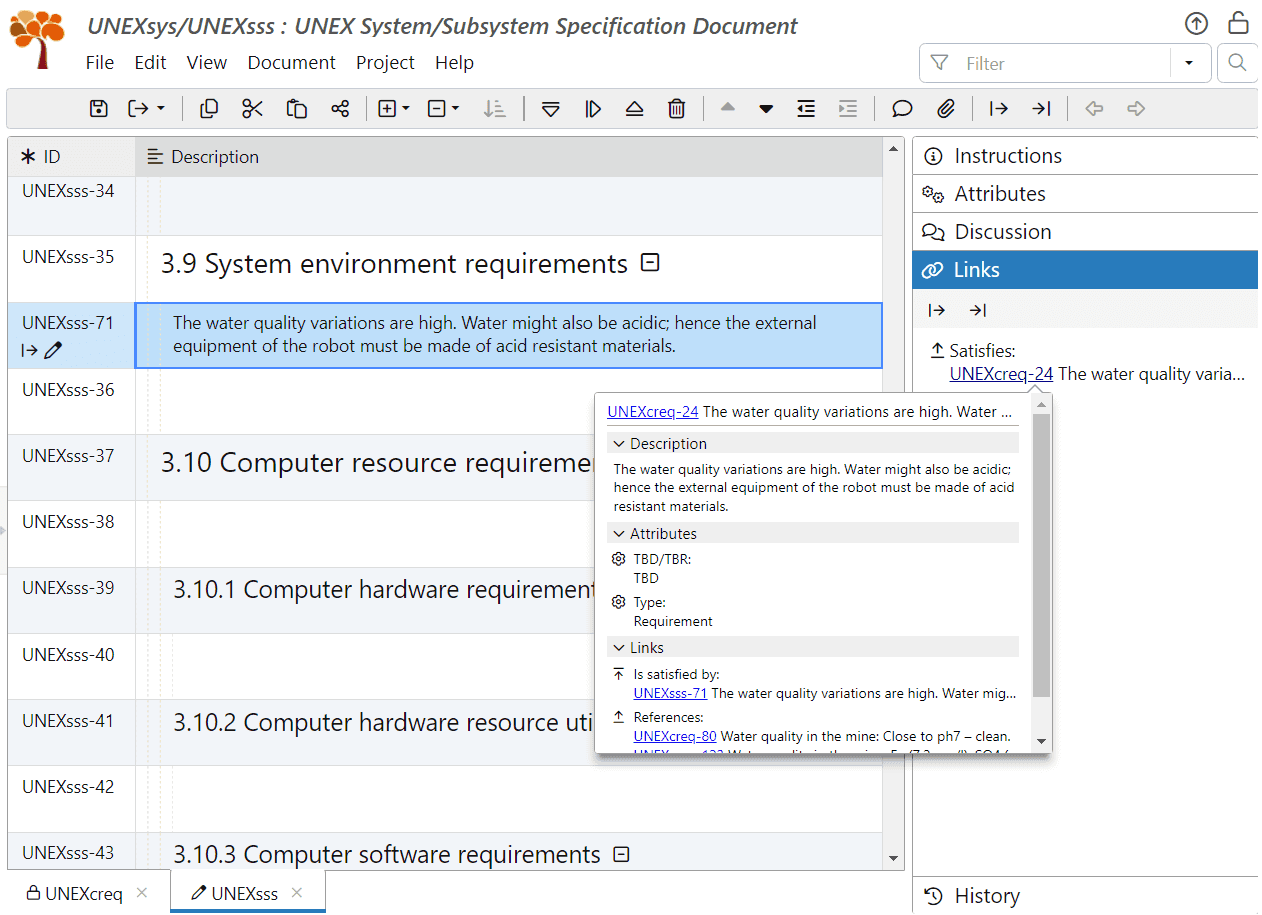
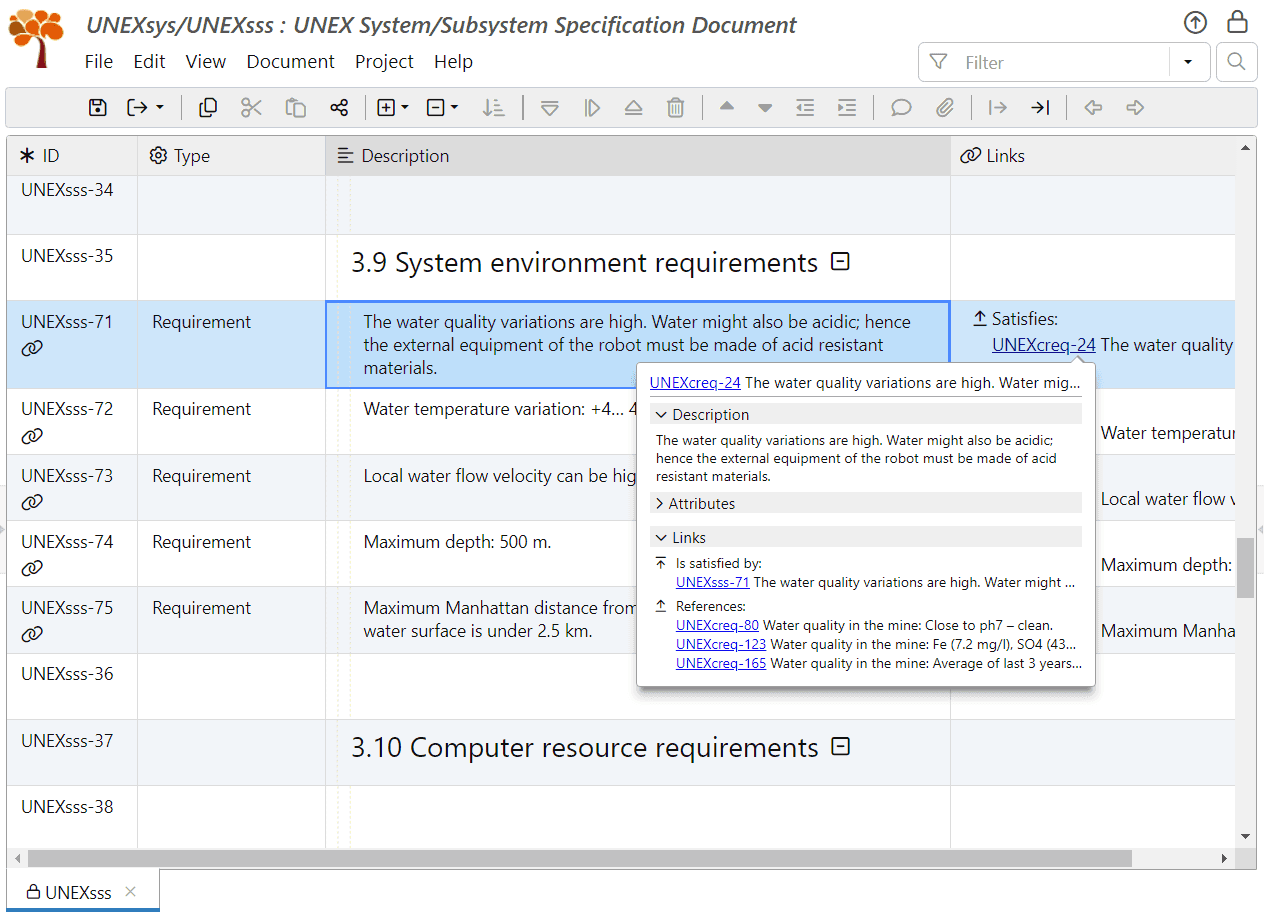
Display the Links pane on the right. It displays the new “Is satisfied by” link from UNEXsss-71. Click on the link to navigate back to the UNEXsss document. The Links column now displays the new “Satisfies” link to UNEXcreq-24. Mouseover the link to preview information about the linked object; see the following screenshot:
![Link the system requirement UNEXsss-71 to its original stakeholder requirement UNEXcreq-24 in ReqView Link the system requirement UNEXsss-71 to its original stakeholder requirement UNEXcreq-24 in ReqView]()
-
-
Repeat Steps 5 and 6 for requirements UNEXcreq-25, UNEXcreq-26, UNEXcreq-27, and UNEXcreq-32, but this time use the last copied requirement as the “paste” anchor and select Paste After from the paste options popup (instead of Paste as Child used for the first requirement copied).
Note that copied and linked stakeholder requirements are not automatically filtered out in the document UNEXcreq with the table view Requirements to Copy active. To refresh the filter, select View->Refresh Table from the main menu (or just press F5). Alternatively, click in the filter box to turn off the filter and then click again to re-enable it.
To distribute the remaining stakeholder requirements:
-
Copy stakeholder requirements UNEXcreq-22, UNEXcreq-31, UNEXcreq-35, UNEXcreq-36 and UNEXcreq-37 into section “3.12 Design and construction constraints” (UNEXsss-49) and create Satisfaction links as described above.
-
In the section “3.2 System capability requirements” (UNEXsss-15), create three new subsections — “Environmental Sensors”, “Motion and Navigation”, and “Propulsion”, as siblings of “3.2.x (System capability)” (UNEXsss-17).
To create the section “3.2.1 Environmental Sensors”, right-click the object UNEXsss-17, select Add Before from the context menu (or select Edit->Add Object->Add Before from the main menu, or click on the toolbar or press CtrlAltEnter). In the Add Object After dialog box, enter “Environmental Sensors” in the heading textbox, and hit OK.
Repeat the same procedure to create the other two additional sections, but at this time, use the previous section just created as the anchor for the new object, and select Add After from the context menu (or select Edit->Add Object->Add After from the main menu, or click on the toolbar or press CtrlEnter).
Keep UNEXsss-17 as a contents placeholder and description for now. Eventually, we will delete it later.
-
Copy stakeholder requirements UNEXcreq-28, UNEXcreq-40, UNEXcreq-46, and UNEXcreq-52 into section “3.2.2 Motion and Navigation” (UNEXsss-82).
-
Copy stakeholder requirements UNEXcreq-41 and UNEXcreq-43 into section “3.2.3 Propulsion” (UNEXsss-83).
-
Copy stakeholder requirements UNEXcreq-23, UNEXcreq-44, UNEXcreq-45, UNEXcreq-49 and UNEXcreq-50 into section “3.2.1 Environmental Sensors” (UNEXsss-81).
-
Press F5 to refresh the view “Requirements to Copy”. There are just eight stakeholder requirements left to classify and copy: UNEXcreq-38, UNEXcreq-39, UNEXcreq-42, UNEXcreq-47, UNEXcreq-48, UNEXcreq-51, UNEXcreq-53 and UNEXcreq-54.
-
Stakeholder requirements UNEXcreq-47 and UNEXcreq-54 describe communication capabilities, which are both functional and interface requirements. We choose to represent them as Internal Interface requirements since, at this point of development, we consider the whole UNEX ecosystem to be the system, and communication between the UNEX robot and its base station is internal to the system.
Thus, add two new objects under section “3.4 System internal interface requirements” (UNEXsss-25) – “3.4.1 Interface identification and diagrams” and “3.4.2 Communication interfaces”. Then copy stakeholder requirements UNEXcreq-47 and UNEXcreq-54 under section “3.4.2 Communication interfaces”. Note that other requirement packaging decisions might also be valid.
-
Stakeholder requirement UNEXcreq-38 is a design constraint, so copy it into section “3.12 Design and construction constraints” (UNEXsss-49).
-
Stakeholder requirement UNEXcreq-39 is logistic, so copy it into section “3.15 Logistics-related requirements” (UNEXsss-55).
-
Stakeholder requirements UNEXcreq-42 and UNEXcreq-51 are power requirements and can be specified as system capability requirements. Therefore, add a new subsection “Power” of the section “3.2 System capability requirements” (UNEXsss-15) after “3.2.3 Propulsion” (UNEXsss-83), and copy these requirements into the newly added section “3.2.4 Power” (UNEXsss-101).
-
Stakeholder requirement UNEXcreq-49 is an adaptation requirement, so copy it into section “3.6 Adaptation requirements” (UNEXsss-29). It is also an internal (and maybe external) interface requirement, but we will deal with this in the next phase.
-
Stakeholder requirement UNEXcreq-48 addresses both capability and safety. We prefer to place it in section ”3.2 System capabilities” and mark it as having safety implications, rather than placing it in section “3.7 Safety requirements”.
Therefore, add a new subsection “Robot Controller” as a subsection of section “3.2 System capability requirements” (UNEXsss-15) and place it after “3.2.4 Power” (UNEXsss-101), then copy this requirement into the newly added section “3.2.5 Robot Controller” (UNEXsss-105).
After refreshing the table view “Requirements to Copy”, no stakeholder requirement remains. Our mission at this phase is done – we copied all stakeholder requirements into the appropriate sections of our SSS document.
Finally, save the work and check it into the Git repository. Select File->Git->Commit from the main menu. In the Commit Changes dialog, enter the commit message: “Copy stakeholder requirements to the UNEXsss document” and hit OK.
You can clone the result from the GitLab repository ReqView > Starter Guide > UNEXsys ch6_s3_copy_and_link_reqs or download the project folder unexsys-ch6_s3_copy_and_link_reqs.zip.
Develop System Requirements
As we mentioned before, requirements written by the stakeholders might not meet the criteria for “good requirements”. The gold standard for writing requirements is the INCOSE Guide to Writing Requirements, describing 41 rules for need and requirement statements. We can divide these rules into two groups: rules that apply to every requirement and rules that apply to all requirements regarding the completeness of the system as a whole.
Now, we need to identify and correct the system requirements that are not up to the standard. In this section, we will do the first phase of this work on a per-requirement basis. In the next section, Complete Missing Project Requirements, we will take care of missing requirements and the completeness of the whole set of system requirements.
Depending on each requirement, these corrections may involve multiple operations, such as correcting requirement wording, completing missing information, splitting a requirement into various requirements, and more.
ReqView provides an easy workflow to handle this requirements improvements phase based on custom requirement attributes, filtered table views, and discussions:
-
Create a table view called “Requirements Refinements” displaying columns needed for elaboration of system requirements: ID, Type, Requirement Type, Description, Status, TBD/TBR, Assigned to, Deadline, and Links. You may choose different or additional columns.
To check and display the system requirements still pending inspection or correction, define a filter that selects the document objects that are system requirements and their status is not set or is set to “Draft”. We can toggle this filter off to display the whole document when needed.
-
Mark all system requirements as “Draft” using the Status attribute.
-
Process all system requirements to meet “good requirements” criteria.
Now, to the actual work:
1. Create Table View “Requirements Refinements”:
The steps to define the filtered “Requirements Refinements” table view are the same as the steps described in Section List Unsatisfied Stakeholder Requirements, operating on different data:
-
Edit the UNEXsss document.
-
Name the new table view “Requirements Refinements”.
-
Show table view columns ID, Type, Requirement Type, Description, Links, Status, TBD/TBR, Assigned to, and Deadline. Choose column order and width to best support your work.
-
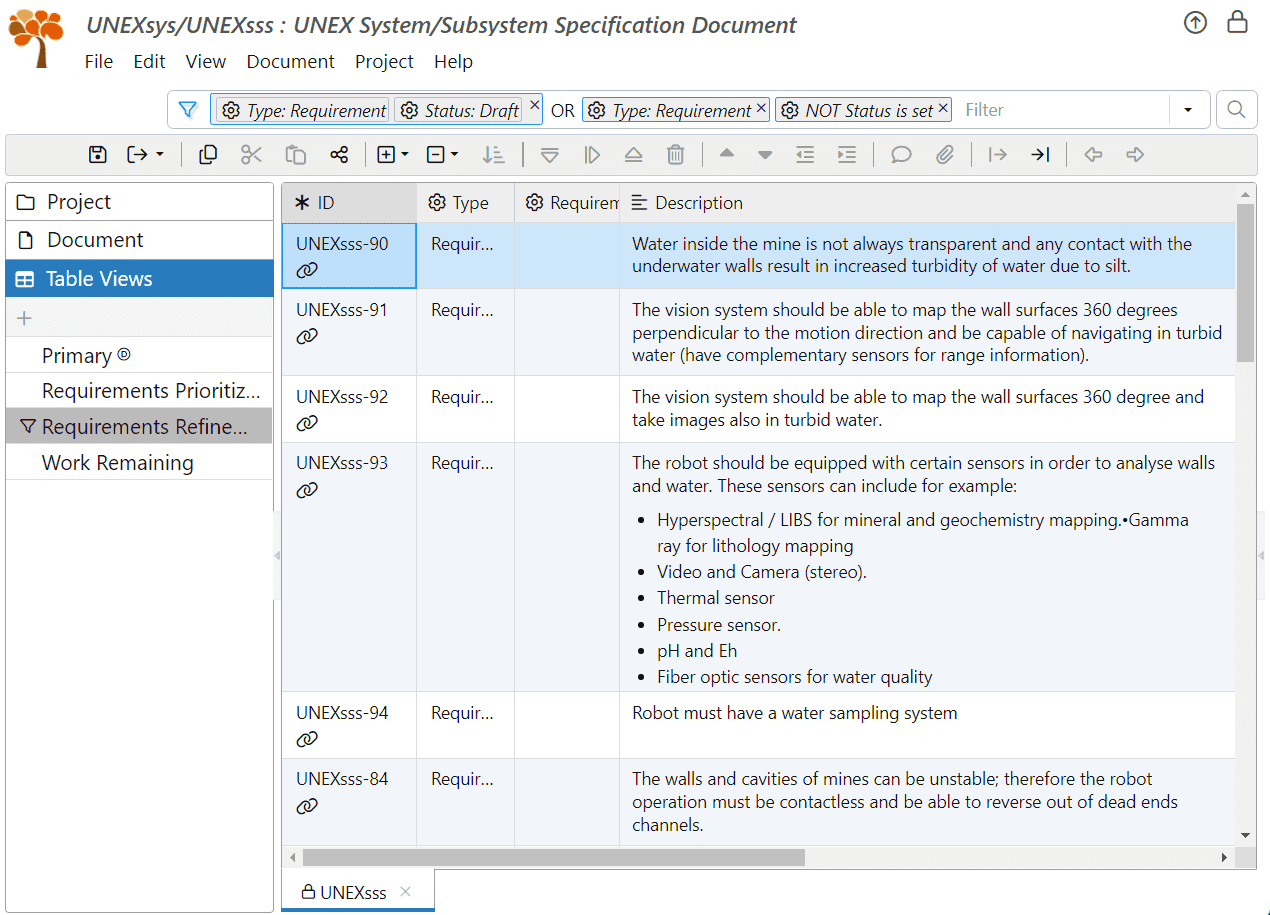
Define the filter: Type: Requirement Status: Draft OR Type: Requirement NOT Status is set. Your screen should look like this:
![Create table view Requirements Refinements in ReqView Create table view Requirements Refinements in ReqView]()
You may notice that the AND logical operator is not displayed in the filter definition, while the logical operators OR and NOT are displayed. The AND operators are implicitly used for the adjacent conditions and are not shown in filters. See Filter, Sort, and Search Requirements for more information about filtering documents.
It is a good time to save and check the work in the Git repository. Select File->Git->Commit from the main menu. In the Commit Changes dialog, enter the commit message: “Create the Requirement Refinements Table View in the UNEXsss document” and hit OK.
You can clone the result from the GitLab repository ReqView > Starter Guide > UNEXsys ch6_s4_create_reqs_refinements_view or download the project folder unexsys-ch6_s4_create_reqs_refinements_view.zip.
2. Mark All System Requirements As Draft:
We will initially mark all system requirements as a “Draft”, and later update their status as we process them. With the filtered table view “Requirements Refinements” active, you can do it in a single edit operation: press CtrlA to select all requirements, press Ctrl and while keeping it pressed double click on the Status column for any of the selected document objects (or press F2 on the cell). Finally, select “Draft��” from the list, and the “Status” attribute of all system requirements will be changed to “Draft”.
You may want to save your work now. Select File->Git->Commit from the main menu and enter the commit message “Mark all system requirements in the UNEXsss document as Draft”.
3. Process System Requirements:
Use the table view “Requirements Refinements” to walk through the system requirements and take the appropriate processing for each requirement. We demonstrate the processing of some typical cases in the next Section Refine System Requirements into “Good Requirements”.
For each system requirement that you completely processed, double-click on the Status column for the requirement (or press F2 on the cell) and select “Ready” from the list to change its status. Select View->Refresh Table (or press F5) to update the filtered table view “Requirements Refinements”. When the view is empty, this phase of work is done.
Refine System Requirements into “Good Requirements”
In general, we will implement none, some, or all of the following actions to refine each system requirement:
-
Correct Requirements Wording: When necessary, correct the wording so that requirements will use structured and complete sentences describing what the system shall do. We recommend using Easy Approach to Requirements Syntax (EARS), providing intuitive patterns for writing high-quality textual requirements in English.
-
Group Requirements: When appropriate, group or re-arrange requirements in document sections. While not critical for satisfaction of the system requirements in the project, this will enhance the readability of the system requirements document.
-
Disambiguate Requirements: Replace vague terms, such as “few” or “many,” with precise definitions. This may involve defining missing values or limits. When the vague terms are not needed, remove them.
-
Resolve Duplicate Requirements. Delete duplicate requirements.
-
Split Non-Atomic Requirements: Split system requirements that describe multiple required functionalities or characteristics into atomic requirements, each describing a single system functionality or constraint, to manage them separately through development.
Refinement often focuses on individual requirements. However, simultaneous evaluation of multiple requirements is necessary for tasks like removal of duplicate requirements.
There are multiple ways to carry out the refinement process. The usual approach is to walk the document section by section and refine the requirements in each section. However, this is not obligatory, and you can handle the refinement process in any convenient order, for example, according to the availability of specific experts.
For our tutorial, we will first demonstrate refining several requirements according to the above actions so that one can learn the various refinement techniques in ReqView. Then, we will walk through the document sections and refine the remaining requirements.
Before we begin, turn off the filter in the “Requirements Refinements” table view to see the whole document structure. Select Document->Filter from the main menu (or click on the left side of the filter box or press CtrlAltF). The light-blue color of the filter icon will change to grey to indicate that the filter is disabled. You can re-enable the filter in the same way any time later.
Always enable the document's editing before making changes if editing is currently locked.
Mark Already Good Requirements:
System requirements that are already “good requirements” require only a status update to “Ready”, following the procedure described in the previous section.
Correct Wording of System Requirements:
For system requirements that are almost “good requirements” and require only minor wording corrections, double-click the Description column of the requirement (or right-click the Description column and select Edit from the context menu or select Edit->Edit Text from the main menu, or press CtrlE) and correct their text description in the editor as needed.
For example, requirement UNEXsss-89 (“The propulsion unit must provide enough thrust to drive the robot with 0.5 m/s velocity under 50 bar pressure”) is almost perfect. We recommend changing “must” to “shall” to comply with the EARS.
Group System Requirements in Sections:
You can easily re-arrange system requirements by moving them to the correct document section. First, right-click on the system requirement you want to move and select Cut from the context menu (or focus the requirement and either select Edit->Cut from the main menu, or click on the toolbar, or press CtrlX) to mark the requirement as cut. The text color on its row will change to blue, and its ID column will display the icon.
You can place the moved requirement in one of three locations: as a child within a document section, or as a sibling, either before or after an existing requirement. In the first case, the target document section heading will be the target object. In the second and third cases, the sibling requirement will be the target object. Right-click the target object and select Paste from the context menu (or focus the section, select Edit->Paste from the main menu, or click on the toolbar, or press CtrlV), and finally select Paste As Child, Paste Before or Paste After from the paste option popup.
You can also move multiple requirements at once. Just select all the desired requirements before the cut operation.
For example, we created the system requirement UNEXsss-88 (“The power unit should be capable of supporting the robot for 5 hours of driving autonomously”) in section “3.2.3: Propulsion.” After reading the requirement, we decided to move it to the right section, “3.2.4: Power.”
Disambiguate Vague and Incomplete System Requirements:
Some requirements may be vague and not precisely define what the system should do. Usually, vague requirements also miss critical information and circumnavigate the need to specify some missing data. When you see a vaguely written requirement, always look for missing data.
For example, look at the requirement UNEXsss-71 (“The water quality variations are high. Water might also be acidic; hence the external equipment of the robot must be made of acid resistant materials”). The wording is poor, but it is clear that the water in some abandoned mines may be acidic and that the robot must withstand acidic water. However, the level of acidity that the robot must withstand is not specified, though it may significantly impact the robot's materials and design, and therefore, it must be specified.
There are several ways to find the target value of the acidity level the robot must withstand. One can consult the customer/stakeholders, ask some experts, or study available information. In our case, the stakeholder requirements already have some information.
We will now leverage our previous processing of the stakeholder requirements document UNEXcreq in ReqView:
-
Select the UNEXsss-71 requirement.
-
Open the Links pane and see all related stakeholder requirements. In this case, it satisfies the stakeholder requirement UNEXcreq-24.
-
Mouseover the UNEXcreq-24 hyperlink and scroll down the popup window to see all stakeholder requirements referenced by UNEXcreq-24 (we set up these reference traceability links in Section Incomplete Stakeholder Requirements of Chapter 5).
The referenced stakeholder requirements UNEXcreq-80, UNEXcreq-123, and UNEXcreq-165 describe the acidity levels in each of the reference mines. Your screen will look like this:
![Display popup with links of the original stakeholder requirement UNEXcreq-24 in ReqView Display popup with links of the original stakeholder requirement UNEXcreq-24 in ReqView]()
-
Click on each of the hyperlinks UNEXcreq-80, UNEXcreq-123 and UNEXcreq-165 to navigate to the referenced stakeholder requirement in the UNEXcreq document.
You can quickly see that the water pH level required by UNEXcreq-80 is 7 (i.e., water is not acid at all), and the pH level needed by UNEXcreq-165 is 6.43 (i.e., lightly acid). However, UNEXcreq-123 is a different story: the pH level of the water is not specified, but the water contents specify a high level of SO4 concentration (4300 mg/l), which might make the water quite acid.
To navigate back to the system requirement UNEXsss-71, click on the toolbar, or switch between documents by clicking the UNEXcreq and UNEXsss tabs at the bottom.
-
Here, we must consult with an expert since stakeholder requirement UNEXcreq-123 does not specify the water pH level but a high level of SO4 concentration. What makes things even more complicated is that calculating the acidity level of water caused by SO4 is complex and depends on many factors.
For this tutorial, we used ChatGPT as our expert (however, we do not recommend using any AI as the lead or sole expert in a real project):
- ChatGPT Question: “Give me worst case estimate of the acidity level of water that has 4300 mg/l of SO4, 7.2 mg/l of Fe, 90 mg/l of Hg and is at 17 degrees Celsius”.
- ChatGPT Summary:
- If the sulfate concentration is due entirely to sulfuric acid (H2SO4), and we assume maximum dissociation, the pH could be very low, around 1.5–2.
- If the sulfate is present as a salt (like sodium sulfate), the impact on pH would be less severe, and the pH might be closer to 4–5 due to the influence of iron oxidation.
-
Given that uncertainty, we will set the value to 3, with a design goal of 1.5. Double-click the Description column of UNEXsss-71, and change the requirement text to “The robot shall withstand water pH level of at least 3. There is a design goal of withstanding pH level of 1.5, with a decision to be made at the robot design review, based on complexity and price.”.
-
Such processing requires us to specify a rationale, or reasoning, for the requirement. The standard way of doing it in ReqView is to set the custom rich text attribute Rationale. Another possibility is to specify the rationale in the requirement text description as a separate paragraph starting with “Rationale:”.
Each way has its merits and drawbacks. Using the attribute Rationale is the most natural way, but the rationale may be hidden in the attribute “sea”, and you may have to take special steps to include it in exported documents in some formats. On the other hand, specifying the rationale in the requirement Description assures that the rationale is always visible. However, it does not allow separation of the requirement description and its rationale if we wish to. It also does not allow straightforward document filtering to see which requirements have a rationale.
Since most objects do not require a rationale, this tutorial includes the rationale in the description. Other projects may use a Rationale attribute for this purpose.
Edit the description of the system requirement UNEXsss-71 again, and add the following reasoning text as a second paragraph: “Rationale: Water quality variations are high and may be acidic in some mines. The required value of 3 is one pH aggravation on the likely acidity of the Idrija mine (the worst of all three). The design goal value of 1.5 is the worst-case acidity level expected in the Idrija mine in the worst case scenario.”.
Resolve Duplicate Requirements:
As we refine system requirements, we may find some duplicate requirements. To remove the duplication, select one of the duplicate requirements as the surviving system requirement (possibly update its wording) and permanently delete all other system requirements in the duplicate requirements set.
When duplicate system requirements result from duplication at the higher level in the project document hierarchy (for example, in stakeholder requirements). In that case, we have two options how to resolve the link connecting the deleted requirement and the upper-level requirement:
-
Delete the Traceability links between the requirements and modify the parent requirement's Type attribute to none in order to declassify it.
-
Link the surviving requirement to the parent requirement(s) of the duplicate requirement(s) before deleting the duplicate requirement(s). This is needed to ensure traceability compliance in subsequent development phases.
Both options are legitimate. However, there are cases where only the second one is possible.
There might also be cases when one of the duplicate system requirements is not a “good requirement” by itself and should be deleted as a requirement but still have an informative value in the context of describing the system. In this case, we can leave the duplicate system requirement in the document and change its classification by setting the value of the attribute Type from “Requirement” to “Information” (or to "none").
For example, examine system requirement UNEXsss-90: “Water inside the mine is not always transparent, and any contact with the underwater walls result in increased turbidity of water due to silt.” originating from UNEXcreq-23. The statement was categorized as a requirement because the description implies hidden requirements from the robot's vision and motion systems. However, as a requirement, the wording is poor, and other requirements UNEXsss-91 and UNEXsss-92 (operation in turbid water), and UNEXsss-84 (contactless operation), offer more explicit specifications.
Therefore, we move the link from UNEXsss-90 to UNEXcreq-23 to the surviving requirements (UNEXsss-91, UNEXsss-92 and UNEXsss-84) and change classification of UNEXsss-90 as a requirement:
-
Create the link from requirements UNEXsss-91, UNEXsss-92 and UNEXsss-84 to UNEXcreq-23:
First, select requirement UNEXsss-91, press and hold Ctrl, and click UNEXsss-92 and UNEXsss-84 to select all link source requirements. Right-click one of the selected requirements, and select Start Link from the context menu.
Then, click on the hyperlink UNEXcreq-23 in the Links column of object UNEXsss-90 to navigate to the link target in the UNEXcreq document, right-click the selected object and select Place Link from the context menu. In the Create Links dialog, select the “Satisfaction” link type and hit OK.
Finally, move back to UNEXsss-90. You can do that easily by clicking the hyperlink to UNEXsss-90 in the Links pane.
-
Remove the link from UNEXsss-90 to UNEXcreq-23:
While UNEXsss-90 is selected, right-click the hyperlink UNEXcreq-23 in the Links pane, select Delete Link to UNEXcreq-23 from the context menu, and hit OK in the Delete Link confirmation dialog.
-
Remove the classification of UNEXsss-90 as a requirement:
Select UNEXsss-90, set the value of the attribute Type from “Requirement” to “Information” (or "none"), and unset the value of the attribute Status.
Alternatively, you may delete UNEXsss-90 completely.
-
Optionally, update the description on UNEXsss-90 to reflect the fact this object is a descriptive one and does not preset requirements by itself:
Right-click the Description column of UNEXsss-90, select Edit from the context menu, and add the following text: “Specific requirements regarding water transparency and turbidity will be presented later”.
Decompose Non-Atomic System Requirements:
Non-atomic system requirements that specify two or more system functions, constraints, etc., in a single requirement, are another common issue. This is preventing the separate management (planning, implementing, verifing) and tracing of these functions or constraints through the development. We need to split such requirements into several atomic system requirements and link each new atomic requirement to the source stakeholder requirement.
For example, look at requirement UNEXsss-91: “The vision system should be able to map the wall surfaces 360 degrees perpendicular to the motion direction and be capable of navigating in turbid water (have complementary sensors for range information).” This requirement specifies two or three different functionalities:
-
“The vision system should be able to map the wall surfaces 360 degrees perpendicular to the motion direction.”
-
“The vision system should be capable of navigating in turbid water (have complementary sensors for range information).”
The first requirement defines the coverage required from the vision system. The second requirement is less obvious: the vision system does not navigate by itself but provides images for the navigation system. The requirement for complementary sensors for range information is yet another different requirement, both from the sensors and from the navigation system.
Thus, we will split UNEXsss-91 into three requirements. The easiest way to do this is to copy UNEXsss-91 twice and then edit UNEXsss-91 and the two new requirements so that each one will be a distinct requirement. To do that:
-
Right-click UNEXsss-91 and select Copy from the context menu.
-
Right-click it again and select Paste from the context menu.
-
In the paste options popup, check the Copy Outgoing Links so that the new requirements retain the satisfaction links to the original stakeholder requirements. Finally, click Paste After. You have just created a duplicate requirement, UNEXsss-107.
-
Repeat these steps to create another duplicate requirement UNEXsss-108.
-
Select UNEXsss-91, double-click the Description column, and set the text description to: “The vision system shall be able to map the wall surfaces 360 degrees perpendicular to the motion direction.”
-
Select UNEXsss-107, double-click the Description column, and set the text description to: “The vision system shall be capable of taking images in turbid water.”
-
Select UNEXsss-108, double-click the Description column, and change the text description to: “The system shall have complementary sensors for range information.” Then, add the second paragraph: “Rationale: Provide backup for the vision system in case of turbid water.“
Next, look at the requirement UNEXsss-92: “The vision system should be able to map the wall surfaces 360 degree and take images also in turbid water.” It is also a non-atomic requirement. Moreover, it also duplicates requirements UNEXsss-91 and UNEXsss-107. Thus, add a satisfaction link from requirements UNEXsss-91 and UNEXsss-107 to UNEXcreq-45, as described above in this section, and then permanently delete the requirement UNEXsss-92 from the document.
You can clone the result from the GitLab repository ReqView > Starter Guide > UNEXsys ch6_s5_demonstrate_refinements or download the project folder ch6_s5_demonstrate_refinements.zip.
Summary of Other Refinements:
We have demonstrated the various techniques of refining system requirements into “good requirements”. We will now walk through each section of the UNEXsss document and refine each system requirement that still needs refinement. These requirements are identified by the Status attribute not set to “Ready”. You can do that sequentially or in any order that best serves you. You can easily see all requirements that still need refinement by turning the “Requirements Refinements” filter on.
Let us summarize the refinements taken on the remaining requirements using the techniques demonstrated in the previous paragraphs:
| ID | Requirement Text | Classification/ Technique | Refinement |
|---|---|---|---|
UNEXsss-93 | The robot should be equipped with certain sensors in order to analyse walls and water. These sensors can include for example:
| Almost Good Requirement | It may look as containing multiple requirements, but since the list of sensors is only “for example” it is a single, legitimate requirement. Actual sensor selection is, and should, be deferred to design. We only correct the import typo, separating “Gamma ray for lithology mapping” to a separate line |
UNEXsss-94 | Robot must have a water sampling system | Duplicate Requirement | Included in UNEXsss-93. Copy the Satisfaction link (to UNEXcreq-50) from UNEXsss-94 to UNEXsss-93 and then delete UNEXsss-94 |
UNEXsss-84 | The walls and cavities of mines can be unstable; therefore the robot operation must be contactless and be able to reverse out of dead ends channels | Containing Multiple Requirements | Split into two requirements (UNEXsss-84 and UNEXsss-109) and add rationale paragraphs |
UNEXsss-85 | The robot must possess high maneuverability while driving through constrained spots | Almost Good Requirement | “High maneuverability” is vague. However, the purpose is clear, so only slight re-wording is required (“The robot maneuverability will allow it to drive through constrained spots”) |
UNEXsss-86 | Due to the lack of absolute positioning systems, robot navigation must be environment based (based on perception). Varying water turbidity and extreme environment conditions require multiple navigation sensor systems providing information to be fused. These can include, multibeam sonar, sector scan sonar, vision based systems with structured light and INS coupled with DVL with fluid current measurement capability | Rephrased | Rephrased requirement text (i.e. Description) to highlight the actual requirement (environment based navigation system that uses data fusing of multiple navigation sensor systems). Added “Rationale” paragraph. |
UNEXsss-87 | The robot must have the key functionalities:
| Containing Multiple Requirements | Split into 6 separate requirements: UNEXsss-87, UNEXsss-110, UNEXsss-111, UNEXsss-112, UNEXsss-1113, UNEXsss-1114; each bullet in the original UNEXsss-87 is a separate requirement. Rephrased each requirement. |
UNEXsss-102 | Distance covered with single charge 1 – 5 km | Almost Good Requirement | The minimum distance specified is irrelevant. Rephrased to include covering of at least the maximum range required |
UNEXsss-103 | The robot batteries can be loaded or charged while the robot is in water | Good Requirement | |
UNEXsss-106 | The robot controller unit must provide autonomous operation, power monitoring, and fault detection for safety purposes | Containing Multiple Requirements | Split into three separate requirements: UNEXsss-106 (autonomous operation), UNEXsss-115 (power monitoring), UNEXsss-116 (fault detection) |
UNEXsss-97 | The robot must be capable of constant communication with a base station during the mission while the robot is up to 500 meters underwater | Almost Good Requirement | Very slight re-wording |
UNEXsss-98 | The robot system should have a wireless communication for easy setup and parametrization | Almost Good Requirement | Very slight re-wording |
UNEXsss-104 | The mission design system should allow the operator to specify the type of mission and the parametrization of the robot exploration methods | Incomplete, “Master” Requirement | See special considerations |
UNEXsss-72 | Water temperature variation: +4… 40°C | Almost Good Requirement | Slight rephrasing |
UNEXsss-73 | Local water flow velocity can be high | Vague and Incomplete Requirement | Requirement not quantitative and not based on reference mines” data. Our “expert” (i.e. ChatGPT) is used to define a full, consistent requirement |
UNEXsss-74 | Maximum depth: 500 m | Almost Good Requirement | Slight rephrasing |
UNEXsss-75 | Maximum Manhattan distance from any point of the mine to entrance at water surface is under 2.5 km | Duplicate Requirement | Duplicate with UNEXsss-102. Copy the link to UNEXcreq-32 to UNEXsss-102 and then delete UNEXsss-75 |
UNEXsss-76 | Mine tunnels and other openings are narrow which must be considered both in designing manoeuvrability of the robot but also in hauling robot itself and support equipment inside the mine | Partially Duplicate Requirement | The maneuverability part is duplicated with UNEXsss-80. The link to UNEXcreq-22 is copied to UNEXsss-80 as well, and the requirement is changed to in include only the hauling of the robot and support equipment |
UNEXsss-77 | There is also a possibility of having at some locations wider underground spaces (either in galleries or at junctions). In these locations the width can exceed over 10m | Not a requirement. Leave object as descriptive text | “Requirement” type removed. See special considerations |
UNEXsss-78 | Revolution shape if possible without external protuberances (such as spherical or cylindrical shape) allowing maneuverability in tight spaces. | Almost Good Requirement | Rephrased and add rational as a separate paragraph |
UNEXsss-79 | The robot body should be streamlined to reduce drag and reduce probability of getting stuck | Good Requirement | One may argue if it does not partially duplicate UNEXsss-78, but we decided to leave it |
UNEXsss-80 | Maximum diameter 600 mm to be able to navigate through narrow channels | Almost Good Requirement | Slight rephrasing. This assumes that the contradiction with UNEXcreq-134 (0.5 meter) was resolved |
UNEXsss-100 | Modular design (can be adapted to different missions or scenarios) | General, inconclusive requirement | See special considerations |
UNEXsss-99 | Easy transportation, hauling and deployment | Vague Requirement | Re-phrased requirement to be more effective |
Having some requirements that need a unique, non-standard treatment is quite common. In our case, the following requirements were handled differently:
-
UNEXsss-77: “There is also a possibility of having wider underground spaces at some locations (either in galleries or at junctions). In these locations, the width can exceed over 10m.” This is a description and not a requirement. We decided to leave the description paragraph in place since it may contain valuable data for the designer and to remove the “Requirement” classification from the attribute Type. If we delete the paragraph, we may miss some information. One may also consider changing the attribute Requirement attribute of the source stakeholder requirement UNEXcreq-31.
-
UNEXsss-100: “Modular design (can be adapted to different missions or scenarios).” This is a typical example of a general and inconclusive requirement we cannot verify. In this particular example, we can improve the requirement. But in real life, there are many cases when we cannot improve such general requirements and leave them as “general goal” requirements.
-
UNEXsss-104: “The mission design system should allow the operator to specify the type of mission and the parametrization of the robot exploration methods.” This requirement is a “master requirement” hinting at the need for a mission design system that communicates with the robot, controls its mission, and downloads the collected data. These Mission Design System requirements must be completed. Let us leave this requirement for later processing, leaving the requirement status as “Draft”. We will process this requirement in the next Section Complete Missing System Requirements.
You can clone the result from the GitLab repository ReqView > Starter Guide > UNEXsys ch6_s6_finish_refinements or download the project folder ch6_s6_finish_refinements.zip.
Identify Missing System Requirements
The refined system requirements capture our best knowledge about the desired system so far. However, this knowledge is often far from being complete. As the next task, we shall identify and complete missing information about the system necessary for building a solution satisfying all real project needs. This task is the heart of system engineering work.
ReqView provides several functionalities to help you with this task. For instance, ReqView document templates based on industry standards contain document sections that can be used as checklists. Each document section includes instructions and guidance about the intended contents, which you can use as the starting point for identifying missing requirements. Another example is organizing requirements under document sections expressing the system logic, which helps with spotting missing parts.
In this section, we will demonstrate how to do this engineering work for various parts of the UNEX project:
- Model system states and modes
- Capture robot transportation requirements
- Capture robot charging requirements
- Capture Missing Design System requirements
- Describe Missing Design System interfaces
Please keep in mind that producing a complete UNEX System Requirements Specification is not our goal, and is outside the scope of this tutorial.
1. Model System States and Modes:
We suggest starting the process by completing the UNEXsss section “3.1 Required States and Modes”. When stakeholder requirements have a definition of the required states and/or modes, make sure that it is complete and covers the required system behavior during its entire life cycle.
In our case, there is no explicit definition for the required states and modes in the UNEX stakeholder requirements. For this tutorial, we sketched a possible life-cycle state diagram for the UNEX system from our understanding of the system and hints from the requirements so far:
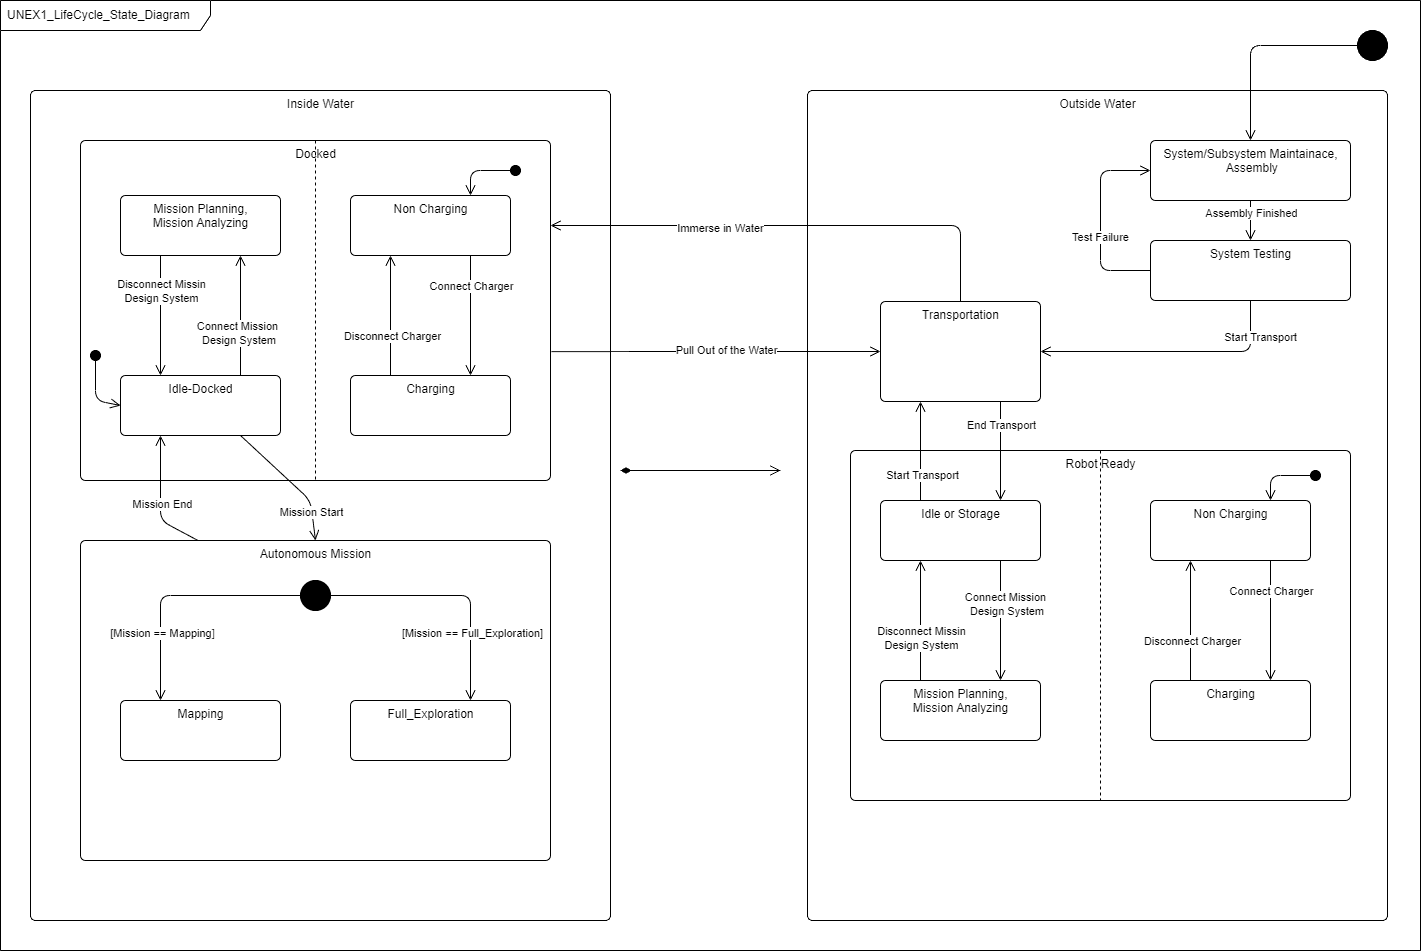
We created this diagram using the draw.io open-source software tool. You can use any suitable software tool that supports exporting diagrams to image file formats (.jpg*, .png, or .svg).
Adding the state diagram to our UNEXsss document is easy. Just drag the image file from the file explorer and drop it into the Description column of the document object UNEXsss-14 in ReqView. Enter the attachment's name in the Paste Attachment dialog, and then hit OK. The state diagram is displayed in the Description column of the UNEXsss-14 object; see the following screenshot:
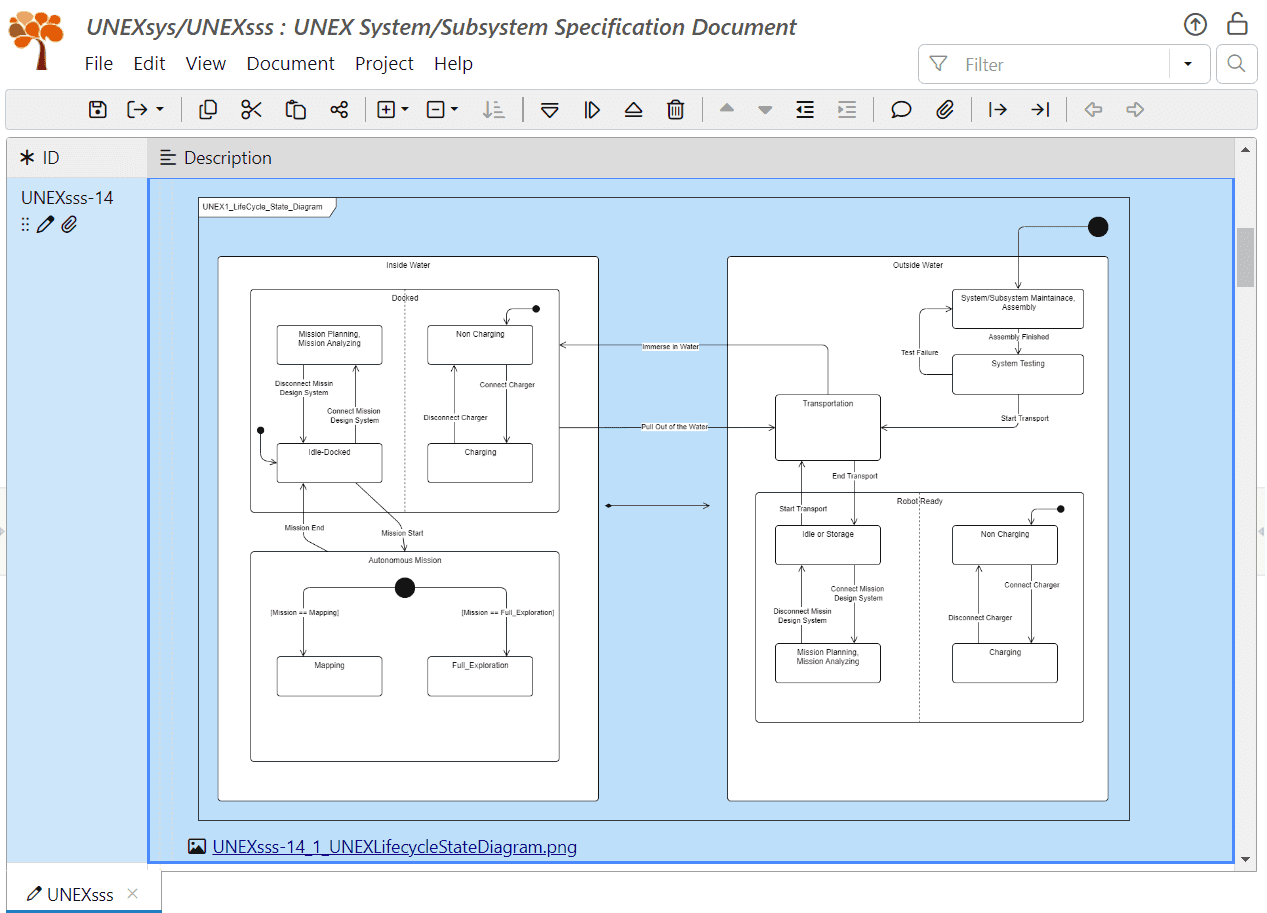
Alternatively, right-click the UNEXsss-14 object, select Attach File from the context menu (or navigate to the object and select Edit->Attach File from the main menu, or click on the toolbar, or press CtrlShiftA). Select the desired image file in the Select Attached File dialog and hit Attach.
You can add descriptive text to that object like any other object. Double click on the Description column of UNEXsss-14 to bring up the inline editor, and enter the desired text description, for example: “The next state diagram describes the UNEX states during its life-cycle:”.
Replacing the diagram with an updated version when needed is similarly straightforward; just drag and drop the updated image file. Or, right-click the diagram displayed in the Description column of UNEXsss-14, select Replace from the context menu, and finally select the updated image file in the Select Attached File dialog and hit Attach.
Then, we describe the expected behavior of the system in each state and the transitions between states. This is an excellent source of information for system requirements. Some of these requirements are already specified as stakeholder requirements, but others are new. You can describe these new requirements in the document section containing the diagram or in other, more suitable sections.
In our case, we describe the states and transitions in new objects UNEXsss-117, ..., UNEXsss-139 placed right after the object UNEXsss-14. From these objects, we deduce that we need to describe the safe transportation and charging capability of the robot, as well as the mission control terminal.
We can either directly specify the system requirements and set their Type attribute to “Requirement”, or capture the missing information in new descriptive objects with Type unset or set to “Information” and add the related requirements later in the more appropriate document sections. We opt for the second approach; it tends to make the document more precise, and some of the information is already captured in existing stakeholder requirements in other sections. You can add the new objects in any order in the most convenient way to you at the moment; just pay attention to whether you want to add a sibling of an existing object (select Add Before or Add After from the menu) or a child object (select Add Child the menu) of a document section.
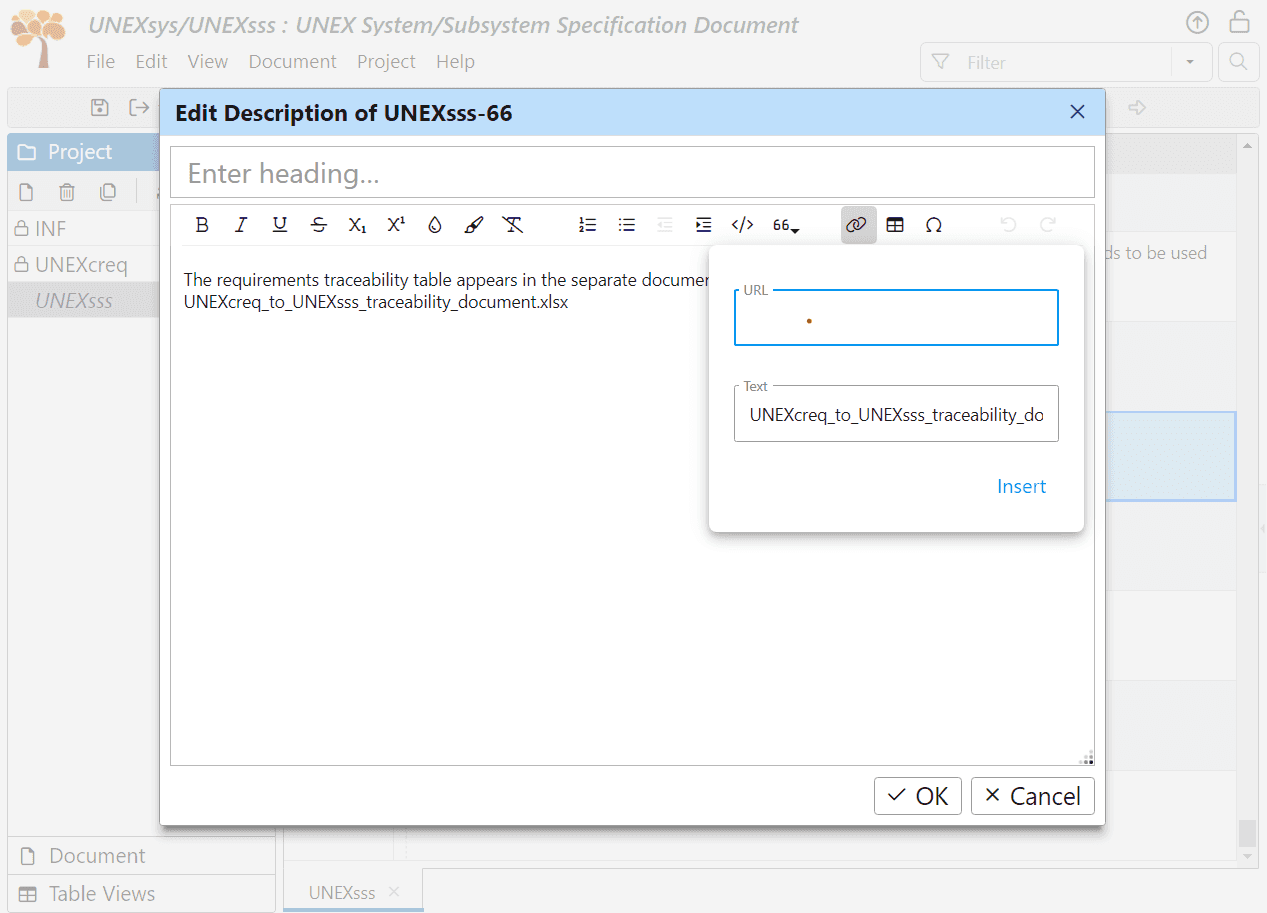
Please note the description of the object UNEXsss-138 in the section “3.1.2.1 Docked state”, in which we wanted to refer to another place in the UNEXsss document. To not repeat the description of the object UNEXsss-129 (“Charging states”) and the object UNEXsss-131 (“Mission Planning and Analyzing state”), we referenced these objects using URL links. To do it:
- Right click the object UNEXsss-129 and select Copy Object URL from the context menu (or select Edit->Copy Object URL from the main menu, or press CtrlK) to copy the URL to the clipboard.
- Select the Description column of the object UNEXsss-138, select Edit->Edit Text from the main menu (or press CtrlE) to open the Edit Description dialog.
- In the Edit Description dialog, place the cursor where you want to insert the URL. Click on the toolbar (or press CtrlK) to open the link properties dialog. Focus the URL field and press CtrlV to paste the copied URL of the object UNEXsss-129. Then move to the text field and enter “Charging states” as the link description. Finally, hit Insert.
- Repeat the steps above for UNEXsss-131.
2. Capture Robot Transportation Requirements:
The robot transportation requirements belong to the UNEXsss section “3.15 Logistics-related requirements”. Currently, this section contains a general nonspecific requirement UNEXsss-99 (“The UNEX project will include the design and implementation of means that will support easy transportation, hauling and deployment.”) created from the stakeholder requirement UNEXcreq-39 (“Easy transportation, hauling and deployment.”) directly relating to robot transportation and not conforming to the “good requirement” rules.
We use the life cycle state diagram now to formulate several new requirements, replacing UNEXsss-99:
-
In section “3.15 Logistics-related requirements”, create a new subsection UNEXsss-140 and call it “3.15.1 Robot Transportation Requirements”.
-
In this subsection, create requirements UNEXsss-141, ..., 152, detailing transportation requirements for a storage/transportation container designed for the robot, a transportation cart to support moving the storage container around, and the robot itself.
Set the attribute Type for all these new objects to “Requirement” and the attribute Status to “Ready”.
-
Link all new requirements to the stakeholder requirement UNEXcreq-39.
-
Delete the system requirement UNEXsss-99 now because it is general and vague, and we have just detailed its content according to the robot's life cycle state diagram.
-
Finally, organize requirements UNEXsss-141, ..., 152 under three subsections: UNEXsss-153 (“3.15.1.1 Storage Container”), UNEXsss-154 (“3.15.1.2 Transportation Cart”), and UNEXsss-155 (“3.15.1.3 General Transportation Requirements”).
Although we might have organized the requirements in this way previously, requirements re-arrangement under new or modified subsections is common and can be easily performed as needed: just select all the sibling objects that you want to move together to a new location, cut them to the clipboard, and then paste them to the new location (see Section Group System Requirements to Sections.
Please note that the requirement IDs in the document sections are not continuous. That is because requirements are created interactively and not sequentially. First, you add some requirements, then you realize that you want to group them in a subsection, then you add the subsection (and maybe another one), then add more requirements, and so on. Requirement IDs are unique and stable throughout the development to reliably identify requirements; therefore, continuous requirements numbering makes no sense.
3. Capture Robot Charging Requirements:
The UNEXsss document already contains the section “3.2.4 Power” with several system requirements (UNEXsss-88, UNEXsss-102 and UNEXsss-103) originating from the UNEX stakeholder requirements and relating to the robot power system.
Add the charging requirements UNEXsss-156, ..., UNEXsss-162 derived from the life-cycle state diagram to this section. The power-related requirement UNEXsss-163 (“The storage container will allow the charging of the robot while it is stored inside the storage container (for example - providing access to the robot charging connection by the opening of a top lead of the storage container”) better relates to the storage container and thus add it to section UNEXsss-153 (“3.15.1.1 The Storage Container”).
4. Capture Mission Design System Requirements:
Currently, there is only one system requirement related to the Mission Design System: requirement UNEXsss-104 (“The mission design system should allow the operator to specify the type of mission and the parametrization of the robot exploration methods.”). It was created in section “3.6 Adaptation requirements” from the stakeholder requirements and still holds the status “Draft”, so it needs to be refined.
We replace this requirement with proper requirements describing the Mission Design System derived from this requirement and the life cycle state diagram:
-
In the section “3.2 System capability requirements”, create a new subsection UNEXsss-164 and call it “3.2.6 Mission Design System”.
-
In the new subsection, create new requirements UNEXsss-165, ..., UNEXsss-178 for the Mission Design System. Set their attribute Type to “Requirement”.
-
Add four new subsections: UNEXsss-179 (“3.2.6.1 Mine Maps Handling”), UNEXsss-180 (“3.2.6.2 Mission Control”), UNEXsss-181 (“3.2.6.3 Mission Data”) and UNEXsss-182 (“3.2.6.4 Robot Status Testing”). Then, distribute the new requirements into these subsections.
-
Create a link from new requirements UNEXsss-171, ..., UNEXsss-172 to UNEXcreq-53, thus rendering UNEXsss-104 obsolete. Then, we will delete UNEXsss-104.
5. Describe Mission Design System Interfaces:
It is important to remember that the Mission Design System does not stand alone. Many Mission Design System requirements need corresponding requirements for various robot subsystems and interface requirements between the robot and the Mission Design System. Most Robot subsystem requirements are already in the UNEXsss document (for example, UNEXsss-87, UNEXsss-110, and UNEXsss-111) since we created them from the UNEX stakeholder requirements. However, we must add the missing interface and Mission Design System requirements.
Next, we will describe interface requirements and organize them in the appropriate document sections corresponding to internal and external interfaces:
-
First, create a section for requirements describing the external interface between the Mission Design System and the external world.
In the section UNEXsss-19 (“3.3 System external interface requirements”), right-click UNEXsss-21 (“3.3.1 Interface identification and diagrams”), select Add After from the context menu to create the new object UNEXsss-183, and set its heading to “3.3.2 Mission Design System Interfaces”.
-
Second, create a section for requirements describing the internal interface between the Robot and the Mission Design System, which is considered an internal interface because we are looking at the whole system and not at its sub-components at this stage of development. Later, when we look at the UNEX Robot and the Mission Design System as sub-projects, the interface between the Robot and the Mission Design System will be considered an external interface.
In the section UNEXsss-25 (“3.4 System internal interface requirements”), right-click UNEXsss-96 (“3.4.2 Communication interfaces”), select Add After from the context menu to create the new object UNEXsss-184, and set its heading to “3.4.3 Mission Design System - Robot Data Interfaces”.
-
Now, we add requirements UNEXsss-185, ..., UNEXsss-191 under the section UNEXsss-183 (“3.3.2 Mission Design System Interfaces”). Please note that requirements UNEXsss-185, ..., UNEXsss-191 contain “TBD” at the end of their text description, a common practice used when the exact requirement specification is not crucial for the current design phase. We should refine TBD items later in the next design phase. We will mark this fact by setting the attribute TBD/TBR for these requirements to “TBD” and the attribute Assigned To to the Mission Design System chief architect.
-
Repeat this process for the internal interfaces and add requirements UNEXsss-192, ..., UNEXsss-194 in section UNEXsss-184 (“3.4.3 Mission Design System—Robot Data Interfaces”).
We will end the demonstration of completing the missing system requirements here. The job is by no means complete yet. Nevertheless, we aim to demonstrate the process and techniques of developing the system requirements using ReqView, not necessarily to create a complete document. We encourage you to finalize the requirements in the UNEXsss document.
You can clone the result from the GitLab repository ReqView > Starter Guide > UNEXsys_ ch6_s7_identify_missing_reqs or download the project folder ch6_s7_identify_missing_reqs.zip.
Annotate System Requirements
After completing the tasks described in the previous sections, we have a sound basis for the system requirements. In this section, we will set custom attributes supporting the next phases of the system engineering process:
- Managing requirements completion
- Prioritization of requirements
- Planning risk reduction
- Ensuring that requirements are verifiable
- Planning Verification and Validation (V&V)
For this purpose, we have already defined a set of requirement attributes in the document template described in Section Create Bare Document Template of Chapter 4. Let us first recall these requirement attributes. We will describe how these attributes support the various system engineering processes. Finally, we will explain the process of filling these requirements.
Overview of System Requirement Attributes:
-
Type: Describes the type of the current document object. Its value should be set to “Requirement” for each object that is a requirement. Other values can describe document objects that are not requirements or enable export templates to control some aspects of the object printing.
-
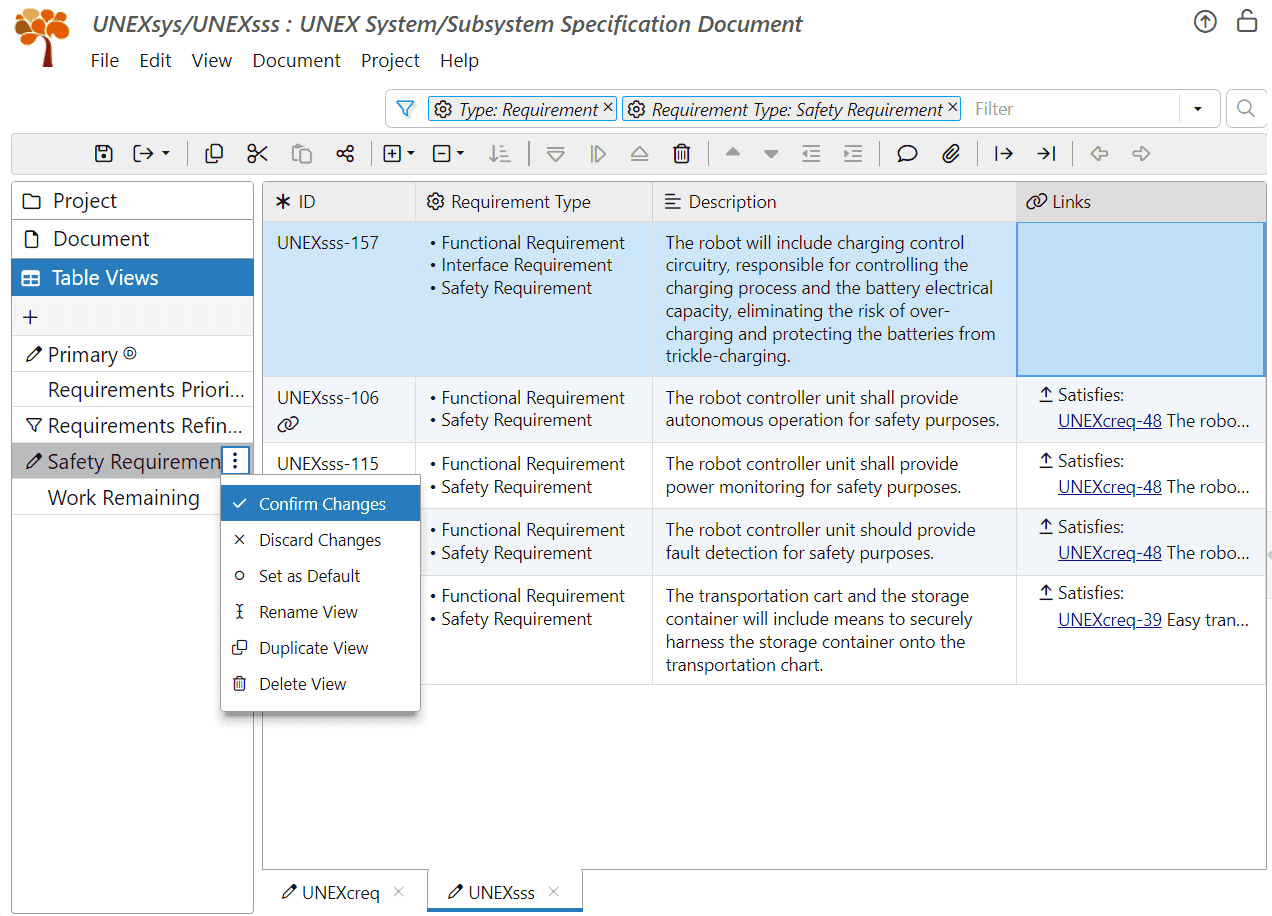
Requirement Type: Classifies the system requirement as being of one or more requirement types (“Functional Requirement”, “Non Functional Requirement”, “Interface Requirement”, “Safety Requirement”, “Security Requirement”, “Quality Requirement”, and “Regulatory Requirement”). Multiple classifications of a single requirement are pretty common: for example, a given requirement may be a “Functional Requirement”, “Interface Requirement”, and a “Safety Requirement” at the same time.
-
Priority: Specifies the priority for implementing the system requirement.
-
Expected Compliance: This assesses the level of compliance that the system will achieve with this requirement (“Comply,” “Partial Comply,” or “Non-Compliant”).
-
Difficulty: Estimates the difficulty and risk involved in implementing and complying with this requirement (“Easy”, “Nominal”, or “Difficult”).
-
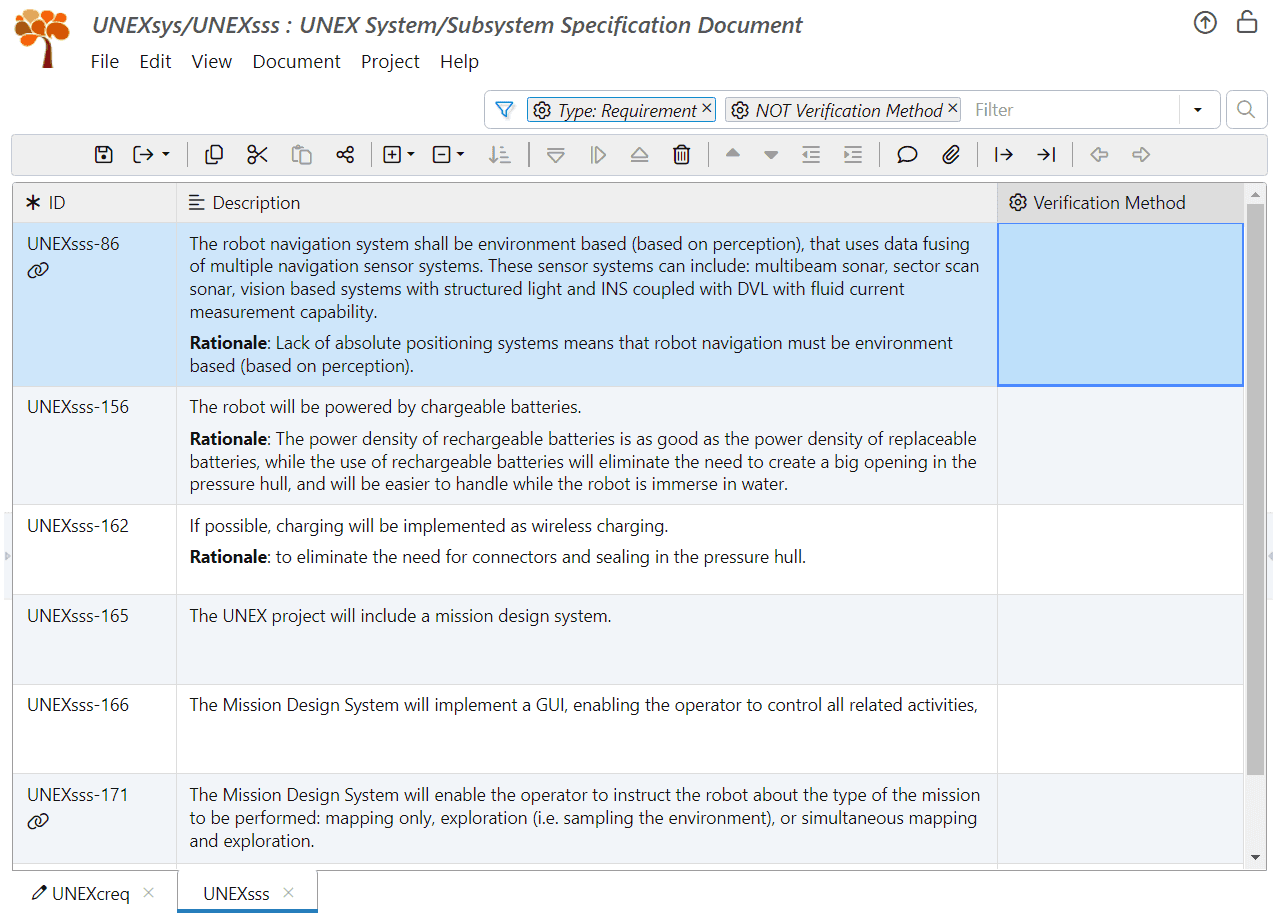
Verification Method: Specifies one or more methods that the system engineering team defines as the required minimum to verify the requirement (“Analysis”, “Inspection”, “Demonstration”, “Test”, or “Special Qualification Method”).
-
Status: Stores the development status of the requirement to support the workflow of completing the requirement (“Draft”, “Ready”, “Reviewed”, “Approved”, and “Released”).
-
TBD/TBR: Marks if the requirement is currently incomplete and has parts that either still need to be defined or refined (“TBD” or “TBR”).
-
Assigned To: Names the person responsible for completing the requirement.
-
Deadline: Specifies the closest deadline for completing this requirement.
-
Rationale: Describes the rationale of the requirement and/or its values. This attribute should already be filled at the current development stage. As described earlier in this chapter, other means for expressing the rationale may also be used.
You can always add more attributes, modify the current attributes, or delete unnecessary attributes according to your process. For example, we will make the following changes to the initial definition of the attributes Difficulty and Verification Method:
-
We will extend the granularity of attribute Difficulty from 3 to 5 values (“Easy”, “Nominal”, “Medium”, “Difficult”, and “Very Difficult”) to better support requirements prioritization and risk reduction planning.
Select Document->Customize Attributes from the main menu. In the Document Attributes dialog, you can use the Wizard or Code tab to change the definition of custom attribute difficulty. For more details, see section Create Bare Document Template in Chapter 4.
-
We will change the definition Verification Method attribute from a single enum. value to multi enum. value, to allow the specification of multiple required verification methods for a requirement.
First, select Document->Customize Attributes from the main menu. In the Document Attributes dialog, switch to the Code tab to edit the definition of attribute Verification Method, and locate the line starting with the text
"verMethod": {.After that line, add a new line containing the text:
"multiValued": true,and click OK.For more details, see Customize Attributes in the documentation.
Set Attributes for System Requirements:
Filling the attribute values is a quick and straightforward process. First, filter the document to display only requirements: Type: Requirement. Then, focus on each requirement and fill in its attribute values. Usually, it is easy to determine the correct attribute values. However, we may need to consult stakeholders, team members, or other experts to determine the proper value for some requirements and attributes.
You can conveniently set a desired attribute value for many requirements at once. First, select all desired requirements for setting the same attribute value (for example, “Test” as the verification method). Then, while holding the Ctrl key down, double-click on the attribute column (i.e., “Verification Method”) of one of the selected objects. Finally, select the desired value (“Test”, in our case) in the inline value editor. The value will be set for all selected objects.
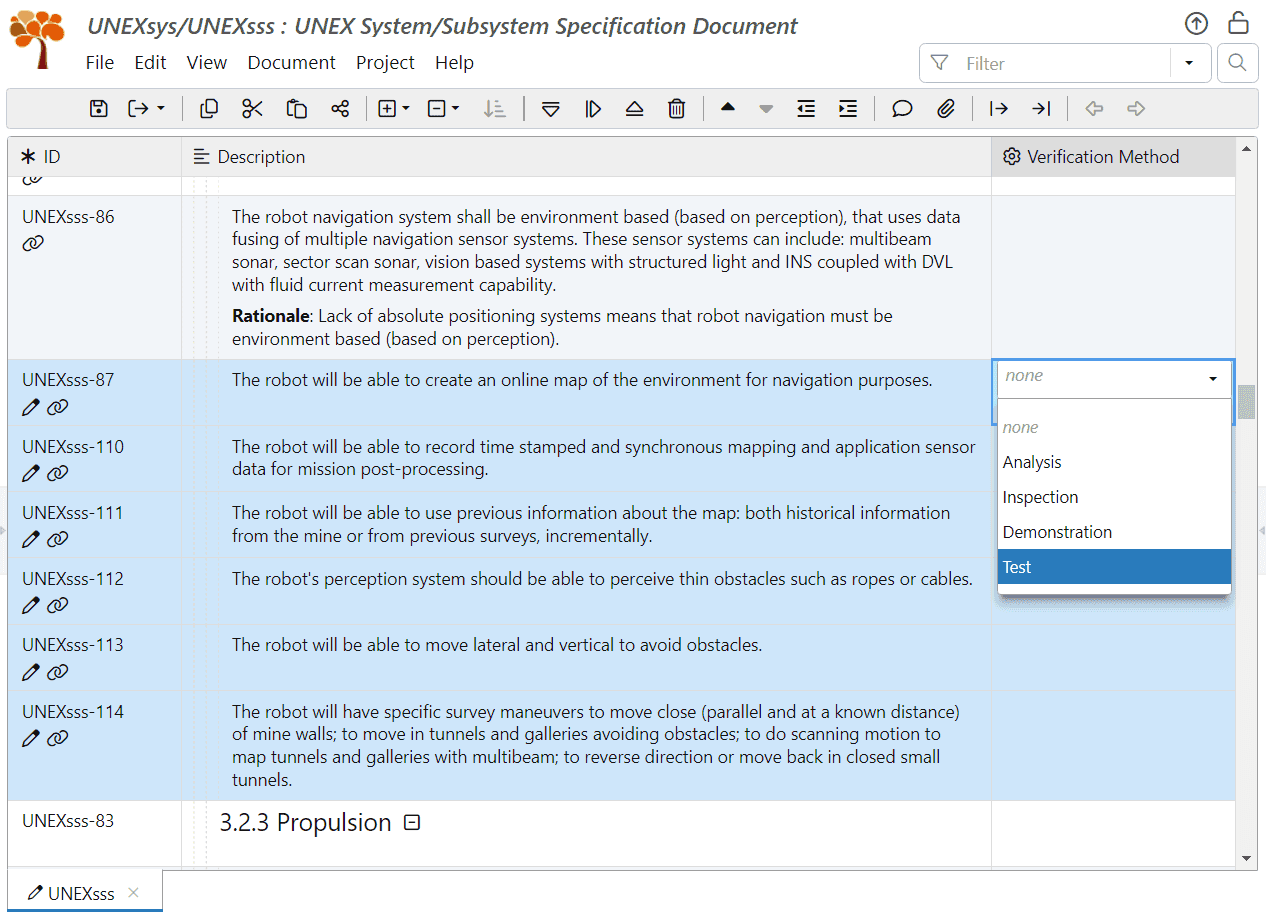
When filling a relatively large number of attributes serially, you can use the Attributes pane on the right of the screen to avoid back-and-forth scrolling of the table columns. You have control over the order of the attributes displayed in this pane. By default, it displays custom attributes in the same order as table columns, followed by attributes hidden in the current view. To sort attributes alphabetically, click on the toolbar of the Attributes pane.
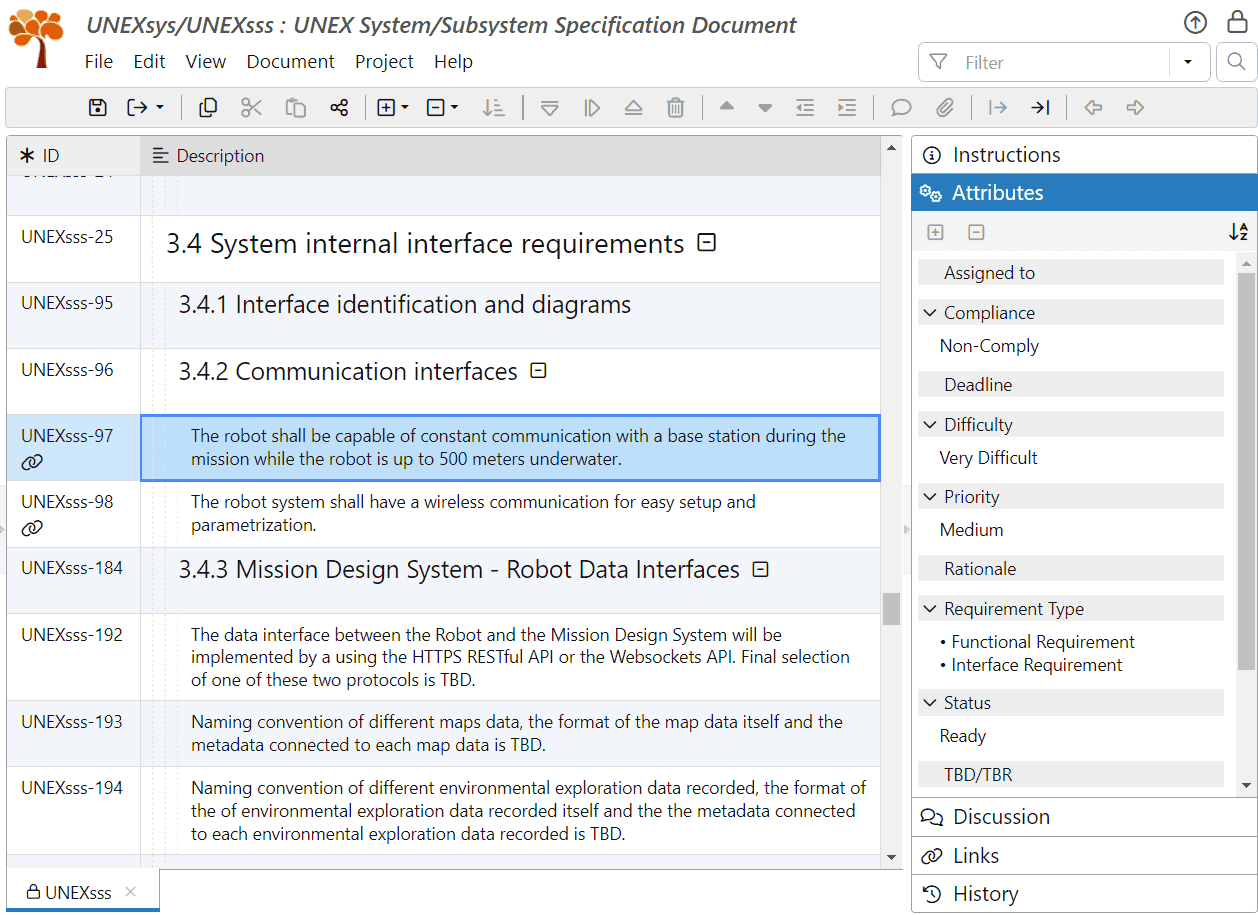
We filled the attributes for most requirements and left some unset to demonstrate related workflow practices later. Let us describe the reasoning behind our decisions for several requirements and attributes to shed light on the system engineering work:
-
For the requirement UNEXsss-97 (“The robot shall be capable of constant communication with a base station during the mission while the robot is up to 500 meters underwater.”), we set the attribute Difficulty to “Very Difficult”, the attribute Requirement Compliance to “Non Comply”, and the attribute Priority to “Medium”. Underwater communication for the required distance is a significant challenge and requires expensive resources, and it is not clear if this requirement is crucial for the UNEX robot operation.
-
For the requirement UNEXsss-71 (“The robot shall withstand water pH level of at least 3. There is a design goal of withstanding pH level of 1.5, with a decision to be made at the robot design review, based on complexity and price.”), we set the attribute Difficulty to “Difficult”. The required pH value results from a worst-case calculation of the water condition in the Idrija mine (UNEXcreq-123), which is practically unknown and was not measured or specified directly. This requirement may be a huge over-specification, and it deserves more checks before committing to this severe acidity level. We also added a comment to the requirement.
-
For the requirement UNEXsss-80 (“The robots' maximum diameter shall be 600 mm in order to be able to navigate through narrow channels.”), we set the attribute Difficulty to “Difficult”. This is a mandatory and understandable requirement, but it imposes a severe volume and weight restriction on the robot (maximum allowed weight of 113 kg, according to Archimedes law). It is not immediately apparent that the required robot functionality can be achieved under these restrictions, and this should be a significant target of the early design phase. We also added a corresponding comment to this requirement.
-
For the requirements UNEXsss-86 (navigation), UNEXsss-112 (motion control in narrow passages and around obstacles like ropes and cables), UNEXsss-107 (taking pictures in turbid water), and UNEXsss-84 (contactless operation of the robot), we set the attribute Difficulty to “Difficult”.
-
For the requirement UNEXsss-157 (“The robot will include charging control circuitry, responsible for controlling the charging process and the battery electrical capacity, eliminating the risk of over-charging and protecting the batteries from trickle-charging.”), we set the attribute Requirement Type to “Functional Requirement”, “Interface Requirement”, and “Safety Requirement”, since the requirement has all these aspects.
-
For the requirement UNEXsss-108 (“The system will have complementary sensors for range information.”), we set the attribute Verification Method to “Inspection” because it is non-testable. Verifying such a requirement involves supplying evidence that more than one range-measuring sensor of different operating methods was implemented in the UNEX robot.
You can use the ReqView filter or search capabilities to locate and update a desired group of requirements. For example, use the following filter: Type: Requirement Text: tbd NOT TBD/TBR is set to verify that all requirements containing “TBD” in their description have the attribute TBD/TBR set. Then select all resulting requirements and set the attribute TBD/TBR to the value “TBD” for all of them at once.
You can clone the result from the GitLab repository ReqView > Starter Guide > UNEXsys ch6_s8_annotate_reqs or download the project folder unexsys-ch6_s8_annotate_reqs.zip.
Complete System Requirements
At this point, the requirements in the UNEXsss document are almost complete. However, there are still a few tasks remaining:
- Analyze requirements coverage to ensure each stakeholder need is addressed.
- Demonstrate stakeholder requirements coverage by the UNEXsss document.
- Review verification methods set for all system requirements to ensure they will be verified correctly.
- Adhere to safety and other regulatory requirements.
- Prioritize requirements.
The following paragraphs will demonstrate how to carry out these tasks.
1. Analyze Requirements Coverage:
One of the most important objectives of the requirements elicitation (and later, the design) phase is assuring that system requirements fully address each stakeholder requirement. Uncovered stakeholder requirements will likely be missing in the final product, endangering the project's suitability for the client.
Fortunately, ReqView and our workflow can be of great help in this analysis, which usually involves two kinds of checks:
-
Check That Each Stakeholder Requirement is Answered: This is a straight forward consistency check:
We marked all stakeholder requirements by setting the attribute Type to “Requirement” during the import and refinement process (see Section Annotate Stakeholder Requirements in Chapter 5).
We also linked every system requirement to the original stakeholder requirements using the Satisfaction link type (see Section Transfer Stakeholder Requirements to System Requirements). As a result, every stakeholder requirement should have (at least one) incoming Satisfaction link.
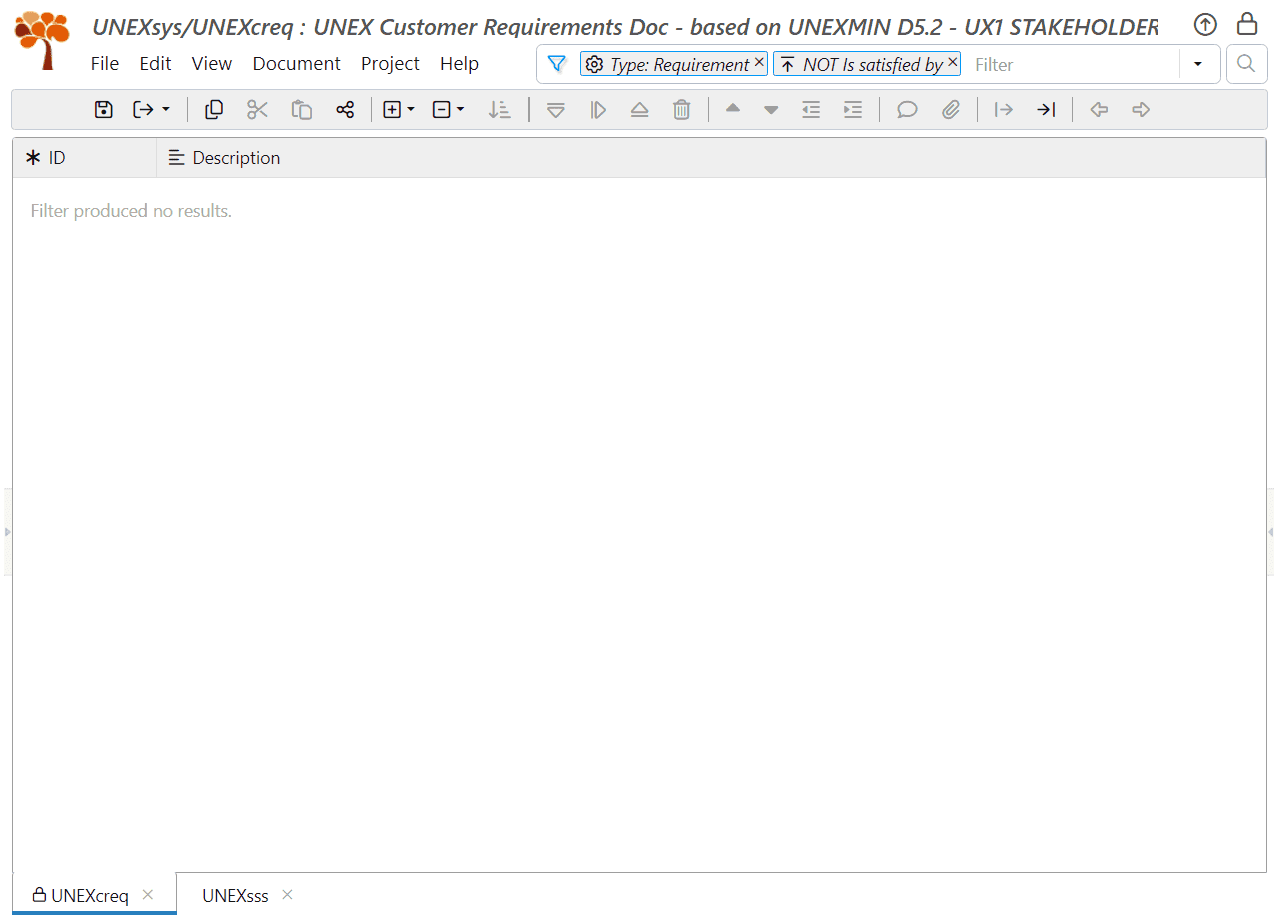
To check that each stakeholder requirement in the UNEXcreq document is covered by system requirements in the UNEXsss document, set a filter in the document UNEXcreq to: Type: Requirement NOT Is satisfied by:
![Filter stakeholder requirements which are not covered by system requirements in ReqView Filter stakeholder requirements which are not covered by system requirements in ReqView]()
An empty filter result signals that system requirements answer all stakeholder requirements.
You can also select the table view “Requirements to Copy” created in Section Transfer Stakeholder Requirements to System Requirements.
-
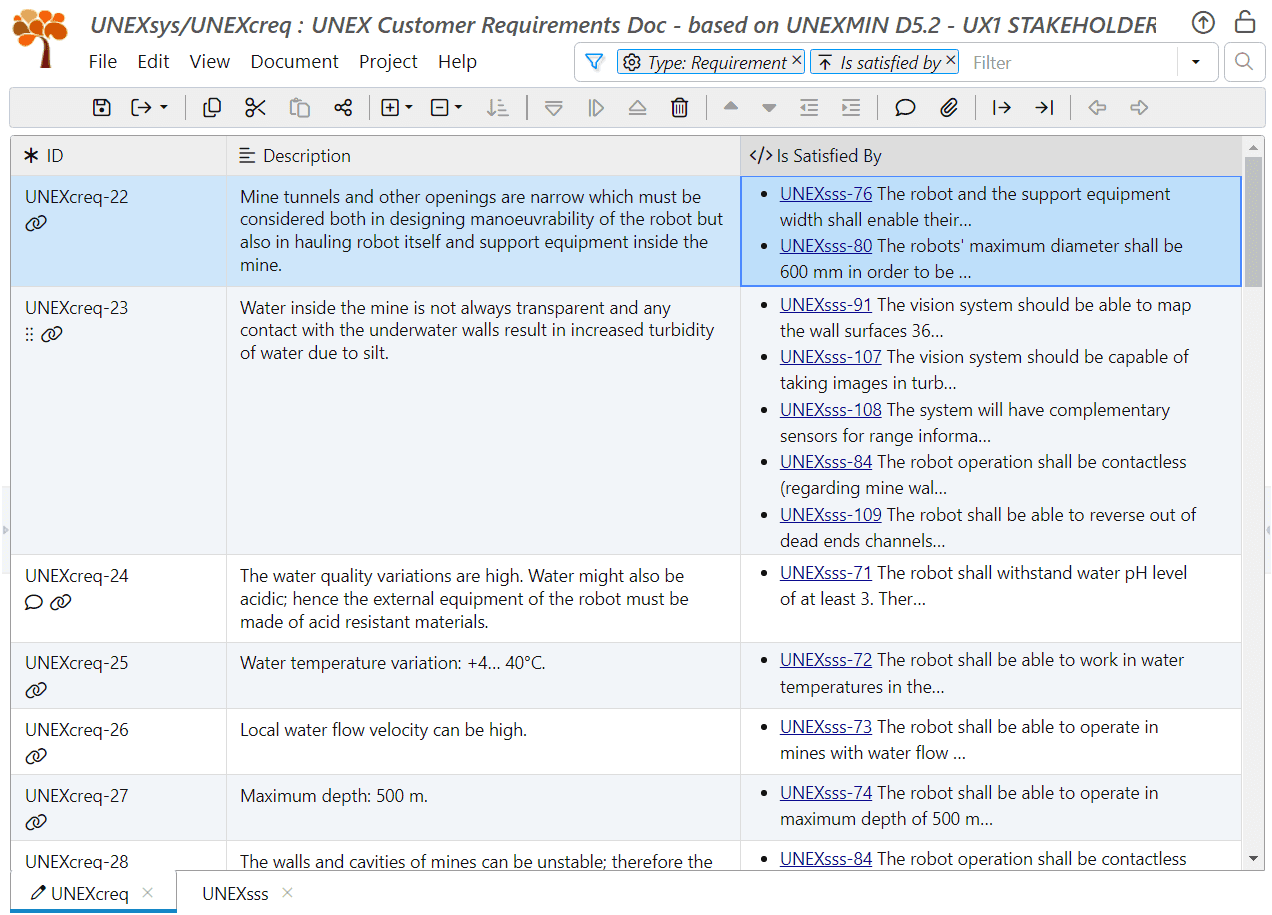
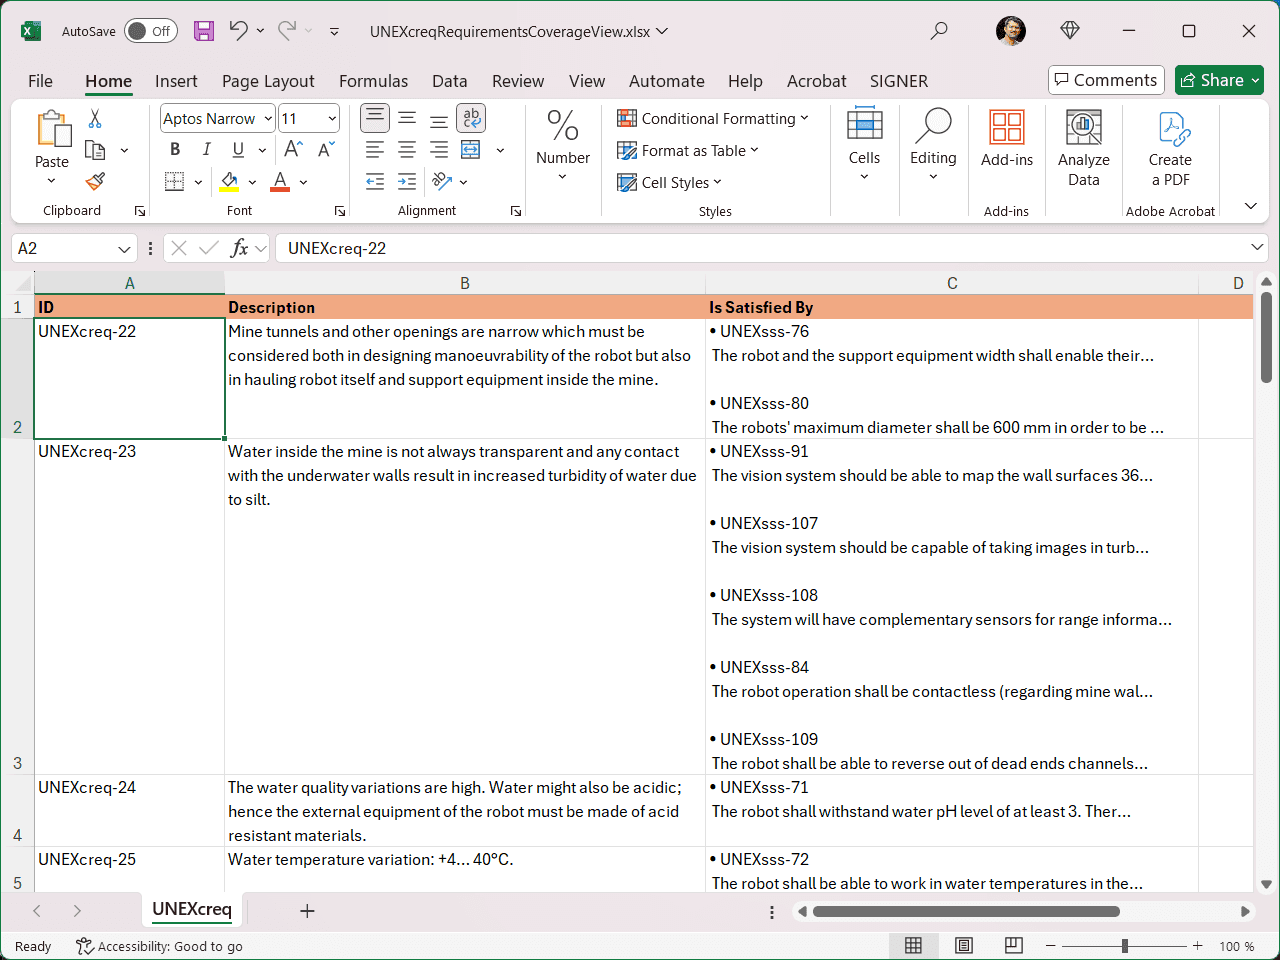
Check That Coverage of All Stakeholder Requirements is Sufficient: This contextual check requires personal inspection — no software can replace the system engineer in this task. ReqView, however, provides excellent help in carrying out this check, by utilizing a table view displaying the traceability matrix for the document UNEXcreq:
-
Open the UNEXcreq document and create a new table view called “Requirements Coverage” that displays only columns “ID” and “Description”. To create the new table view, click the toolbar button in the Table Views pane. In the Create Table View dialog, enter “Requirements Coverage” as the table view name, leave the Duplicate current document view checkbox unchecked, and press OK.
-
Set the filter to: Type: Requirement Is satisfied by.
-
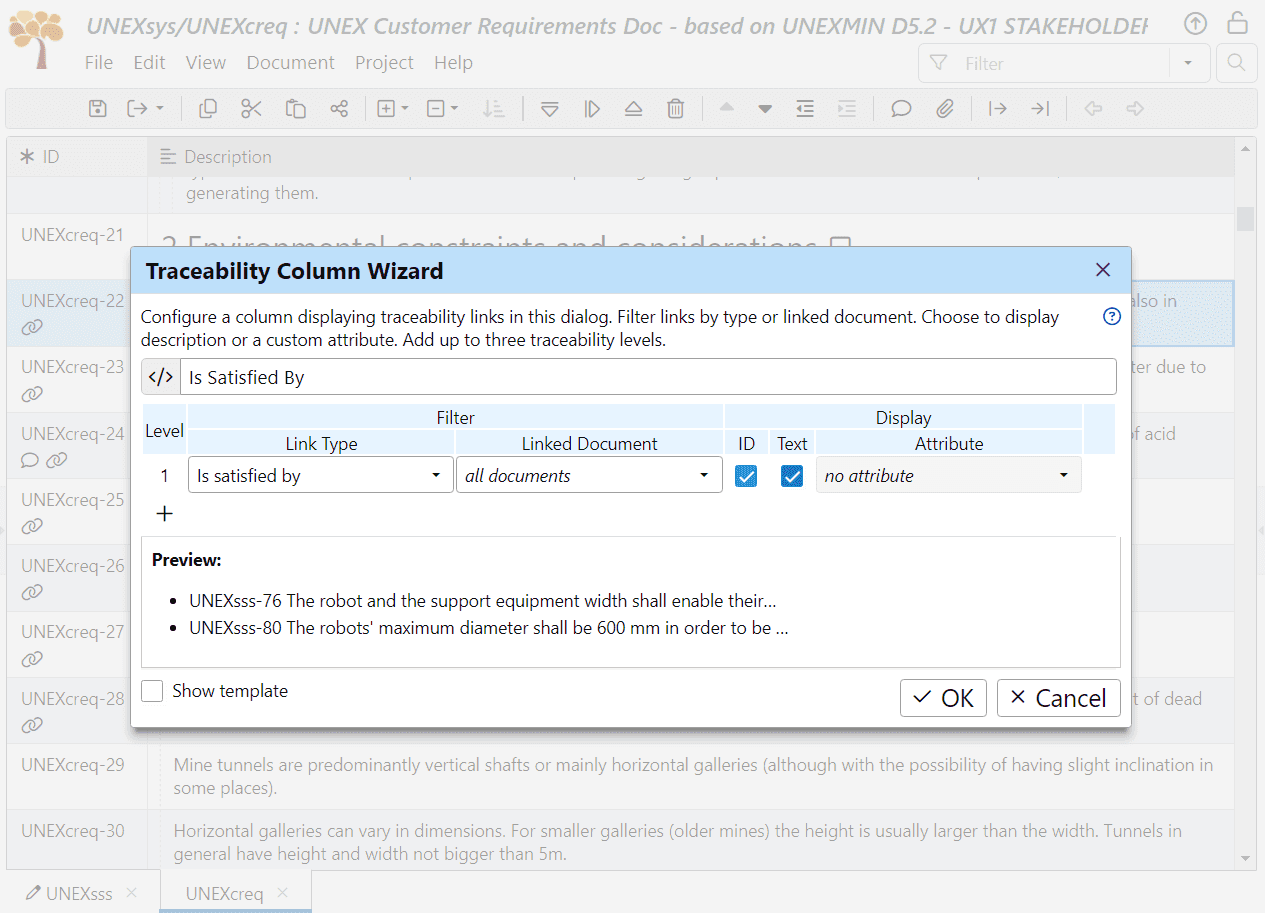
Create a traceability template column “Is Satisfied By” displaying satisfaction links from the UNEXsss document.
Select Document->Add Template Column->Traceability Column to display the Traceability Column Wizard dialog. Then, enter “Is Satisfied By” in the Column Label, select “Is satisfied by” from the Link Type dropdown:
![Use the traceability column wizard to add column 'Is Satisfied By' in ReqView Use the traceability column wizard to add column 'Is Satisfied By' in ReqView]()
Finally, hit OK to add the column “Is Satisfied By” to the table view:
![Display custom traceability column 'Is Satisfied By' in ReqView Display custom traceability column 'Is Satisfied By' in ReqView]()
-
Save the changes to the table view “Requirements Coverage”: right-click Requirements Coverage in the Table Views pane and select Confirm Changes from the context menu.
-
Using the Requirements Coverage table view, check the content of the Is Satisfied By column of each stakeholder requirement. Review and verify the coverage of each stakeholder requirement by downstream system requirements. You can easily see the full definition of any given downstream system requirement by hovering the mouse over the requirement link.
-
2. Demonstrate Requirements Coverage:
One remaining task is to add a traceability matrix into section UNEXsss-65 (“5. Requirements traceability”). The traceability matrix should display all system requirements that address each stakeholder requirement and is precisely the table represented by the table view “Requirements Coverage” in the document UNEXcreq.
You cannot embed a dynamic table view into the Description column. However, you can use one of the following approaches:
-
Reference File With Traceability Matrix: You can export the table view “Requirements Coverage” in the document UNEXcreq into a separate CSV, HTML, DOCX, XLSX, or PDF file and reference this file in the object UNEXsss-66.
For example, export the table view to an Excel spreadsheet and reference it using a URL link as follows:
-
Open the document UNEXcreq, select the table view “Requirements Coverage”, and select File->Export->XLSX File from the main menu. In the Export XLSX Options dialog, leave all the default settings and hit OK. In the Select Output XLSX File dialog, select a filename and a shareable location for the exported file (e.g., on Sharepoint).
![Export the Requirements Coverage view for stakeholder requirements from ReqView to Excel Export the Requirements Coverage view for stakeholder requirements from ReqView to Excel]()
-
To reference this document from the object UNEXsss-66, set its description to “The requirements traceability table appears in the separate document <URL link>.” The file is easily accessible through the URL.
![Edit document object description to insert a URL link to an Excel file storing the traceability matrix exported from ReqView Edit document object description to insert a URL link to an Excel file storing the traceability matrix exported from ReqView]()
Please note that you need to generate the exported file again for each baseline of system requirements.
-
-
Attach File With Traceability Matrix: Export the “Requirements Coverage” table view of the document UNEXcreq to a file, as previously detailed, and attach this file to the object UNEXsss-66. The attachment is versioned with the document UNEXsss, however, this requires updating the attachment for each document baseline. The file is easily accessible through the attached file link.
-
Custom Export of Document and Traceability Matrix: You can create a custom export template and export the UNEXsss document to an HTML, DOCX, or PDF file, embedding the traceability matrix in the description of the object UNEXsss-66 during the export process.
This broad and somewhat advanced topic requires some basic programming knowledge; therefore, we will not cover it here. See the documentation page Export Using Custom Templates, which includes examples for creating a traceability matrix. You are also welcome to contact us if you want to learn more about customizing an export of DOCX documents using templates or need more help.
You can clone the result from the GitLab repository ReqView > Starter Guide > UNEXsys ch6_s9_demonstrate_reqs_coverage or download the project folder unexsys-ch6_s9_demonstrate_reqs_coverage.zip.
3. Review Verification Methods:
Up to this point, we set the values of requirement attributes on a per-requirement basis. However, we may have accidentally skipped setting some values. For example, when we defer setting an attribute for specific requirements to a later discussion, which never happens.
One critical area where omissions can endanger successful project completion is verification. Obviously, unverified requirements may not work correctly, or even not at all. Also, missing verification methods will probably result in omissions in the design and implementation of the required test cases and testing setups, which are done based on the verification methods set for each requirement.
ReqView makes it easy to check for missing values by the use of filters and adjusting the table view. Let us demonstrate this on the attribute Verification Method for system requirements in the UNEXsss document:
-
Open the UNEXsss document and create a new table view called “Verification Methods” displaying only columns “ID”, “Description”, and “Verification Method”.
-
To display all system requirements that were not assigned any verification method, set the filter to: Type: Requirement NOT Verification Method.
For this demonstration, we intentionally did not define a verification method for requirements UNEXsss-86, UNEXsss-156, UNEXsss-162, UNEXsss-165, UNEXsss-166, UNEXsss-171 and UNEXsss-79 during the previous phases. The verification method for these requirements is still unset and needs to be completed. Thus, your display will look like this:
![Filter UNEX system requirements without verification method in ReqView Filter UNEX system requirements without verification method in ReqView]()
-
In verification, “Test” is usually the preferred method; every other method should be reviewed and approved. You can easily display all requirements not including “Test” as one of their assigned verification methods. Just set the filter to: Type: Requirement NOT Verification Method: Test.
Please note that this filter will not display requirements with the “Test” set as one of the verification methods. This is intended since the requirement will be tested and thus adheres to the preferred verification method.
You can also easily use this approach for other requirement attributes.
You can clone the project database to explore using the filters from the GitLab repository ReqView > Starter Guide > UNEXsys ch6_s10_review_verification_methods or download the project folder unexsys-ch6_s10_review_verification_methods.zip.
4. Adhere to Safety and Other Regulatory Requirements:
At this phase, we should also ensure that the System Specification document meets regulatory requirements. For example, safety standards, like IEC 60601 (Medical Electrical Equipment – Safety), DO-178C (Software Considerations in Airborne Systems), ISO 26262 (Functional Safety for Road Vehicles) require clear identification and traceability of all requirements that relate to system safety.
We already addressed most of these requirements in the ReqView workflow presented in this tutorial:
- Safety requirements are marked by setting the Requirement Type attribute to “Safety Requirement”. You can quickly display a list of all requirements that are not marked as safety requirements and double check that there are no safety requirements among them by setting a filter in the UNEXsss document to: Type: Requirement NOT Requirement Type: Safety Requirement.
- Backward traceability to stakeholder requirements is in place using satisfaction links.
Some safety standards require that a list of all safety requirements is generated. We can use the same approach presented in Section Demonstrate Requirements Coverage. To demonstrate this approach, we will create in the document UNEXsss the table view “Safety Requirements” and refer to the table view in the description of the object UNEXsss-32 (“3.7: Safety requirements”):
-
Open the UNEXsss document and create a new table view called “Safety Requirements” that displays only columns “ID”, “Requirement Type”, “Description”, and “Links”.
-
Set the filter to: Type: Requirement Requirement Type: Safety Requirement.
-
To apply changes to the table view “Safety Requirements”, right-click Safety Requirements in the Table Views pane and select Confirm Changes from the context menu:
![Filter UNEX system safety requirements in ReqView Filter UNEX system safety requirements in ReqView]()
-
Set the description of the object UNEXsss-32 to:
“Requirements that are safety requirements or requirements that should be treated as safety requirements are clearly marked as such using the 'Safety Requirement' value of the 'Requirement Type' attribute. These requirements appear in their natural place in the document and are not concentrated in this paragraph.”
Should a concentrated list of all safety requirements be required, it can be generated by exporting the contents of the “Safety Requirements” table view.
As mentioned in Section Demonstrate Requirements Coverage, you can also choose to export the table view to a file and refer to it via a URL in the description of the object UNEXsss-32. Or, you can create a custom export template, which generates the table on HTML, DOCX, or PDF export of the UNEXsss document automatically.
In the following chapters, we will also describe how to implement forward traceability for design documents and verification and validation documents.
You can clone the project database to explore using the filters from the GitLab repository _ReqView > Starter Guide > UNEXsys ch6_s11_adhere_to_safety_reqs or download the project folder unexsys-ch6_s11_adhere_to_safety_reqs.zip.
5. Prioritize Requirements
Requirements prioritization, simplification, and elimination are crucial for effective, on-time, and on-budget system development. By removing or simplifying low-value and/or conflicting requirements, you can prevent spending on expensive development and testing resources for features that are not required, reduce the risk of schedule and budget runaway, and straighten your risk management program.
There are many techniques for doing requirements prioritization, simplification, and elimination, like Quality Function Deployment (QFD), MoSCoW (Must have, Should have, Could have, Won't have), Analytical Hierarchy Process (AHP), Risk Assessment and many others. Selecting the appropriate technique (or techniques) for your project is outside the scope of this tutorial.
Regardless of the techniques chosen, ReqView provides great help in this process. It enables you to focus on the candidates for this process: requirements that are risky, complex, expensive to implement, or that look ambiguous or over-specified. Just use the attributes Priority, Expected Compliance, Difficulty, and TBD/TBR to spot requirements that are, or might be, problematic and, thus, should be subject to discussion during the requirements prioritizing process. For example:
-
Requirements with Priority set to Low (or sometimes even Medium) may be candidates for deletion/simplifications.
-
Requirements with Expected Compliance set to Partial Comply or Non-Compliant or with Difficulty set to Difficult or Very Difficult signal potential complications and/or verification problems and have to be looked at.
-
Requirements with TBD/TBR set may signal poorly defined requirements that may be candidates for simplification.
You can easily filter the UNEXsss document to flag out the candidate requirements.
For our UNEX project, at least requirements UNEXsss-71 (“The robot shall withstand water pH level of at least 3. There is a design goal of withstanding pH level of 1.5, with a decision to be made at the robot design review, based on complexity and price.”) and UNEXsss-97 (“The robot shall be capable of constant communication with a base station during the mission while the robot is up to 500 meters underwater.”) should be examined for removal or simplification.
Because demonstrating the whole prioritization process is outside the scope of our tutorial, we left the UNEXsss document unchanged.
Finalize System Specification Document
There are a few empty sections of the System Specification document left that we need to complete for the System Requirements Review:
- Complete the section “1. Scope”
- Complete the section “2. Referenced documents”
- Fill empty document sections
- Delete unused document objects
- Add all required appendices
Let us walk over these tasks.
1. Complete Section “1. Scope”:
Describe the scope of our system in the section “1. Scope” :
- In “1.1 Identification”, identify the system to which the document applies.
- In “1.2 System overview”, state the purpose of the system to which the document applies.
- In “1.3 Document overview”, summarize the purpose and contents of the System Specification document.
To get immediate help about the expected contents of each section, use the Instructions pane, which is available on the right side of the ReqView screen.
For our UNEX project, open the UNEXsss document and update description of the document objects UNEXsss-4, UNEXsss-6, and UNEXsss-8 as illustrated by the following screenshot:
2. Complete Section “2. Referenced documents”:
In the section “2. Referenced documents”, reference all upper-level documents addressed by the System Specification document. These can be the Stakeholder Requirements Specification documents, design documents, test plans, quality plans, or standards the system must adhere to.
You can also reference documents not required for the project development, such as prior designs and/or experience, preliminary research, or feasibility test results. We advise dividing the mandatory and other documents into two separate sub-sections. For each listed document reference, include the document title, number, revision, and date of publication.
For our UNEX project, select the section “2. Referenced documents”, then create the sub-sections UNEXsss-195 (“2.1 Mandatory referenced documents”) and UNEXsss-198 (“2.2: Other referenced documents”). Add document references UNEXsss-196, UNEXsss-197 and UNEXsss-199 as illustrated by the following screenshot:
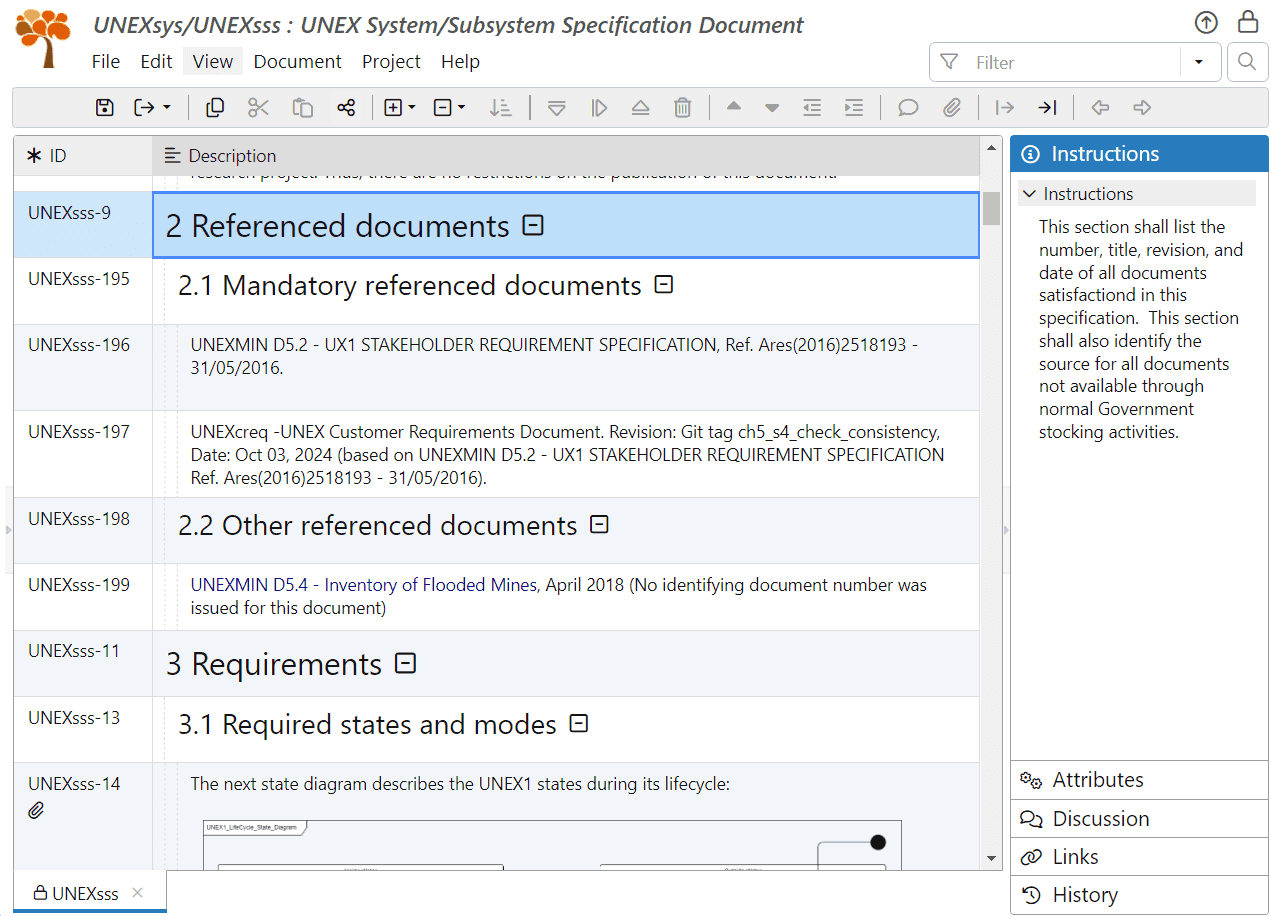
We referenced the ReqView document UNEXcreq because it is the basis for the UNEXsss document. We used the document ID (UNEXcreq) as the document number and the Git tag (ch5_s4_check_consistency) as the revision.
We also decided to reference the original document UNEXMIN D5.2 - UX1 STAKEHOLDER REQUIREMENT SPECIFICATION.pdf imported into ReqView (see Section Import Stakeholder Requirements to ReqView of Chapter 5) because it is the obligatory document, no matter how close is the ReqView document UNEXcreq to the original document. However, referencing only the ReqView document UNEXcreq will also suffice.
3. Fill Empty Document Sections:
Because we created the System Specification document from a general-purpose SSS-DID template based on the MIL-STD-498 standard, some sections contain an empty document object without any requirement or other descriptive text. That happens when the system, at least at the current abstraction level, contains no content related to the sub-section topic.
For example, see the object UNEXsss-33 (“3.8: Security and privacy requirements”), which is empty because we have not specified any security and privacy requirements. Another example is the object UNEXsss-21 (“3.3.1: Interface identification and diagram”) and UNEXsss-22.
The best practice and an explicit MIL-STD-498 requirement is not to delete any empty document subsection. The rationale behind leaving all document subsections in place is to clarify what topics are not (yet) covered by the document, making it easier to assess, for example during a review, whether the omission is legitimate or the missing section should be completed.
We will place a short explanatory statement, such as “There are currently no system requirements under this sub-section” for all such empty subsections. The text might be a bit different depending on the topic of the section. One might ask why a generic text was not filled in the document template to save us this work. The main reason is that the existence of such a text may be misleading at earlier stages. The system engineer might think mistakenly that this section was already thought about and filled. When we fill it manually, we will hopefully do a second (and last) check to see whether the section should stay empty.
For our UNEX project, fill the empty document sections UNEXsss-22, 28, 30, 34, 40, 42, 44, 46, 48, 52, 54, 58, 64, 68, and 70.
4. Delete Unused Document Objects:
There may also be unused objects located in non-empty sections, which were part of the document template, but we did not fill them because we created other objects instead. For example see the objects UNEXsss-2, UNEXsss-38, or UNEXsss-56.
Other unused objects are repeatable section headers, for which we created sibling project-specific section headers, for example, the objects UNEXsss-17 (“3.2.x (System capability)”) or UNEXsss-23.
All these unused objects are now surplus, and we should delete them. To permanently delete all unused objects in the UNEXsss document:
- For each unused object, select Edit->Delete Objects from the main menu (or click the on the toolbar, or press CtrlDel) to mark it as deleted. The text of deleted objects is displayed as a strikethrough.
- Finally, select Edit->Purge Objects->Purge All to permanently remove from the UNEXsss document all objects marked as deleted.
5. Add Required Appendices:
You can add any required appendixes under section “7. Appendixes”.
We did not need to add any appendix in the document UNEXsss.
You can clone the current project database to explore using the filters from the GitLab repository _ReqView > Starter Guide > UNEXsys ch6_s12_finalize_sss or download the project folder unexsys-ch6_s12_finalize_sss.zip.
Create Baseline of System Specification Document
The System Specification document is complete now. There is only one more mandatory step before the System Requirements Review: freezing the current system requirements by creating a baseline of the System Specification document.
This step is essential because the System Specification document is live, and changes in its contents are inevitable. Some changes can result from the System Requirements Review, others from the design phase, or from new stakeholder requirements coming during development (which happens often despite being definitely unrecommended).
We will create a baseline of the System Specification document by tagging the current document revision in the Version Control System (VCS). The VCS tag serves as the version number of the System Specification document, so you should use a clear and descriptive tag name like “V1_0_SSS_version_for_SRR”. Having a clear tag for each document version will enable us to compare changes between the document versions.
With ReqView, you can easily create a baseline of the UNEXsss project in Git:
-
Select File->Git->Commit from the main menu to commit all project changes into Git before creating the project baseline.
If there are uncommitted changes, ReqView will display the Commit Changes dialog. In this dialog, you can see the changed project files. Enter a commit message and press OK.
-
Select File->Git->History from the main menu to open the Git History dialog:
![Display the Git history for the UNEX project in ReqView Display the Git history for the UNEX project in ReqView]()
The dialog displays a list of the last Git commits, including the commit message, author, date, and the Git hash. If a commit is tagged, the tag name is included as well.
-
To create a tag for the current project revision, right-click the most recent commit displayed at top of the list in the Git History dialog, and select Create Tag from the context menu.
Enter the tag name in the Create Tag dialog and hit OK. You will see the created tag in the Git History dialog.
Note that ReqView pushes the created tag to the Git repository automatically.
-
Finally, click or press Esc to close the Git History dialog.
Publish System Specification Document
Typically, the System Requirements Review requires pre-publishing the System Specification document in a printable/viewable format (like PDF or DOCX) for all participants, regardless of their ReqView access.
To support this, as well as other needs, you can export ReqView documents in various predefined file formats:
- MS Word DOCX
- MS Excel XLSX
- HTML
- CSV
You can also create a custom export template to customize the export of a ReqView document in these file formats or to generate files in another structured text format (such as XML or JSON) that suits your specific needs for data layout and visual style.
Export MS Word DOCX Files:
The DOCX format best suits most publishing use cases. It preserves rich text formatting appearing in ReqView attributes, includes image attachments, and allows easy customization of page layout. You can open the DOCX file in MS Word for review, printing, digital signing, or conversion to the PDF format.
To export the UNEXsss document to a DOCX file, select File->Export->DOCX File from the main menu. In the Export DOCX dialog, you can choose several export options:
- Word Template: Select the Word template to use as the base for the output file. You can choose between the default Word template or provide a custom Word template (.docx or .dotx file) that defines a document title page, headers, and footers fitting your company standards.
- Layout: select Book layout (a “regular” document format), Table layout, or Custom layout using a customized HTML template file you provide.
See Export Documents to DOCX documentation page to learn about all available DOCX export options.
See Export Using Custom Templates > Export HTML Format > HTML for DOCX Export documentation page for more information on how to create HTML templates used for the Custom layout option.
Export MS Excel XLSX Files:
The XLSX format does not preserve rich text formatting or image attachments. On the other hand, it preserves the table layout of ReqView table views. Therefore, it is the easiest option for publishing a filtered list of requirements or a traceability matrix. Recall that we have used this export option in Section Complete System Requirements.
To export the UNEXsss document to an XLSX file, select File->Export->XLSX File from the main menu. In the Export XLSX dialog, select the desired export options.
See Export Documents to XLSX documentation page to learn about all available XLSX export options.
Export HTML Files:
The HTML format provides the easiest way to preview ReqView documents in a table layout, preserving rich text format and attachments. Compared to MS Word format, it also supports easy browsing of traceability links between different files by clicking on link URLs.
To export the UNEXsss document to an HTML file, select File->Export->HTML File from the main menu. In the Export HTML dialog, select the Modern Report, Book or Table layout, and other export options.
See Export Documents to HTML documentation page to learn about all available export options.
You can also fully customize the layout and styling of exported HTML files; see Export Files Using Custom Templates below.
Export PDF Files:
The PDF file format provides options similar to those of the DOCX format. However, customization of page layout for PDF files is more difficult because it needs to be defined in the HTML export template using paged media CSS properties. Use this option if your stakeholders prefer getting PDF files to save the step of exporting the PDF file from MS Word.
To export the UNEXsss document to a PDF file, select File->Export->PDF File from the main menu. In the Export PDF dialog, select the Book or Custom layout using a selected HTML export template file and other export options.
See Export Documents to PDF documentation page to learn about all available export options.
Export CSV Files:
The CSV file format does not support rich text or attachments. However, it has a unique role because it allows the import and update of plain text attribute values. You can use the CSV format to make mass changes to some attributes or to integrate ReqView with other tools, for instance:
- Open a CSV file storing requirements in Excel or another spreadsheet, enter a text comment into a dedicated column, and finally import to ReqView the updated CSV file to set the comments to the corresponding attribute.
- Import a CSV file with requirements into a test management tool and import back to ReqView a CSV file storing the requirements verification status.
- Process a CSV file, storing a traceability matrix efficiently with a custom script.
To export the UNEXsss document to a CSV file, select File->Export->CSV File from the main menu. The CSV file will contain all attributes and link types as columns.
See Export Requirements to CSV and Import and Update Requirements From MS Excel documentation pages to learn more about CSV round trip.
Export Files Using Custom Templates:
There are cases when ReqView broad support of exporting documents might not be enough. For instance, if you need to customize layout and styling using the HTML file format entirely or if you need to export a specific structured text file format (e.g., XML or JSON) processed by other tools.
Through custom templates, you have access to the ReqView data model. You can iterate through all documents in a project, through all the objects in a document, through all the attributes of a document object, over all its links, walk over the traceability links to arbitrary depth, and so on.
To export the UNEXsss document to a text file, select File->Export->Custom Template from the main menu. In the Export Using Custom Template dialog, choose a custom template file in the Template file field.
The flexibility of the custom templates does not come without some learning curve. A detailed explanation of how to write a custom export template for the UNEXsss document is beyond the scope of this chapter. However, the documentation page Export Using Custom Templates provides excellent and detailed instructions. At the end of this page, you can also freely download example templates.
Export Configurations:
While ReqView provides numerous export methods, this flexibility adds overhead for users, who must select output formats, export options, and provide template details (names and locations) for custom exports.
ReqView Export Configurations solves this problem and offers a simple way to export documents using just a few clicks. This feature allows you to set up all the details of an export configuration, to name it and enter its description, and to save the configuration in the project. Any user can then reuse the configuration to export documents easily without the need to specify, or even know, the configuration details.
To define a new export configuration or manage/modify existing export configurations, select File->Export->Configurations->Manage Export Configurations from the main menu. In the Manage Export Configurations dialog, you can see a list of all available export configurations. Click Edit to enable creating or modifying export configurations:
-
To add a new configuration, select the desired export format in the Format field, enter a clear and descriptive name in the Configuration name, and briefly describe the purpose of the configuration in the Configuration description field. Then click on the right of the entry fields.
The Create Export Configuration dialog appears and displays options depending on the selected output format. Fill in all the required information (layout, templates, and other options) and hit Add. The project now defines the export configuration; other users can reuse it.
-
To modify a configuration, click on the right of the configuration and then select Edit from the popup menu. Then, update the configuration in the Edit Export Configuration dialog.
-
To delete a configuration, click on the right of the configuration and then select Remove from the popup menu.
Exporting documents using a predefined export configuration is easy: click on the toolbar (or File->Export->Configurations from the main menu), then select the configuration from the popup and choose the desired target location for the exported file(s).
We will demonstrate how to use export configurations to generate an Excel file documenting the requirements traceability, which we described in Section Demonstrate Requirements Coverage. You should export the traceability matrix for every baseline of the System Specification document, which may change upstream requirements traceability.
To make the generation of the Excel file easier for all users, we will define the export configuration “Export UNEXcreq Traceability to XLSX” as follows:
-
Open the UNEXcreq document and select the Requirements Coverage table view.
-
Select File->Export->Configurations->Manage Export Configurations from the main menu.
-
The Manage Export Configurations dialog shows a list of all the export configurations defined for the project. Currently, the list is empty.
-
Click Edit to enable editing of export configurations. In the new line generated for the new export configuration, select XLSX as the Format, enter “Export UNEXcreq Traceability to XLSX” as the Name and “Export the UNEXcreq requirements traceability matrix to an XLSX file” as the Description. Your dialog box will look like this:
![Manage export configurations in ReqView Manage export configurations in ReqView]()
Click the icon on the right of the entry fields.
-
In the Create XLSX Export Configuration dialog, check the Persist Document Selection checkbox (this will ensure that this export configuration will always use the document UNEXcreq for export regardless of the current document), and select “Requirements Coverage” as the Table View. Leave all other options unchecked, and your dialog will look like this:
![Edit export configuration in ReqView Edit export configuration in ReqView]()
Hit OK to close the Create XLSX Export Configuration dialog.
-
In the Manage Export Configurations dialog, hit OK to close the dialog. You have just created your export configuration.
Using this export configuration to generate an XLSX file is a breeze. You do not even need to open the exported documents. Just click on the toolbar and select Export UNEXcreq Traceability to XLSX from the menu:
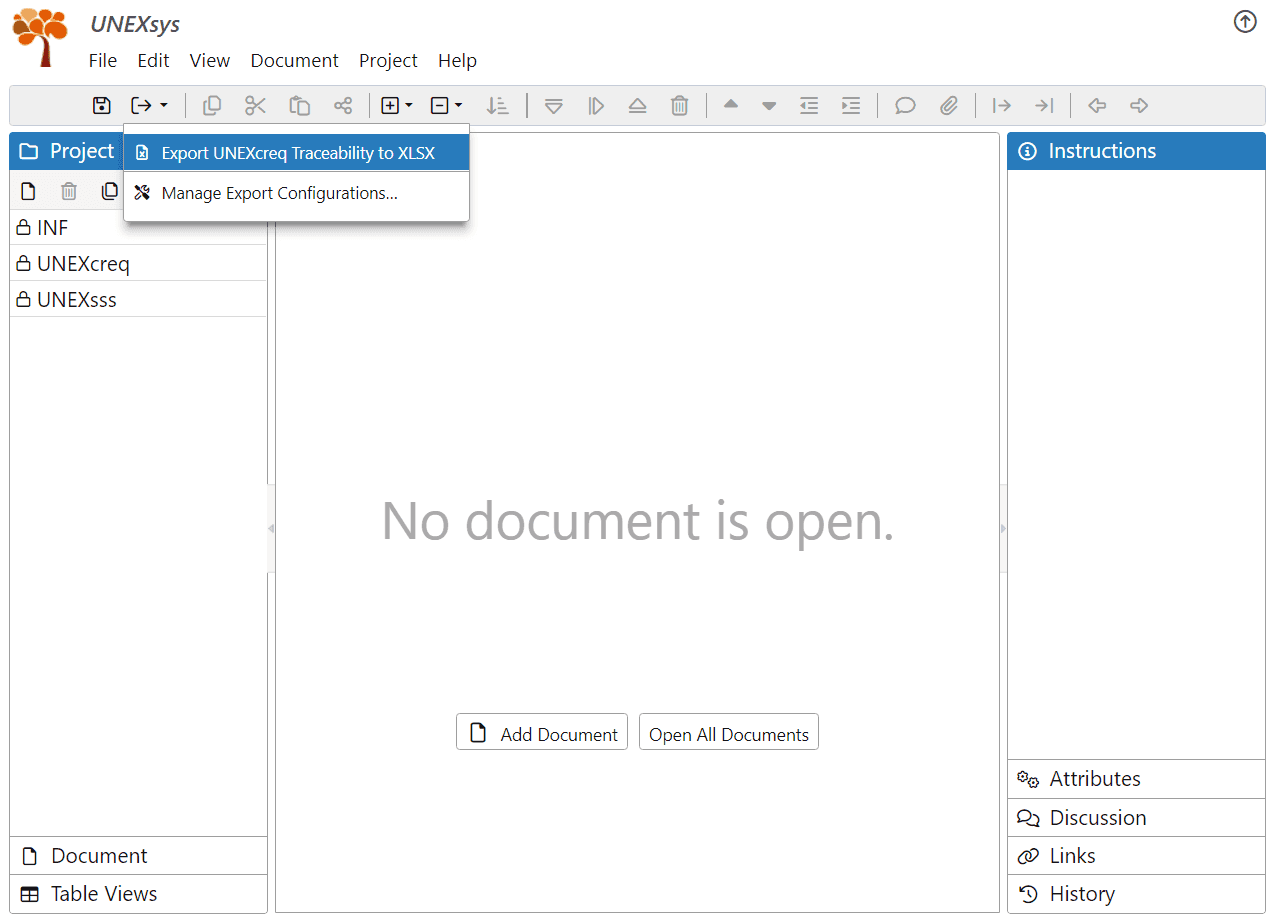
Finally, choose the filename and location of the output file in the Select Output XLSX File dialog and hit Export. That's it!
See the Export Configuration documentation page to learn more.
You can clone the current project database to explore using the filters from the GitLab repository _ReqView > Starter Guide > UNEXsys ch6_s13_create_export_config or download the project folder ch6_s13_create_export_config.zip.
