Stakeholder Requirements Specification
In this chapter, we cover the phase of documenting stakeholder requirements. We will demonstrate how to import stakeholder requirements for the UNEX project and process them as a verifiable base for system requirements.
Avy Strominger
Project Initiation Documents
Every project starts with some form of project initiation documents — Customer Requirements (CR), Top-level/High-level Requirements (TLR/HLR), Stakeholder Requirements Specification (StRS), Product Requirements Document (PRD), Request for Information (RFI), Request for Proposal (RFP), Business Needs, User Needs, etc.
In addition, these documents may also include standards, quality assurance methodologies, and program management practices that the project must follow.
The main goal of project initiation documents is to describe product requirements from the stakeholders' point of view. A stakeholder can be external (e.g. an end user, a customer, an investor, or a regulatory agency) or internal (e.g. the Product Manager, the Marketing Manager, or IT).
These documents come in a variety of sizes, complexity, and completeness. For some projects, a Top Level Requirements document may be only a few pages long. For others, like complex or safety-critical products in automotive, aerospace & defense, railway, and medical devices industries, they usually tend to be large. Some industry standards have even several hundreds of pages.
Because these documents are written by different stakeholders in diverse formats, their contents may be incomplete, inconsistent, and include uneven levels of detail and uniformity. Yet, these documents serve as the root requirements of the project.
The first use of the project initiation documents is to determine an initial estimate for the project size and structure and to decide on methodologies and documentation supporting the development. Project size, nature, engineering disciplines, risks, company expertise and practices, and customer-specific requirements or constraints influence these decisions.
In our tutorial, we will use the document “UNEXMIN D5.2 - UX1 STAKEHOLDER REQUIREMENT SPECIFICATION” available in PDF format at the UNEXMIN Public Deliverables page as the project initiation document.
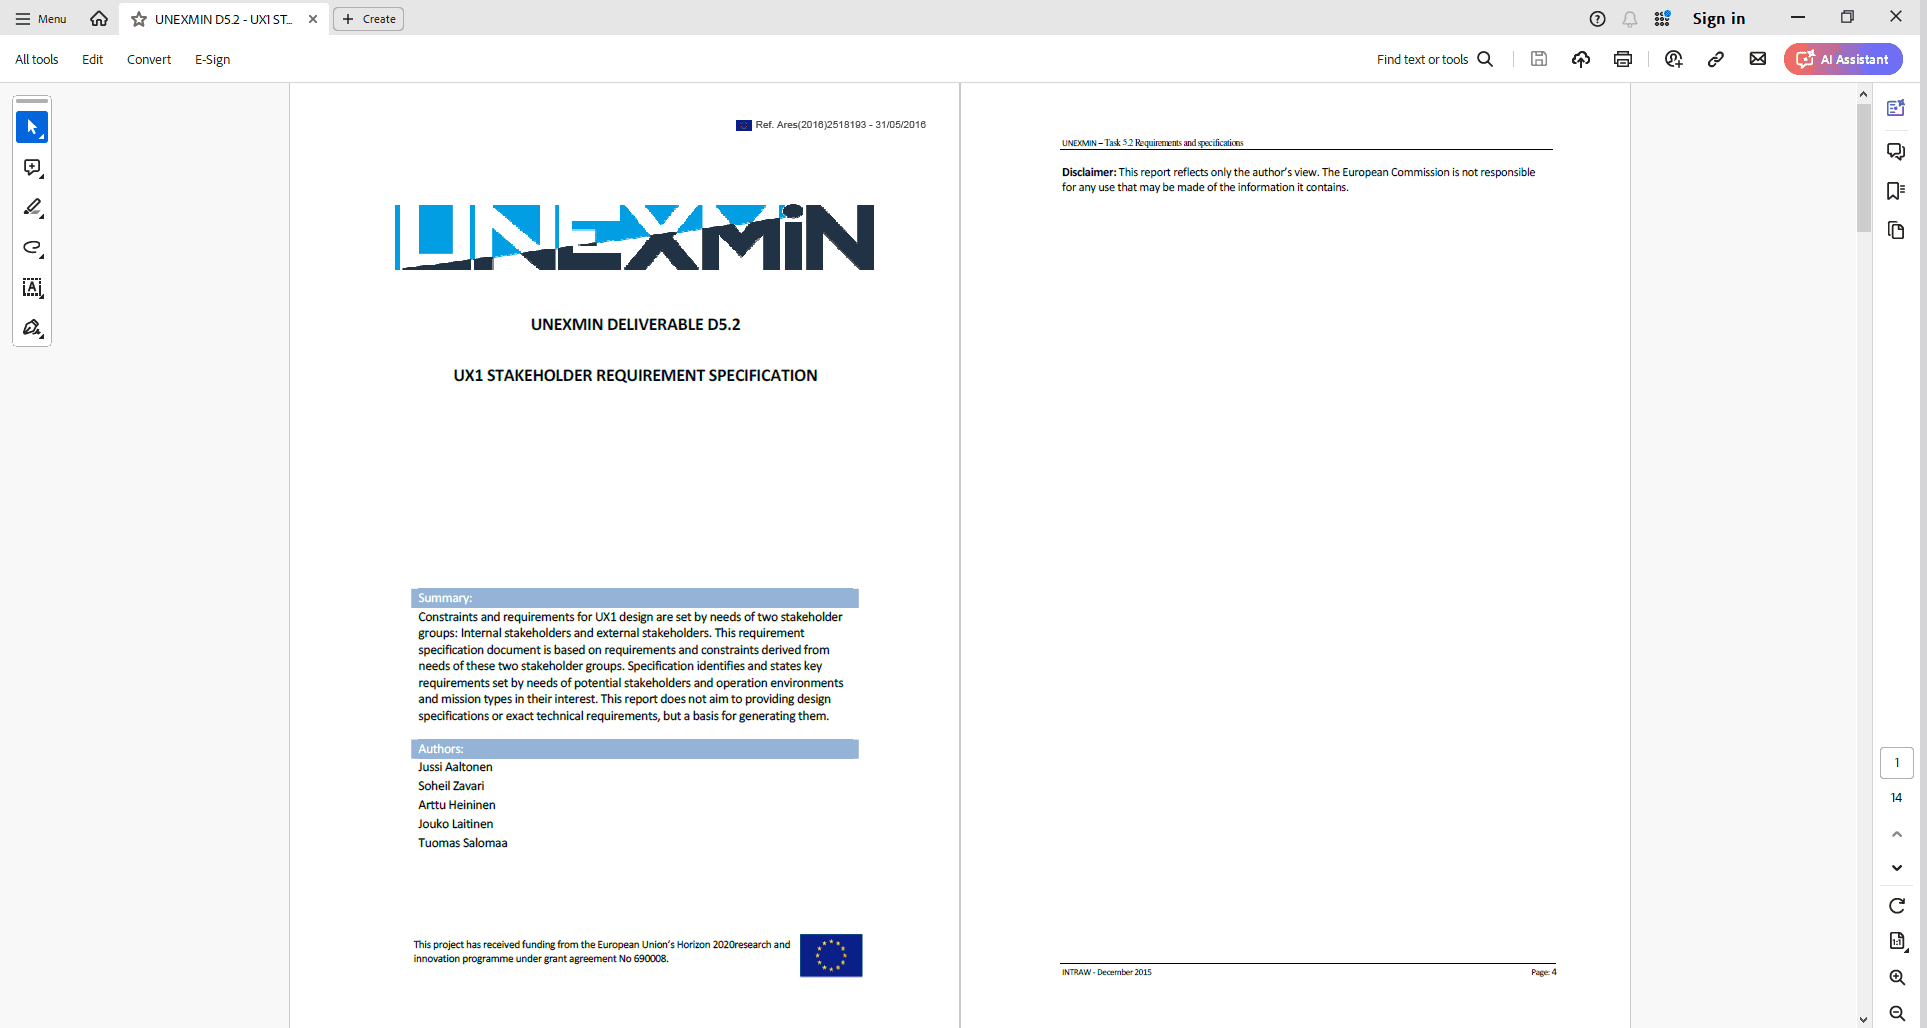
You can download the file UNEXMIN D5.2 - UX1 STAKEHOLDER REQUIREMENT SPECIFICATION.pdf also from our project library at GitLab.
Initial analysis of the UNEXMIN stakeholder document reveals that the UNEXMIN project is a multi-disciplinary project, which will consist of mechanics, electronics, software, and support systems. Each subsystem will require its own specification, design, and testing documents, and will be developed by different teams. Thus, we will use a hierarchical project approach for developing the UNEXMIN system, using different ReqView projects for each subsystem and linking them according to the project hierarchy.
The top-level ReqView project in the UNEXMIN project hierarchy will be named UNEXsys. This project will store all system-level documents (stakeholder requirements document, system requirements document, system design document, system test plan, etc.). We will call the whole project tree UNEX.
In the next Sections, we will describe how to:
- Create a ReqView project for the system-level documents.
- Import stakeholder requirements into the ReqView project.
- Clean up and refine the imported stakeholder requirements in ReqView.
- Process and manage stakeholder requirements.
This will later enable us to check the compliance of the project requirements and design to the stakeholder requirements. It can also help us to check the consistency and completeness of stakeholder requirements.
Create ReqView Project for System-level Documents
Let us create a ReqView project UNEXsys to store the system-level documents for our tutorial. Creating and initializing a new ReqView project has three steps, which need to be performed once per project, usually done by the Chief Systems Engineer, and takes about 10 minutes to complete.
The general layout of the procedure was explained in detail in Section Create Project Storing Document Templates of this tutorial. Here we need to use a small variant of that procedure.
1. Create Global Git Repository:
Log in to GitLab and create an empty global Git Repository UNEXsys. Its URL will look like https://gitlab.com/<GitLab-name-space>/UNEXsys.git.
2. Clone Git Repository Locally:
To create a local clone of the global Git repository for the UNEXsys project:
-
In the Local Workspace, create a new empty directory named “UNEX”. This directory will contain all the ReqView local project directories for the UNEX project.
-
In the new directory UNEX just created, create a sub-directory named “UNEXsys”.
-
In ReqView, select File->Git->Clone Repository in ReqView to clone the Git repository UNEXsys into the directory UNEX/UNEXsys.
3. Initialize Git Repository:
This time, we will clone the project template PROJECT.reqw stored in the Templates Area, see Section Customize Traceability Links.
To create the UNEXsys project, take the following steps:
-
In ReqView, select Project->Create Project to create a new project. In the Create Project dialog, choose Clone Project, enter “UNEXsys” in the Project ID, and “UNEX system project” in the Project description edit box, and hit OK.
-
In the Select Cloned ReqView Project dialog select the project template PROJECT.reqw and then hit Clone Project.
-
ReqView will open the newly created UNEXsys project. Select File->Save and choose the UNEXsys directory storing the local Git repository created in Step 2 above and hit Save.
-
In the Commit Changes dialog, fill in an appropriate comment, like “Creation of the UNEXsys project”, and hit OK to commit and push the changes to the global Git repository.
Import Stakeholder Requirements to ReqView
We can import stakeholder requirements into ReqView similarly to the way we imported the SSS-DID template, see Section Create Document Template for System Requirements in Chapter 4:
- Prepare the DOCX file for import using MS Word.
- Save the DOCX file as HTML content.
- Import the HTML contents to a new ReqView document.
- Clean up the stakeholder requirements in ReqView.
There are just some minor differences. Let us describe each step in detail.
1. Prepare DOCX File for Import:
Open the file UNEXMIN D5.2 - UX1 STAKEHOLDER REQUIREMENT SPECIFICATION.pdf in MS Word and then do the following edits:
-
Remove the page headers and footers from all 3 document sections.
-
Removed the Table of Contents (on page 2) and the List of Tables (on page 3).
-
On the first page, remove all white space and some headings, and change the style of paragraphs to “Normal”.
-
The “Heading 1” style in this document defines white characters on a light blue background. Change the font color for this style to black.
-
All top-level section headings in the document are in tables and do not use the “Heading 1” style. We need to convert the tables into text in “Heading 1” style as follows:
- Select the table rows for “1. Introduction”, “2. Environmental constraints and considerations”, “3. Requirements for robot characteristics”, and “4. Test site characteristics”.
- On the Table Tools Layout contextual tab, click Convert to Text.
- In the Convert to Text dialog, leave the default option Tabs in the Separate text with section selected, and click OK.
- Set the paragraph style to “Heading 1”.
- Remove section numbers “1”, “2”, “3”, and “4” manually.
-
All section headings at level 2 have the right paragraph style “Heading 2” therefore only remove their section numbers manually.
-
Each paragraph in sections 2 and 3 is numbered. These paragraphs describe mainly requirements, however the numbers are not unique. Delete these numbers because ReqView will assign requirements new unique identifiers automatically.
Note: If you set automatic Word numbering for a list of paragraphs describing requirements then the whole list will be imported as one ReqView document object. This is not appropriate since each paragraph represents a distinct requirement.
-
Select all bullet lists, click Home->Bullets, and remove extra bullet character.
-
The tables in section 4 need some special treatment because of the following reasons:
- They contain entries describing mine characteristics that we would like to later reference as distinct ReqView objects. When importing a table, the whole table will get a single unique ID.
- They have images and text embedded in table entries which ReqView does not currently support.
- They use table rows as headings.
- They have inconsistent structure, using a two-column table structure just for the compactness of the table.
To prepare the contents of the tables in section 4 for ReqView's use while still preserving maximum structure resemblance to the original document, we will take the following approach:
- Split the tables into hierarchical paragraph structure. To do that, select each row of the table heading (i.e. “SITE LOCATION”, “LOCAL GENERAL FACILITIES” and “TEST SITE CHARACTERIZATION”) and convert the row to text. Then, make each converted row a “Heading 3” paragraph. Repeat this procedure for the “REGIONAL” and “LOCAL” table headings, this time making them “Heading 4” paragraphs.
- Move the six maps and their descriptive line ("Regional Map"/"Local Map") before the corresponding tables. To do this, add two lines after each “REGIONAL” and “LOCAL” headings just created, drag the map to the first line, and move (select and drag) the descriptive line to the second line. Delete the third, now empty, column of the table.
- Convert the tables under the “TEST SITE CHARACTERIZATION” paragraphs into text. Each cell will become a paragraph. When imported, it will get a unique ID in ReqView and thus can be referenced as a requirement if needed.
While this looks like a lot of work, it took only about one and a half hours to complete. You can see the result in the file UNEXMIN D5.2 - UX1 STAKEHOLDER REQUIREMENT SPECIFICATION.docx.
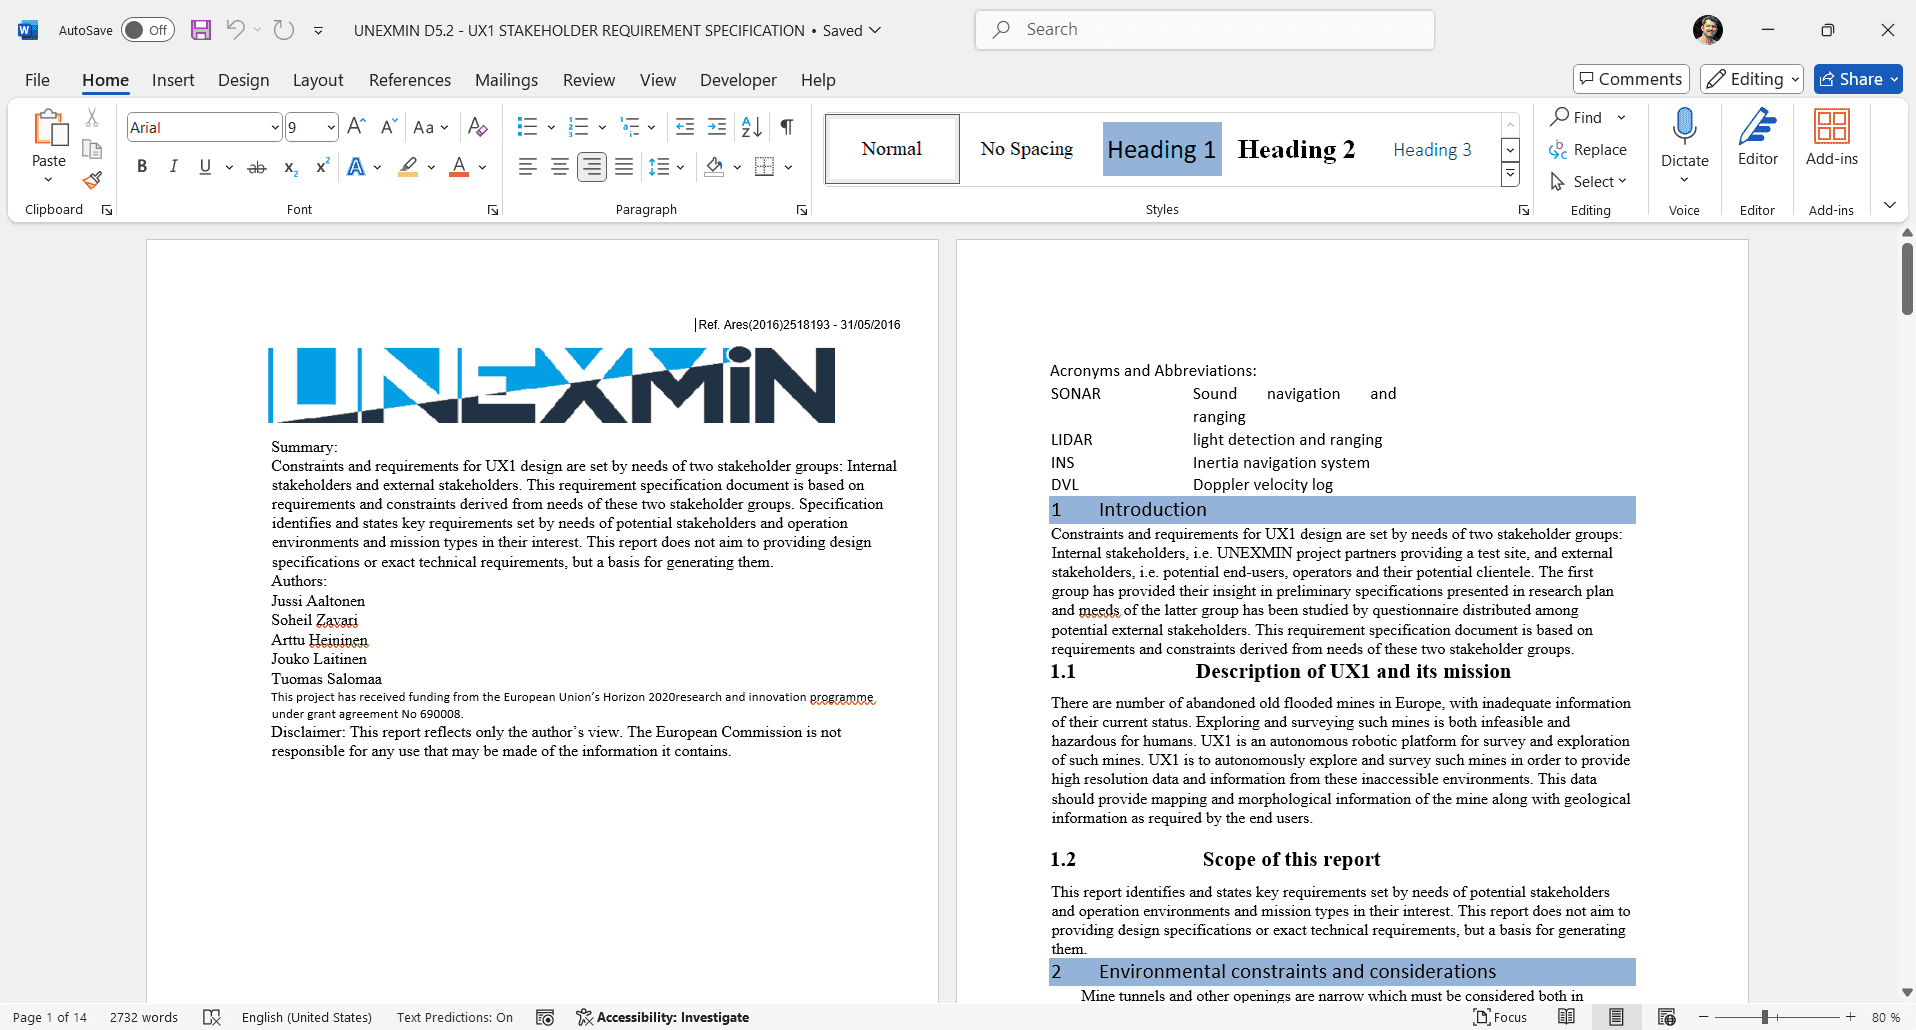
2. Save Filtered HTML File:
This is done in the same way as described in Section Create Document Template for System Requirements of Chapter 4.
The source file has images. Thus, the save will result in two artifacts: the file UNEXMIN D5.2 - UX1 STAKEHOLDER REQUIREMENT SPECIFICATION.htm, and the directory UNEXMIN D5.2 - UX1 STAKEHOLDER REQUIREMENT SPECIFICATION_files, containing the source file images. You will need both artifacts for import into ReqView.
You can download the file import-artifacts-main-stakeholder-requirements.zip with all artifacts for importing stakeholder requirements.
3. Import HTML File to ReqView:
Creating a ReqView document and importing the .htm file into it is described in Section Create Document Template for System Requirements of Chapter 4.
We will carry out the same procedure with several modifications:
- Open ReqView project UNEXsys.
- Set the name of the new document to UNEXcreq (“creq” stands for “Customer REQuirements”).
- Base the new document on the custom document template BARE-TEMPLATE.reqw created in Section Create Bare Document Template of Chapter 4 and stored in the Templates Area. We use the BARE-TEMPLATE and not the SSS-DID template since we want to preserve the structure of imported stakeholder requirements.
- Import file UNEXMIN D5.2 - UX1 STAKEHOLDER REQUIREMENT SPECIFICATION.htm after the object UNEXcreq-1 in the ReqView document UNEXcreq. Note: for the “image files”, select all the images in the directory “UNEXMIN D5.2 - UX1 STAKEHOLDER REQUIREMENT SPECIFICATION_files”.
You have just completed the import! Your ReqView screen will look like this:
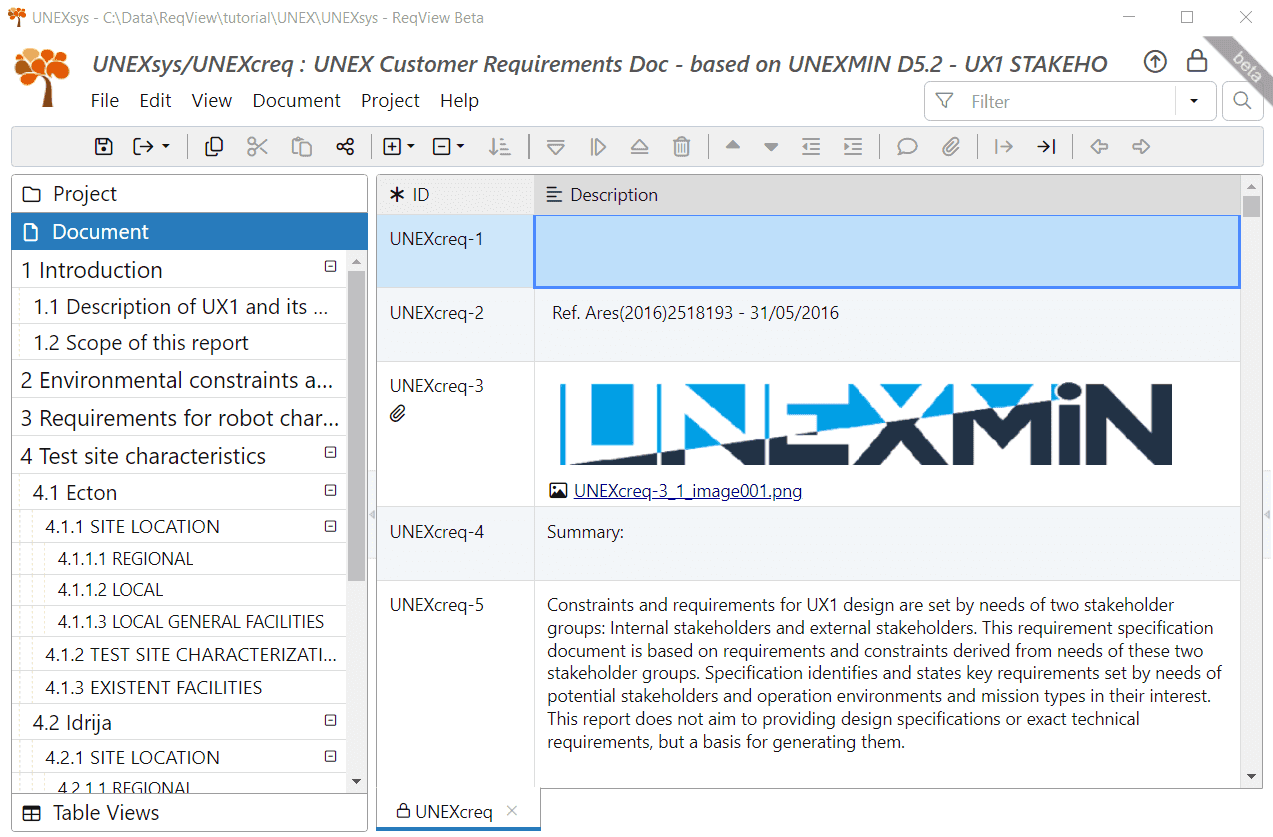
You can clone the result from the GitLab repository ReqView > Starter Guide > UNEXsys ch5_s1_import_html or download the project folder unexsys-ch5_s1_import_html.zip.
4. Cleanup Stakeholder Requirements in ReqView:
The import process is usually doing a good job, however, some minor refinements need to be done in ReqView after import to make the imported document even better.
As an example, we will clean up and refine the imported document as follows:
-
Delete the UNEXcreq-1 object, a leftover from the document before the import. To do this, mark the object as deleted by selecting Edit->Delete Objects from the main menu.
-
Make the text “Summary” in UNEXcreq-4 and “Authors” in UNEXcreq-6 bold, since it is a heading of the next paragraph. One could also make it a heading, but this would change the section numbers, and we would like to refrain from that on a customer document.
-
Merge objects from UNEXcreq-6 to UNEXcreq-11, and objects from UNEXcreq-139 to UNEXcreq-140 by selecting merged objects and selecting Edit->Merge Objects from the main menu. You may choose also to merge objects UNEXcreq-4 to UNEXcreq-5.
-
The import action had an unintended effect — objects UNEXcreq-60, UNEXcreq-63, UNEXcreq-102, UNEXcreq-105, UNEXcreq-146, and UNEXcreq-149 contains a figure caption of the previous (map) object in the first line. Move the figure caption to a new object before the corresponding figure:
- Double click the text description of UNEXcreq-60 and cut the first line of it (i.e., “Regional Map”).
- When UNEXcreq-60 is still focused, select Edit->Add Object->Add Above from the main menu to create a new object UNEXcreq-184 above UNEXcreq-60.
- Double click on the text description of UNEXcreq-184, paste the line you have cut, and add the site name before it (i.e., “Acton Regional Map”).
- Set the Type attribute of UNEXcreq-184 to Figure Caption. Select View->Show Columns to display the column Type if it is not visible.
- Repeat these steps for objects UNEXcreq-63, UNEXcreq-102, UNEXcreq-105, UNEXcreq-146 and UNEXcreq-149.
-
Permanently remove all deleted objects by selecting Edit->Purge Objects->Purge All.
-
Save and commit your change to the Git repository. Select File->Save and then select File->Git->Commit from the main menu. In the Commit Changes dialog, enter a commit log message “Cleanup and refine the imported document UNEXcreq”, and hit OK.
There might be additional refinements that you may think about, but the above refinements demonstrate the typical changes needed after import. The process is straightforward – all changes described here take about 15 minutes!
You can clone the result from the GitLab repository ReqView > Starter Guide > UNEXsys ch5_s2_cleanup_after_import or download the project folder unexsys-ch5_s2_cleanup_after_import.zip.
Annotate Stakeholder Requirements
The main goal of this step is to enable checking the consistency and completeness of the stakeholder requirements and compliance of derived project requirements and design to the stakeholder requirements.
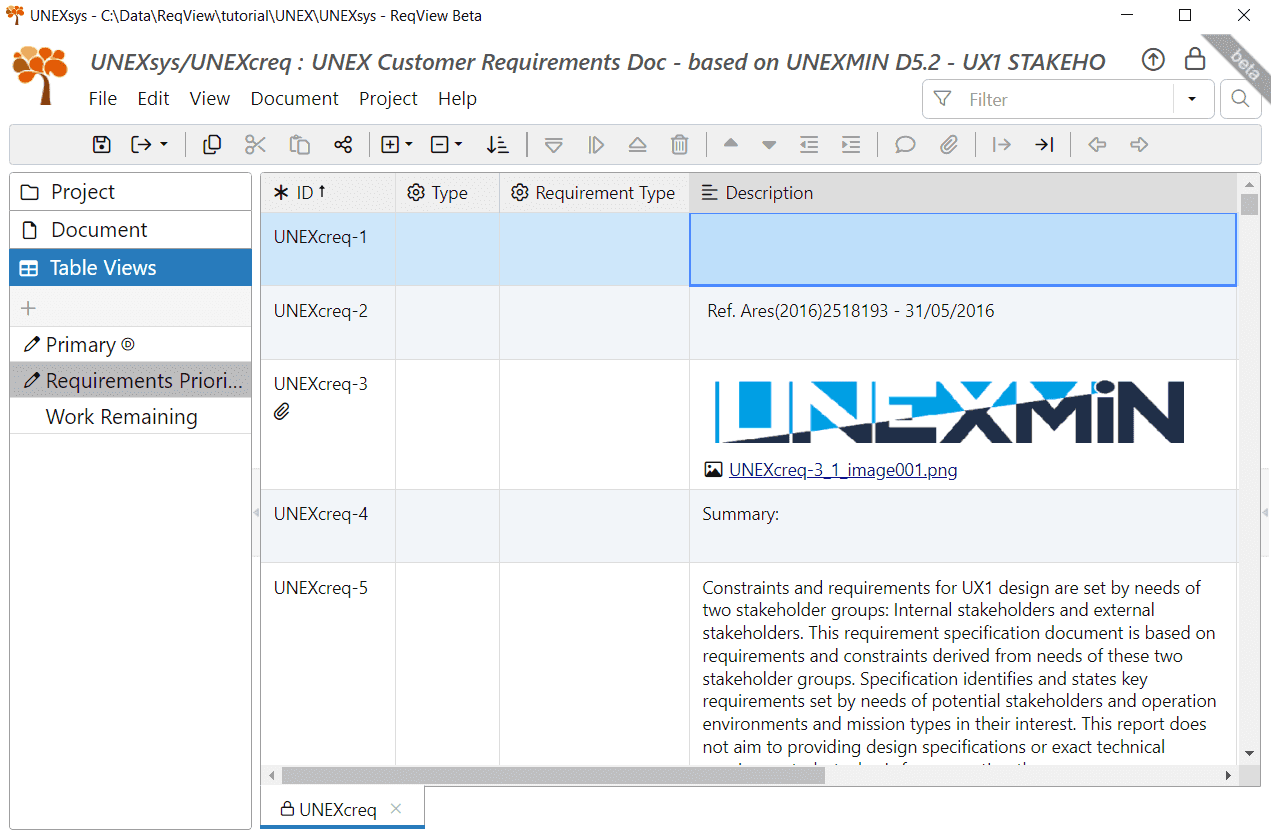
To accomplish this goal, we need to identify the requirements among all the objects of the imported stakeholder document and annotate each requirement with the custom attributes Type and Requirement Type defined in the document template created in Section Create Bare Document Template of Chapter 4. To display these attributes, click View->Left Panes->Table Views Pane and then select the Requirements Prioritization Table View, that we defined in the same document template. Your screen will look like this:
When requirements in the document are described using consistent language patterns, we can use ReqView to help identify requirements: filter possible requirements using keywords (e.g., “must”, “shall” or “should”), scan the result to select actual requirements objects, and set the attribute Type for all selected objects at once.
Unfortunately, this is not the case now. Requirements written by the stakeholders might not meet the criteria for good requirements. The INCOSE Guide to Writing Requirements describes 41 rules for need and requirement statements making a gold standard for writing requirements. The 3 most common issues in requirements wording are:
- Requirements do not use structured and complete sentences (R1).
- Requirements use vague terms, such as “few” or “many” (R7).
- Requirements contain multiple sentences describing several actual requirements (R19).
We still need to identify all these stakeholder requirements, however vague, incomplete, redundant, or non-singular. This requires careful and professional human judgment and filtering.
We will not correct the stakeholder requirements now since we want to preserve the customer document in its original form as much as possible. We will make the corrections when we write our own System Requirements Specification document in the next chapter.
Let us demonstrate our processing for the UNEXcreq stakeholder requirements document. In the following paragraphs, we will use the ReqView object ID to identify the ReqView objects we are acting upon. Note that the object IDs might be a bit different if you try to import the stakeholder requirements by yourself. Even an extra empty line in MS Word will create an extra ReqView object and the numbering of the subsequent objects will be shifted.
When we examine the UNEXcreq document, we see that requirements are contained in sections 2 and 3. Let us have a closer look at the objects in section 2 of the UNEXcreq document:
| ID | Action |
|---|---|
| UNEXcreq‑22 | Requirement |
| UNEXcreq‑23 | Hidden requirement (water transparency). The part of not touching the walls because of the slit is a duplicate (covered by UNEXcreq-28) |
| UNEXcreq‑24 | Requirement (missing value) |
| UNEXcreq‑25 | Requirement |
| UNEXcreq‑26 | Requirement (missing value) |
| UNEXcreq‑27 | Requirement |
| UNEXcreq‑28 | Requirement (actually, two different requirements) |
| UNEXcreq‑29 | Description. Not a requirement. |
| UNEXcreq‑30 | Not a requirement! The actual requirement should be the minimum width/height, but it is missing! |
| UNEXcreq‑31 | Requirement |
| UNEXcreq‑32 | Requirement |
| UNEXcreq‑33 | Not a requirement by itself. We will need to identify in section 4 possible requirements if they are covered. |
Marking all these objects (UNEXcreq-22 to UNEXcreq-32, except UNEXcreq-29 and UNEXcreq-30) as requirements is easy: select the objects, double click the cell in the Type column in one of the selected objects, and choose “Requirement” from the drop-down.
In section 3, all objects are requirements (UNEXcreq-35 to UNEXcreq-54). Not all of them meet the criteria for good requirements: some lack information to be precise; some contain multiple requirements under one object (like UNEXcreq-49 and UNEXcreq-52). Still, mark all these objects as requirements, in the same way as we did in the last paragraph.
Section 4 contains the characteristics of three test sites. As such, some of the requirements in sections 2 and 3 originate from these test site characteristics. We will see soon how we can use this information to check the consistency and completeness of the customer requirements.
When done, select File->Save to save the document changes and File->Git->Commit to commit the changes to the global Git repository.
You can clone the result from the GitLab repository ReqView > Starter Guide > UNEXsys ch5_s3_annotate_reqs or download the project folder unexsys-ch5_s3_annotate_reqs.zip.
Check Consistency of Stakeholder Requirements
As mentioned in the previous section, stakeholder requirements might not be optimal from the good requirement criteria point of view. Some requirements might not be well specified, incomplete, or inconsistent with other requirements. Correcting and refining the stakeholder requirements is typically the customer's responsibility and not ours. However, we should identify these shortfalls to fix them in the System Requirements Specification (SyRS) document that we will write in the next project development phase, and let the customer approve them on the System Requirements Review (SRR).
ReqView can help you with the identification of these erroneous requirements, as well as verification that other requirements are complete. The use of custom attributes, together with links, can support this task. In this paragraph, we will demonstrate some techniques used in the UNEXcreq document.
In our case, section 4 of the UNEXcreq document contains the characteristics of three test sites. As such, some of the requirements in sections 2 and 3 originate from these test sites. Thus, we will use the information about the different test suites to check the consistency of the customer requirements.
Let us show some techniques for verifying the consistency of the stakeholder requirements:
- Identify partial or preliminary stakeholder requirements
- Identify incomplete stakeholder requirements
- Identify over-specified stakeholder requirements
- Verify critical stakeholder requirements
Please note that our goal is to show what can be done and how, but we will not aim to complete all the possible checks.
Partial or Preliminary Stakeholder Requirements
To support the forthcoming checks, we will first identify the inputs influencing the requirements in sections 2 and 3. In our case, these are the mine characteristics where the robot is intended to operate. Each such characteristic may be a partial, or preliminary, input to an actual requirement. We first need to mark all the characteristics of the individual test sites that serve as inputs to the product requirements.
There are multiple options how to mark preliminary customer requirements:
- Add the “Preliminary Requirement” value to the definition of the multi-value attribute Requirement Type and set Requirement Type to this value.
- Using the previous option, also set the Type attribute to “Requirement”.
- Add a new boolean custom attribute Preliminary Requirement and set it to True.
We will use the third option since it does not mix real requirements with partial inputs.
To add the new attribute, select Document->Customize Attributes. The Document Attributes dialog opens. To add the new attribute, enter “pcReq” in the ID column, select boolean value from the dropdown in the Type column, enter “Preliminary Requirement” in the Name column, and hit OK.
The new attribute is now defined. Please keep in mind that the new attribute is defined only for this document since attributes are document-wide definitions. The change was not propagated to the document template BARE-TEMPLATE used for creating the document UNEXcreq.
The new attribute is displayed in the last column column automatically. You may need to scroll the table to the right to see it. To make our work easier, we will re-organize the table. Click the Preliminary Requirement heading cell and drag it to the left, until it is located left to the Description column.
Now, we can easily mark the relevant objects. Select objects UXEXcreq-68, 69, 70, 78, 79, 80, 81, 83, 84, 85, 86, 88, 91, 92, 93 affecting the requirements for the UNEX underwater exploration vehicle. On one of the selected objects, double click the Preliminary Requirement column, and select True from the dropdown. The attribute will be set for all selected items at once. Your screen will look like this:
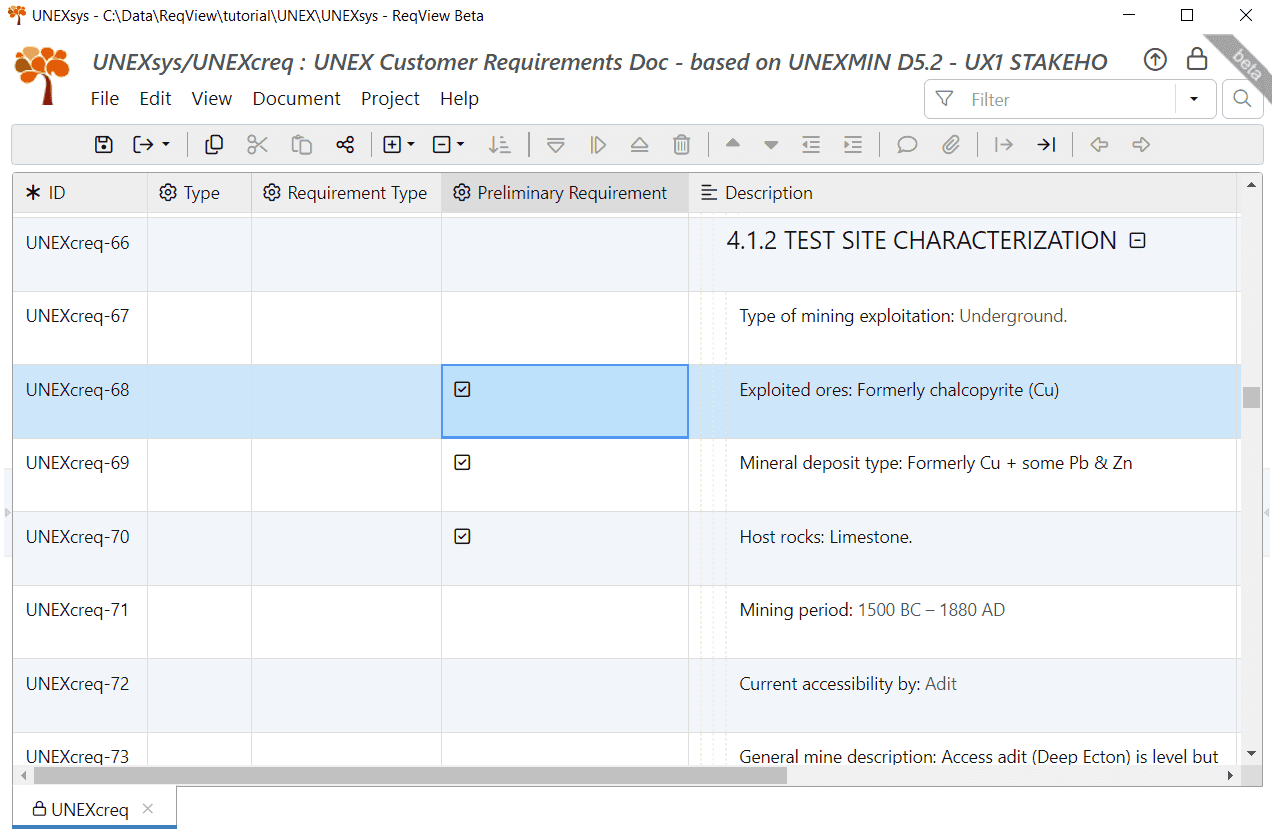
Repeat this process for objects UXEXcreq-110, 111, 112, 121, 122, 123, 124, 125, 127, 128, 129, 130, 133, 134, 135, 136 (Idrija mine), and for objects UXEXcreq-153, 154, 160, 165, 166, 167, 171, 172, 173, 174, 177, 178, 179 (Urgeiriça mine).
We advise you to save the project.
Incomplete Stakeholder Requirements
Let us look at the stakeholder requirement UNEXcreq-24: “The water quality variations are high. Water might also be acidic; hence the external equipment of the robot must be made of acid-resistant materials.”
This is an incomplete requirement as the level of acidity is not specified. We do not know what the robot should withstand. We can check what is known about the acidity of the water in the three reference mines. Effectively, requirement UNEXcreq-24 should be smaller than the minimum acidity in all reference mines.
To make visible evidence, we will create a traceability link from each of the water acidity data objects of the various mines to UNEXcreq-24. These objects are UNEXcreq-80 (for the Ecton mine), UNEXcreq-123 (for the Idrija mine), and UNEXcreq-165 (for the Urgeiriça mine).
To create traceability links, take the following steps:
-
Select UNEXcreq-24 and then select Edit->Start Link or press CtrlL to mark this object as the link source. The ID column for this object will display icon to indicate that it is the starting point for link operations and will remain so until canceled (by pressing ESC), or until another object is selected as a link start.
-
Select UNEXcreq-80, 123, and 165. Then select Edit->Place Link or press CtrlShiftL to mark these objects as link targets.
-
In the Create Links dialog select the “Reference” link type and hit the OK button.
You have created the first ReqView links, all at once and with just a few clicks! For more information see Requirements Traceability Links > Create Links.
Now, effective analysis of the UNEXcreq-24 requirement is easy: select this requirement, click View->Right Panes->Links Pane (or just click on the Links heading on the right pane) to open the Links pane, and check the list of linked objects. Your ReqView screen will look like this:
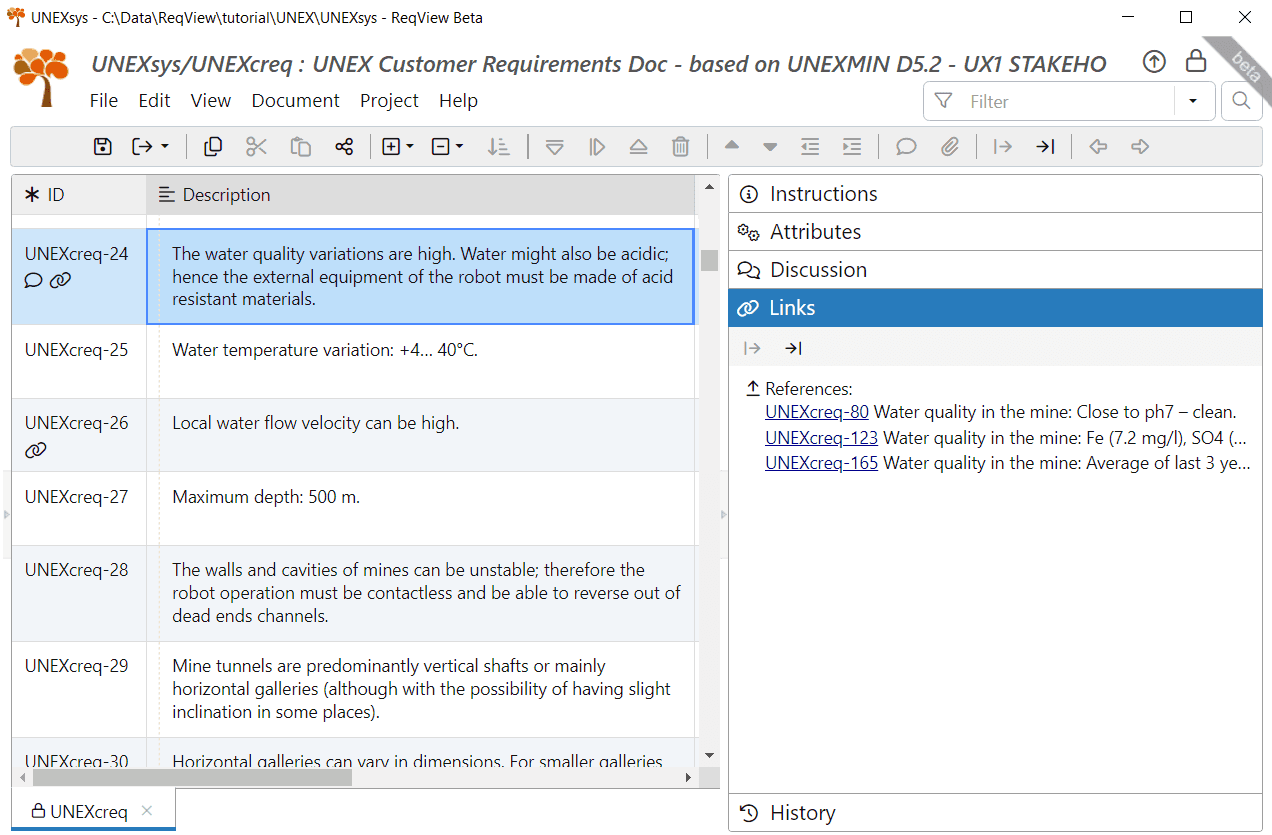
You can see what specific mine requirements UNEXcreq-24 needs to satisfy: pH-7 (i.e. neutral) for the Ecton mine, pH-6.53 for the Urgeiriça mine, and unspecified pH for the Idrija mine. However, the pH can be calculated based on the water contents that were specified, which is surely acid, thanks to its SO4 contents.
Alternatively, select View->Show Columns and tick Links to show the Links column displaying the same information next to the requirements description in the table.
You can click links to navigate navigate back and forth between the different requirements easily. Or mouseover a link to preview the linked object in a popup. For more information see Requirements Traceability Links > Display Links.
You can also use ReqView attribute values or discussion to track the completion of requirements. For example, you can comment on requirements in the ReqView Discussion pane. To display this pane, click View->Right Panes->Discussion. To add a new comment, click Edit->Add Comment. See Manage Requirements Changes > Propose Changes for more information about commenting requirements.
For instance, set the TBD/TBR attribute for the requirement UNEXcreq-24 and add a comment for this requirement with the text “Need to find out the pH level for the Idrija mine, based on the water SO4 contents.”. Then add another comment “Need to specify the acidity level that the robot must stand.”. Your ReqView screen will look like this:
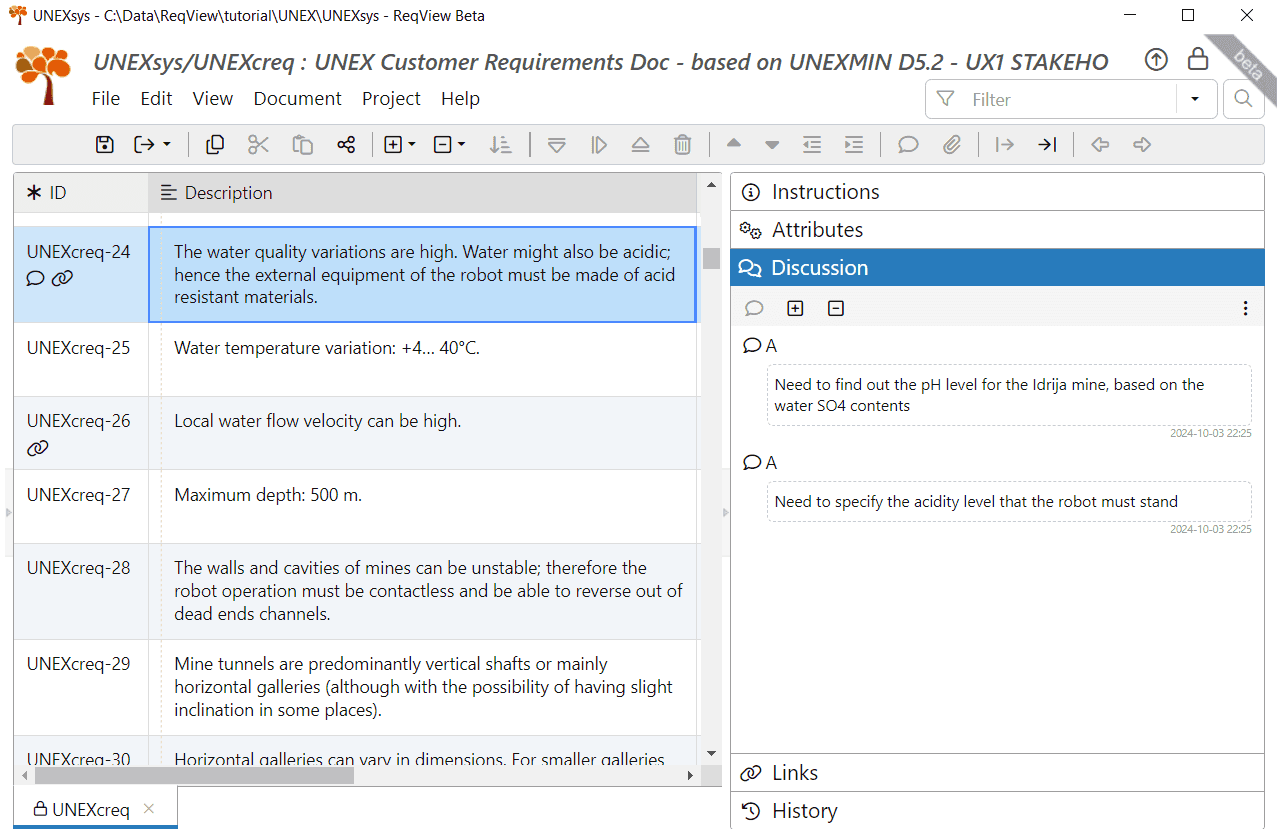
You can later delete the discussions or mark them as 'Resolve', as well as filter the document to display only requirements that have Discussions, for example. We will demonstrate how to define filters later in this Section.
Over-specified Stakeholder Requirements
Now, look at the stakeholder requirement UNEXcreq-26: “Local water flow velocity can be high”. The maximum velocity of the water in the mines is required to design the propulsion system of the robot because the robot needs to be able to overcome the water velocity.
We will use the technique described in the previous Section for UNEXcreq-24. We will link UNEXcreq-26 to the water velocity characteristics of all known test mines: UNEXcreq-86, UNEXcreq-190 (originally UNEXcreq-128), and UNEXcreq-172.
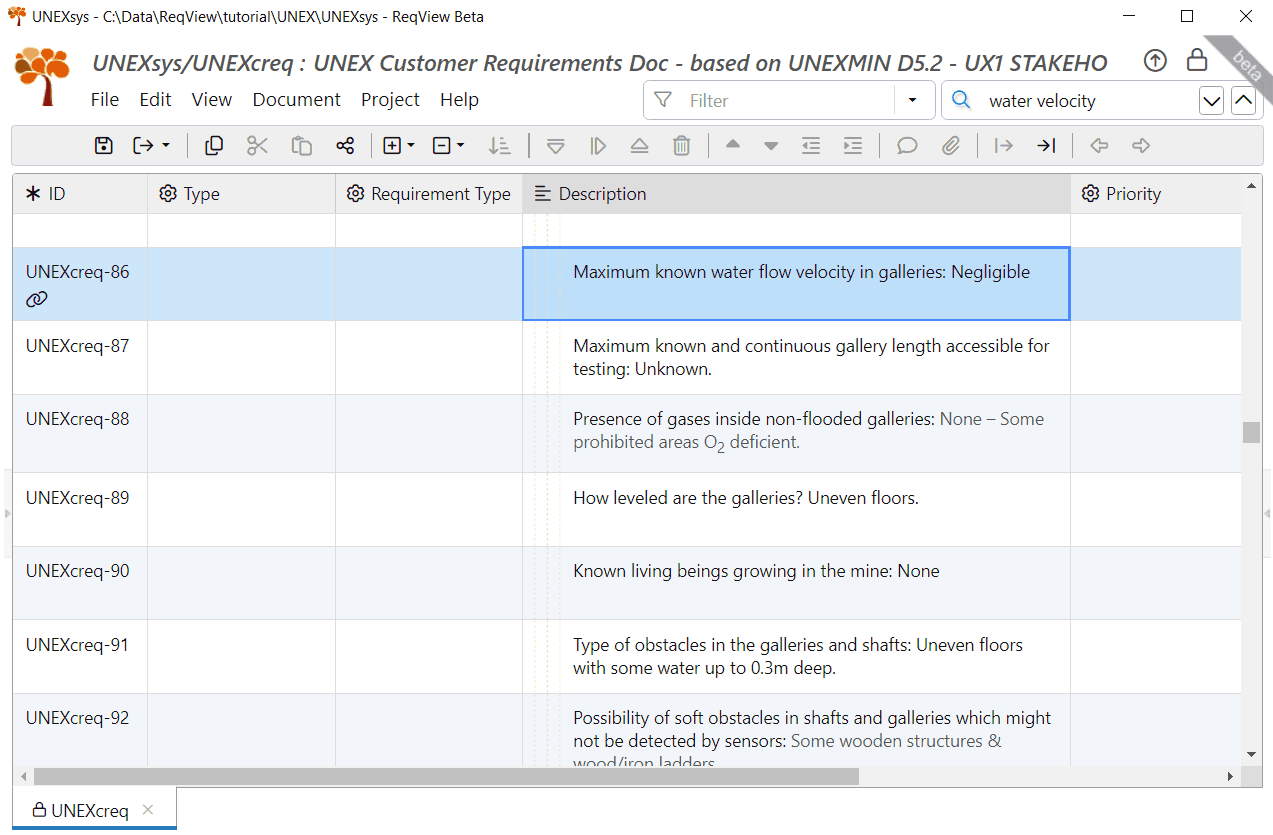
A quick and efficient way to discover the velocity characteristics of the mines is to search for the words “water velocity” (or just “velocity”). To do so, click Document->Search or icon on the top right corner of the ReqView screen, or just press CtrlF. Then enter “water velocity” in the search box. ReqView will highlight all objects containing both keywords “water” and “velocity” in their description. Now, scroll through the document or press F3 to navigate through the objects that might be of interest. To end the search, click the icon again. Your ReqView screen will look like this:
When looking at the water velocity characteristics of the Idrija mine, you can see that it is hidden within the description of UNEXcreq-128, which includes two characteristics: “Maximum original continuous gallery length: not relevant for testing (collapsed), Maximum known water flow velocity in galleries: Unknown (probably negligent)”. Such things can happen. This might be the way it was written in the original document or a consequence that the import pre-processing was not accurate enough.
In any case, we recommend splitting of the object UNEXcreq-128 into two objects:
- Correct UNEXcreq-128 to contain the first characteristic only — “Maximum original continuous gallery length: not relevant for testing (collapsed)”.
- Create a new object UNEXcreq-190 containing the second characteristic – “Maximum known water flow velocity in galleries: Unknown (probably negligent)”.
Then create the reference link from UNEXcreq-86, UNEXcreq-190, and UNEXcreq-172. You can see the result here:
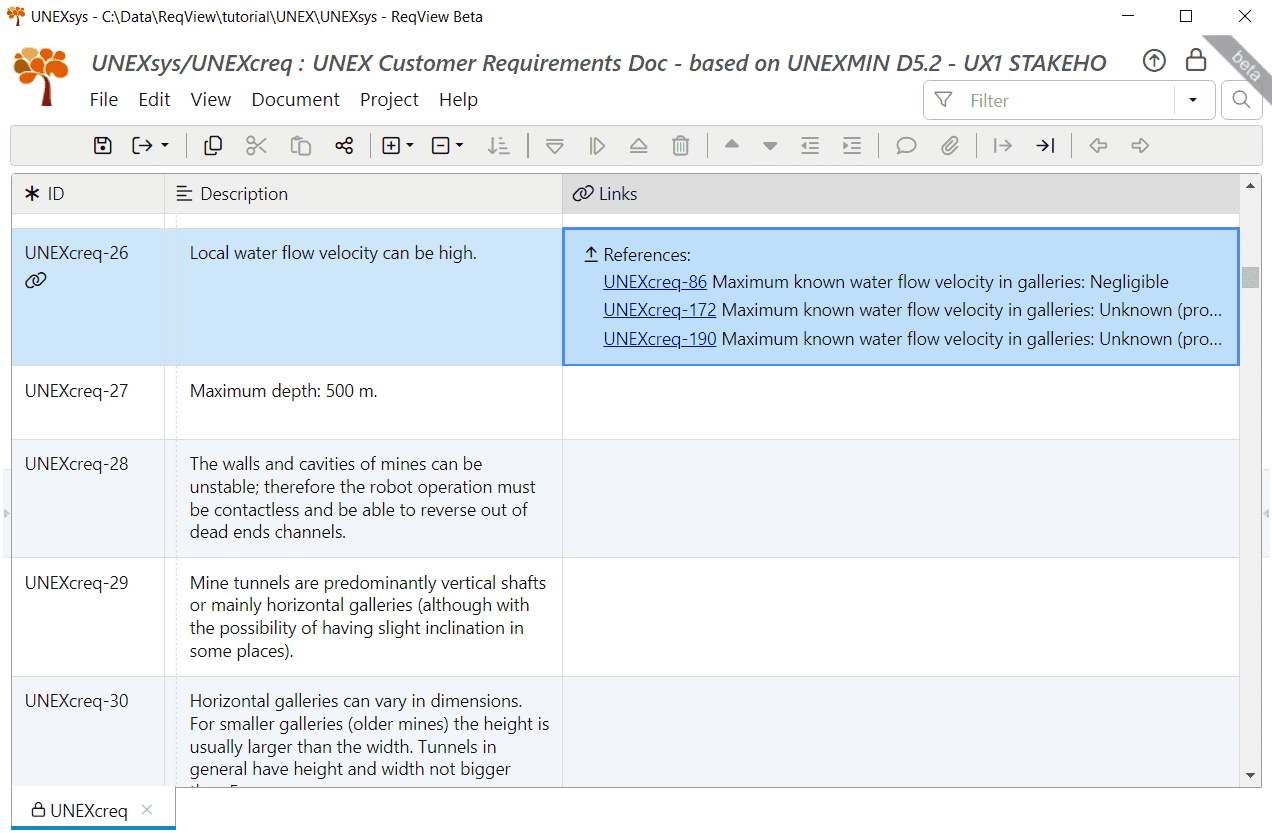
The requirement UNEXcreq-26 states: “Local water flow velocity can be high”. However, there is no evidence that this is the case (at least for the three mines that are the benchmark and testing targets). This may be an over-specified requirement, which should be discussed with the customer.
Critical Stakeholder Requirements
Requirement UNEXcreq-37 specifies the maximum diameter of the robot – 600 mm.
This is a critical requirement: a too-large diameter will get the robot stuck in the mines; a too-small diameter will severely limit the robot's useful payload (i.e. sensors) or its maximum operating range/time (i.e. battery size). There is a great incentive to check that this requirement is correctly set.
To do so, we will use the same technique and link requirement UNEXcreq-37 with the applicable mine characteristics. These will be UNEXcreq-79, UNEXcreq-134 and UNEXcreq-167.
Looking at UNEXcreq-37 and using the same technique for examining the validity of the result, we get:
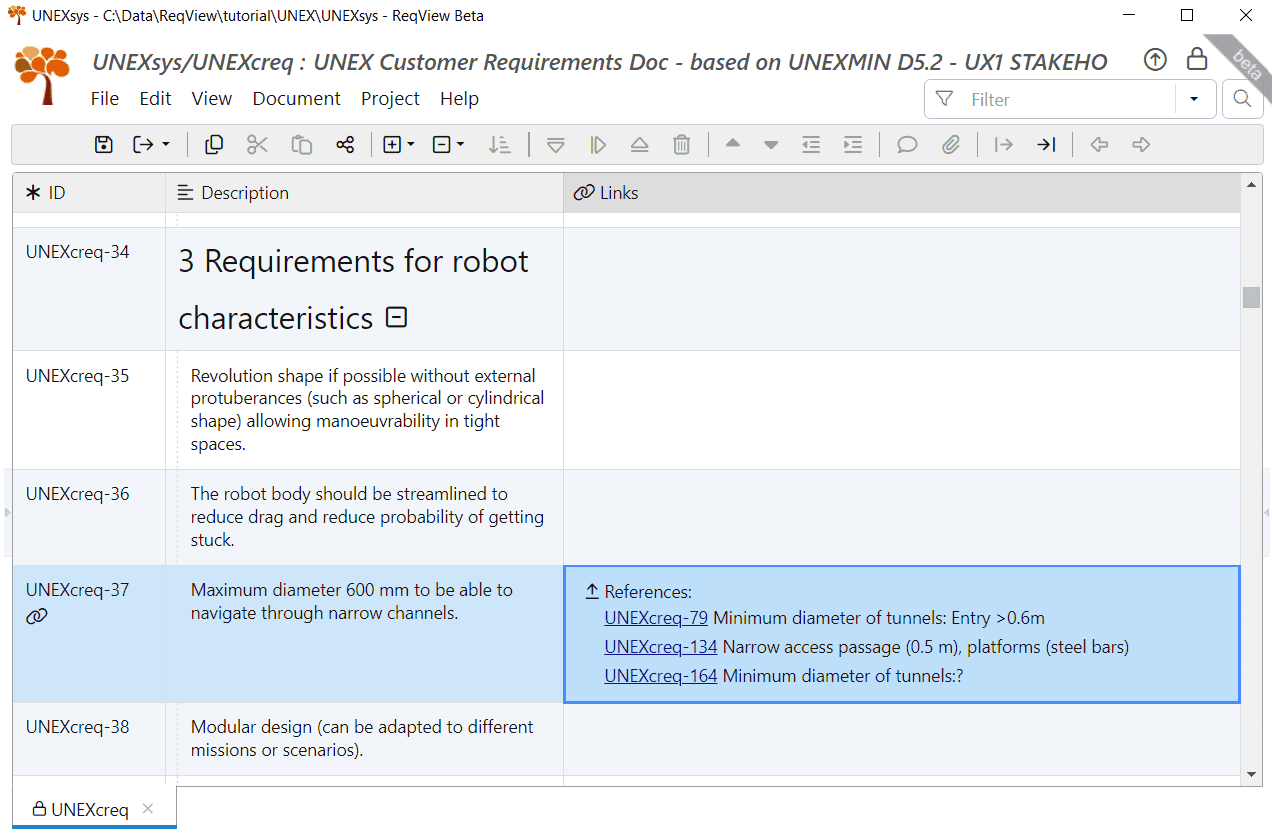
One mine has narrow passage platforms (0.5 m), and for another mine, the information is missing. This is a good reason to review this requirement critically with the customer!
In real projects, we should go on processing all other requirements, using similar techniques. However, this tutorial aims to demonstrate how ReqView effectively and easily helps project managers and system engineers produce satisfactory, better, on-budget, and scheduled projects. Because producing complete project information is not our goal we will stop at this point, and leave the rest of the work for you, an enthusiastic user.
Now, is the right time to save the project and commit changes to the Git repository.
You can clone the result from the GitLab repository ReqView > Starter Guide > UNEXsys ch5_s4_check_consistency or download the project folder unexsys-ch5_s4_check_consistency.zip.
Check Completeness of Stakeholder Requirements
ReqView cannot replace the knowledge of the system engineer and knows only what it was told about. However, one of the great features of ReqView is that it enables you to carry out a completeness check of your process easily and to identify points where something might have been left behind.
We should make two kinds of completeness checks in our current scope:
- Check that all mine characteristics that impose robot requirements were considered when writing the stakeholder requirements.
- Check that all stakeholder requirements have a reason.
Let us see how to carry out these checks, using the framework we laid out in the previous Section.
1. Check All Mine Characteristics Imposing Robot Requirements:
First, map all mine characteristics that affect requirements: for each requirement in sections 2 and 3 of the UNEXcreq document, scan the preliminary requirements in section 4. Link any preliminary requirement that is relevant to the requirement under consideration with a Reference link using the same procedure demonstrated in Sections Incomplete Stakeholder Requirements, Over-specified Stakeholder Requirements, and Critical Stakeholder Requirements. Use this opportunity to check the completeness and consistency of the requirement under consideration as demonstrated there.
When the mapping of the mine characteristics that affect requirements is complete, check if all mine characteristics that impose robot requirements were taken into consideration: since we marked all these characteristics by the Preliminary Requirement attribute, and linked them to the requirements they affect, there should be no objects marked as Preliminary Requirement without a Reference link.
We will use the flexible filtering capability of ReqView to check the above criteria:
- Select the Filter input box at the top right corner of the screen or press CtrlShiftF.
- Press Down to open the dropdown, and select the Preliminary Requirement attribute from the list. Then, press Down again and select • true from the list. As a result, only the objects with the Preliminary Requirement attribute set to true will now appear.
- Press Down again and select ƒ NOT. Then, press Down again and select Is referenced by. As a result, only the objects with no incoming Reference link will now appear.
The filter is now complete: Preliminary Requirement is set NOT Is referenced by. For more information about filtering see Filter, Sort and Search Requirements.
An empty result list will mark that all mine characteristics that impose robot requirements were considered when writing the stakeholder requirements. Any object that will appear on the result list will need to be checked and verified that the characteristic was not neglected. Your ReqView screen will look like this:
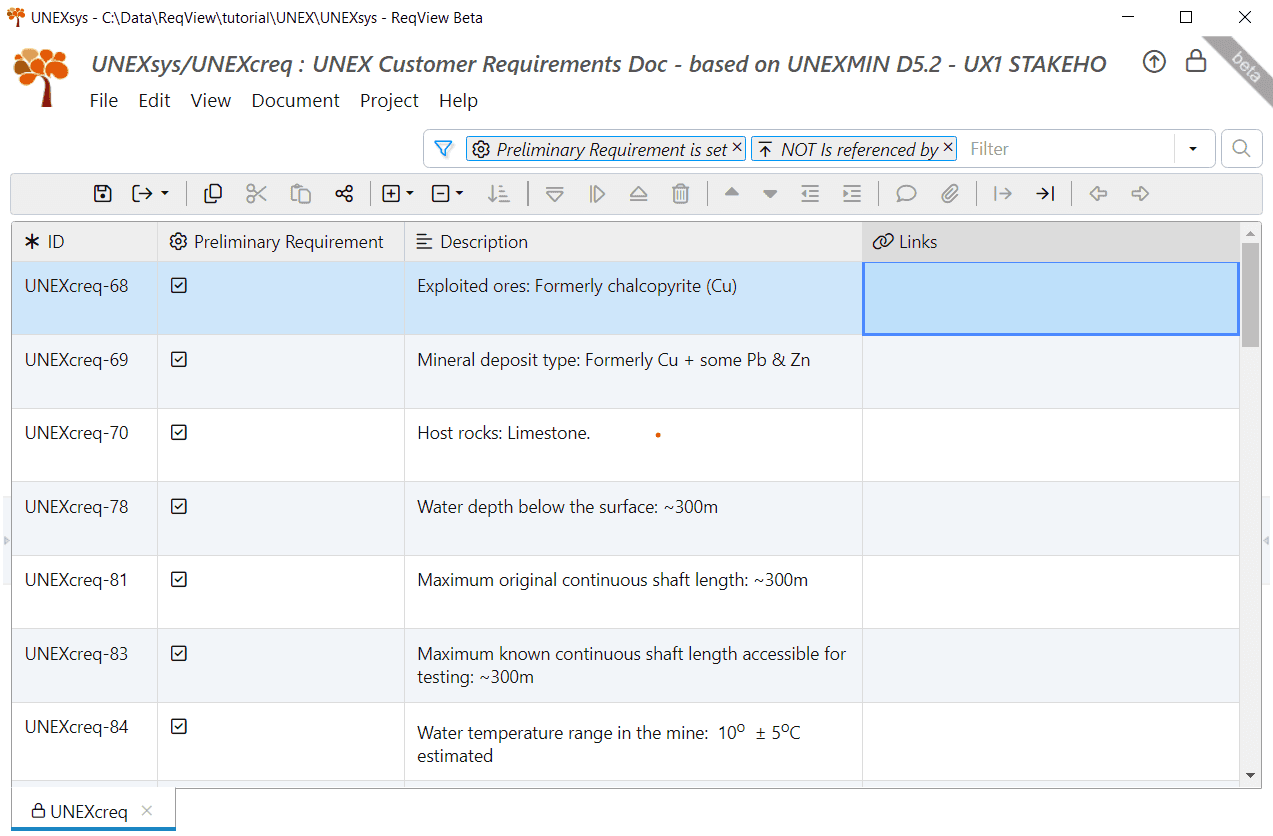
Ideally, the result set displayed on the grid would be empty. In our case, we only linked a small part of the mine characteristics that affect requirements to the affected requirements, and the result set of objects is not empty.
You can save the filter as a Table View for future use. When done, press CtrlShiftF to disable the filter or press Esc to clear the filter.
2. Check That All Stakeholder Requirements Have Reason:
Checking which requirements do not have a direct reason, i.e. not derived from the mine characteristics that affect requirements, has a different significance. These requirements may state functionality not directly required for the mine exploration function. Such requirements may be completely needed or signal optional, nice to have requirements. In the latter case, we can negotiate them with the customer if they are hard to implement.
To carry out this check, identify all requirements referencing no mine characteristics. We will use the filtering capability of ReqView as follows:
- Select the Filter input box at the top right corner of the screen or press CtrlShiftF.
- Press Down to open the dropdown, and select the Type attribute from the list. Then, press Down again and select • Requirement from the list. As a result, only the objects that are marked as Requirement are now displayed.
- Press Down again and select ƒ NOT. Then, press Down again and select References. As a result, only the objects without any outgoing Reference link will now appear.
The filter is now complete: Type: Requirement NOT References. All objects marked as Requirements and do not have an outgoing reference link are now displayed. Your ReqView screen will look like this:
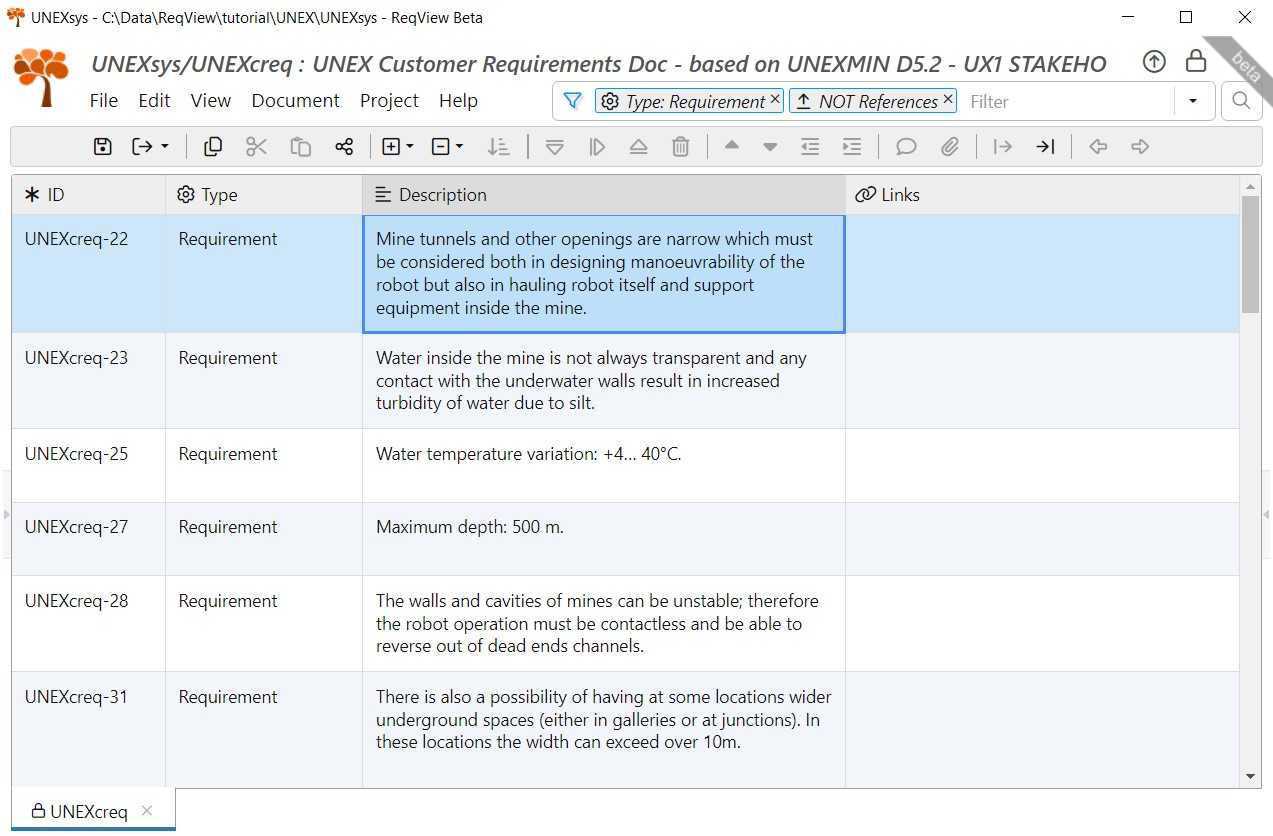
Note that to be effective, this Check 2 should be carried out only after completing the previous Check 1.
In the next Chapter 6: System Requirements Specification, we will create the System Specification and Interface Specification for the UNEX project, set the basis for the Risk Reduction Plan and the Validation and Verification Plans, and add support for the System Requirements Review.