Requirements Interchange Format (ReqIF) is an open industry standard for exchanging requirements between organizations using different requirements management (RM) tools.
The main advantage of ReqIF compared to CSV format is that it supports synchronization of complete requirements specifications including requirements hierarchy, attributes, attachments and traceability without any information loss.
You can use ReqIF to collaborate with your customers that use another RM tool during requirements clarification process or to migrate entire requirements projects from another RM tool. Popular RM tools that support ReqIF include IBM DOORS and IBM DOORS Next Generation (DNG), Polarion Requirements, Windchill, or Visure. For more information about ReqIF use cases see How to Exchange Requirements Between Tools via ReqIF blog post.
Import ReqIF Packages
You can import requirements from ReqIF packages, including their hierarchy, attributes, relations, and attachments, using an automatic one-click import process. No configuration should be required for ReqIF packages that follow the recommended attribute naming conventions, see ReqIF Implementation Guide by prostep ivip association for details.
To import ReqIF packages into a new ReqView project, click Project, select Create Project. In the Create Project dialog choose From ReqIF, and enter an ID of the new project, and press OK.
To import ReqIF packages into the current ReqView project, click File, mouseover Import, and select ReqIF Package.
Choose one or more ReqIF files (.reqif, .reqifz, .xml or .zip) to import in the file picker dialog. The process then differs based on the number of selected files:
- If multiple files were chosen, they will be imported sequentially using the default configuration without being able to customize import of each package. Useful for bulk import or update from different sources.
- If only one file was chosen, the import can be configured and customized as described in the section below.
OLE Objects and Pictures
ReqView tries to extract embedded files from RTF/OLE attachments that come from tools like IBM Rational DOORS. Common files like images, MS Office documents, PDFs etc. will be extracted and the original RTF/OLE wrapper will not be imported.
If ReqView cannot extract an embedded file (because its format is unknown or if the file is an OLE link to another file), the original wrapper file will be imported as RTF. ReqView will open RTF files in your OS-associated application – MS Word, WordPad, LibreOffice Writer etc.
If an OLE object embeds a MS Word or Excel document that contains an embedded picture, ReqView will import the MS Office document, but cannot extract pictures or other data from it automatically.
Please contact us if you have ReqIF files with OLE attachments that are not extracted but you think they should be.
Configuration
When the selected package file is loaded, the application will open the Import ReqIF Package dialog displaying the list of specifications found in the ReqIF package:
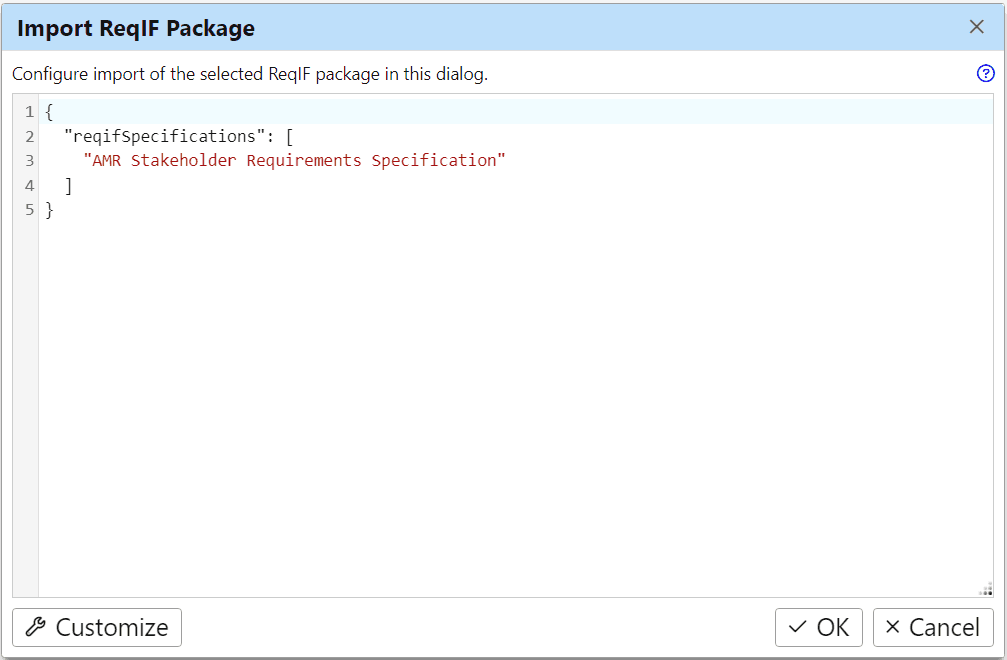
You can edit the list of ReqIF specifications to import, see Select ReqIF Specifications.
If you press the Customize button, the dialog will load advanced configuration for your ReqIF package in JSON format. The configuration is based on the current input, showing settings only for the selected specifications and taking the input attribute mapping into account. Press the button again after making some changes to the config to refresh the configuration.
Finally, press the OK button to import the chosen ReqIF specifications as new documents into your current project.
Select ReqIF Specifications
To select ReqIF specifications to import, list the value of either LONG-NAME or IDENTIFIER for each desired ReqIF specification in the reqifSpecifications configuration property (array). All ReqIF specifications will be imported if the reqifSpecifications array is not present in the config.
Example: Import ReqIF specification with LONG-NAME set to "AMR Stakeholder Requirements Specification".
{ "reqifSpecifications": [ "AMR Stakeholder Requirements Specification" ]}Set Document Properties
To map ReqIF specification attributes to built-in ReqView document properties, set the reqviewDocumentProperties configuration property (object):
- key: ReqView document property —
idorname(string) - value:
- ReqIF specification attribute (string)
- list of ReqIF specification attributes (array)
- map of user-defined values (object)
- key:
LONG-NAMEorIDENTIFIERof the imported ReqIF specification (string) - value: user-defined value of the ReqView document property (string)
- key:
The default mapping of ReqIF specification attributes to ReqView document properties is:
{ "reqviewDocumentProperties": { "id": ["ReqIF.ForeignID", "ReqIF.Prefix", "LONG-NAME", "IDENTIFIER"], "name": ["ReqIF.Description", "ReqIF.Name", "LONG-NAME"] }}Those defaults are not prefilled in the Import ReqIF Package dialog to keep the import configuration concise.
Example: Set the ReqView document identifier to the value of LONG-NAME for all imported ReqIF specifications.
{ "reqviewDocumentProperties": { "id": "LONG-NAME" }}Example: Set the ReqView document identifier to the value of ReqIF.Prefix or IDENTIFIER (in order of preference) for all imported ReqIF specifications:
{ "reqviewDocumentProperties": { "id": ["ReqIF.Prefix", "IDENTIFIER"] }}Example: Set the ReqView document identifier to "SRS" for the imported ReqIF specification with LONG-NAME equal to "Software Requirements Specification".
{ "reqviewDocumentProperties": { "id": { "Software Requirements Specification": "SRS" } }}Set Object Attributes
By default, ReqView imports all attributes of ReqIF spec objects. ReqView document object attributes have unique identifiers created from LONG-NAME or IDENTIFIER of ReqIF spec object type attribute definitions. The “ReqIF.” prefix is removed from all attribute IDs. If attribute data types clash then attribute IDs are prefixed with LONG-NAME or IDENTIFIER of the ReqIF spec object type attribute to disambiguate them.
To configure the attributes mapping from ReqIF spec objects to ReqView document objects, set the reqifObjectAttributes configuration property (object):
- key:
LONG-NAMEorIDENTIFIERof an imported ReqIF spec object attribute (string) - value:
- ReqView document object attribute ID (string)
nullto ignore the attribute
If the ReqIF spec object attribute is not defined for any imported spec object then it is ignored. You can also explicitly ignore a ReqIF spec object attribute by setting the null value in the configuration.
Unless explicitly overridden, the following default mapping to ReqView system attributes heading and text is applied automatically:
{ "reqifObjectAttributes": { "ReqIF.ChapterName": "heading", "ReqIF.Text": "text" }}If the ReqIF.ChapterName attribute is not present in the imported ReqIF file, then the ReqIF.Name attribute is mapped to ReqView system attribute heading:
{ "reqifObjectAttributes": { "ReqIF.Name": "heading", "ReqIF.Text": "text" }}Those defaults are not prefilled in the Import ReqIF Package dialog to keep the import configuration concise.
Example: Set values of ReqView system attribute text from ReqIF spec object attribute RichText for all imported document objects.
{ "reqifObjectAttributes": { "RichText": "text" }}To configure the mapping for a given ReqIF spec object type, set values of the reqifObjectAttributes configuration property as follows:
- key:
LONG-NAMEorIDENTIFIERof an imported ReqIF spec object type (string) - value: attributes mapping for the ReqIF spec object type (object)
- key:
LONG-NAMEorIDENTIFIERof an imported ReqIF spec object attribute (string) - value:
- ReqView document object attribute ID (string)
nullto ignore the attribute
- key:
Example: Some tools use the ReqIF.Name attribute for headings, map this attribute to ReqView system attribute heading to show them as such:
{ "reqifObjectAttributes": { "ReqIF.Name": "heading" }}Example: Set values of ReqView system attribute heading from ReqIF spec object attribute Title defined for the ReqIF spec object type Section Type.
{ "reqifObjectAttributes": { "Section Type": { "Title": "heading" } }}Example: Ignore import of attribute ReqIF.ChapterNumber defined for all ReqIF spec objects and attribute Description defined for ReqIF spec object type Section Type.
{ "reqifObjectAttributes": { "ReqIF.ChapterNumber": null, "Section Type": { "Description": null } }}Example: If some imported objects are marked as deleted using the ReqIF.ForeignDeleted attribute, map it to ReqView system attribute deleted to show these objects crossed and grayed out:
{ "reqifObjectAttributes": { "ReqIF.ForeignDeleted": "deleted" }}Import Specification Attributes
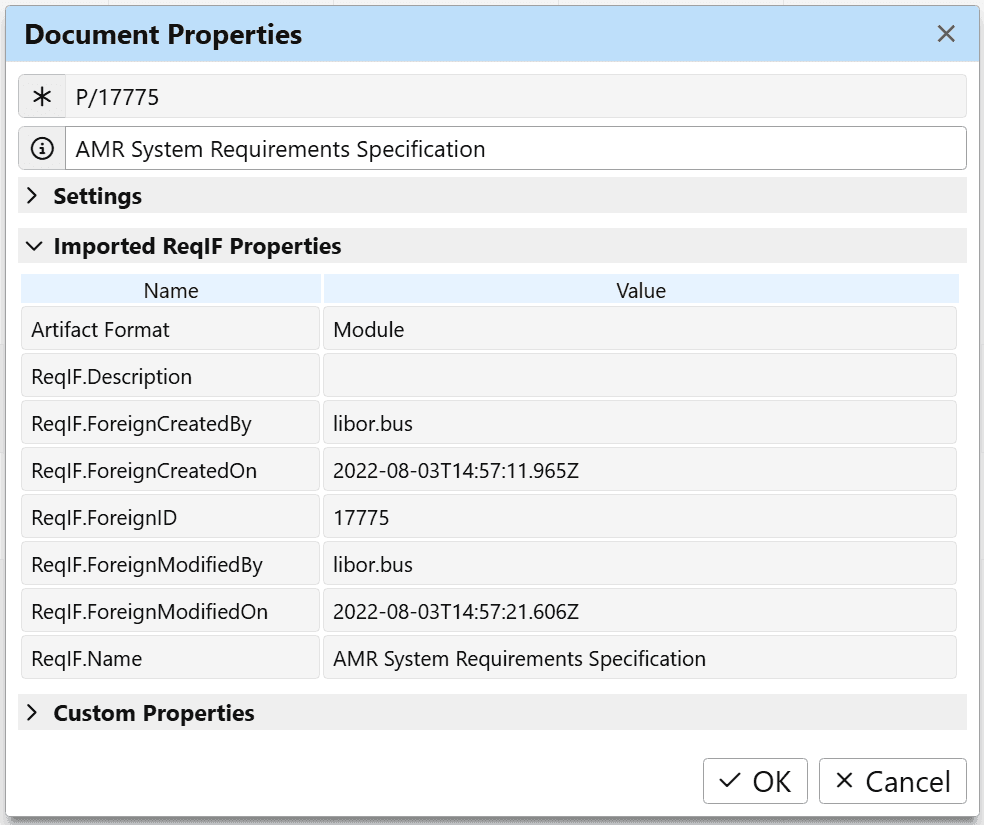
Specification attributes and their values are imported automatically as read-only document properties and can be viewed in the Document Properties dialog:
Example ReqIF Import
Let’s assume that we have received a ReqIF file exported from ProR open-source RM tool. Download the example ReqIF file used in this tutorial.
We need to import ReqIF specifications Specification Document and Glossary as new ReqView documents with IDs SPEC and GLOSSARY and set their names. We need to map ReqIF spec object attributes to ReqView document attributes as follows:
- Map ReqIF attribute Description → ReqView system attribute text
- Override mapping of ReqIF attribute Description for spec object types Section Type and Use Case Type → ReqView system attribute heading
- Ignore ReqIF attribute Known Problems
- Map all other ReqIF attributes → ReqView custom attributes
Follow these steps:
-
Click File, then Import, and finally ReqIF Package from the main menu.
-
Select the imported ReqIF file
-
In the Import ReqIF Package dialog, click Customize to prefill the configuration details automatically.
-
Adjust the JSON configuration as follows:
{"reqifSpecifications": ["Specification Document","Glossary"],"reqviewDocumentProperties": {"id": {"Specification Document": "SPEC","Glossary": "GLOSSARY"},"name": {"Specification Document": "Specification","Glossary": "Glossary"}},"reqifObjectAttributes": {"Description": "text","Known Problems": null,"Section Type": {"Description": "heading"},"Use Case Type": {"Description": "heading"}}} -
Click Customize again to update the configuration by default values.
-
Click OK to import the ReqIF file.
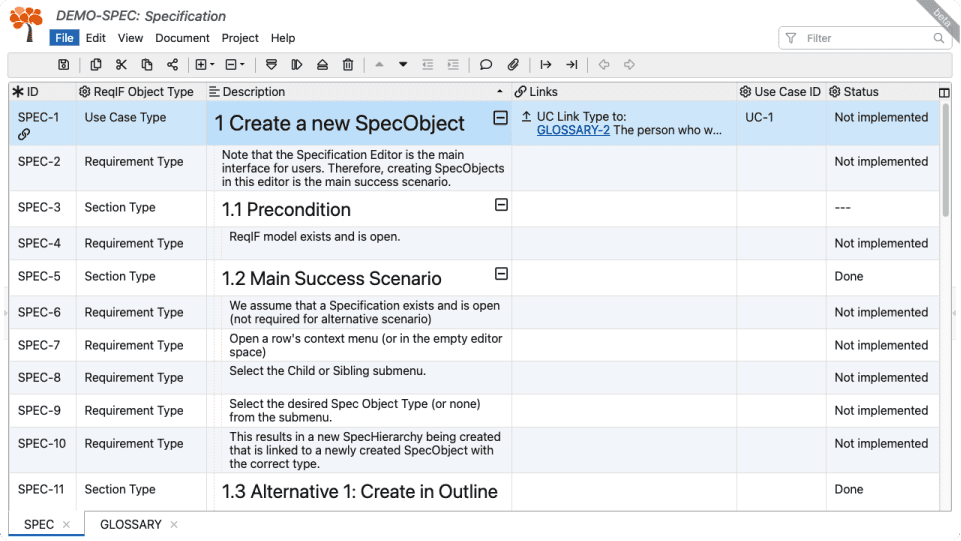
As a result, ReqView successfully imports SPEC document with a list of use cases, GLOSSARY document with the definition of common terms, and traceability links between use cases to the related terms in the glossary:
Update From ReqIF
You can update (even iteratively) ReqView documents that were imported from ReqIF, for instance stakeholder requirements from a customer using another RM tool.
ReqView importer persists the necessary ReqIF IDs, types etc. to match documents and objects during successive imports. Mapping of attributes that have already been imported cannot be changed. You can press Customize and tick the Show only new attributes checkbox in the Import ReqIF Package dialog to hide the already mapped attributes and see only the new attributes in the ReqIF package.
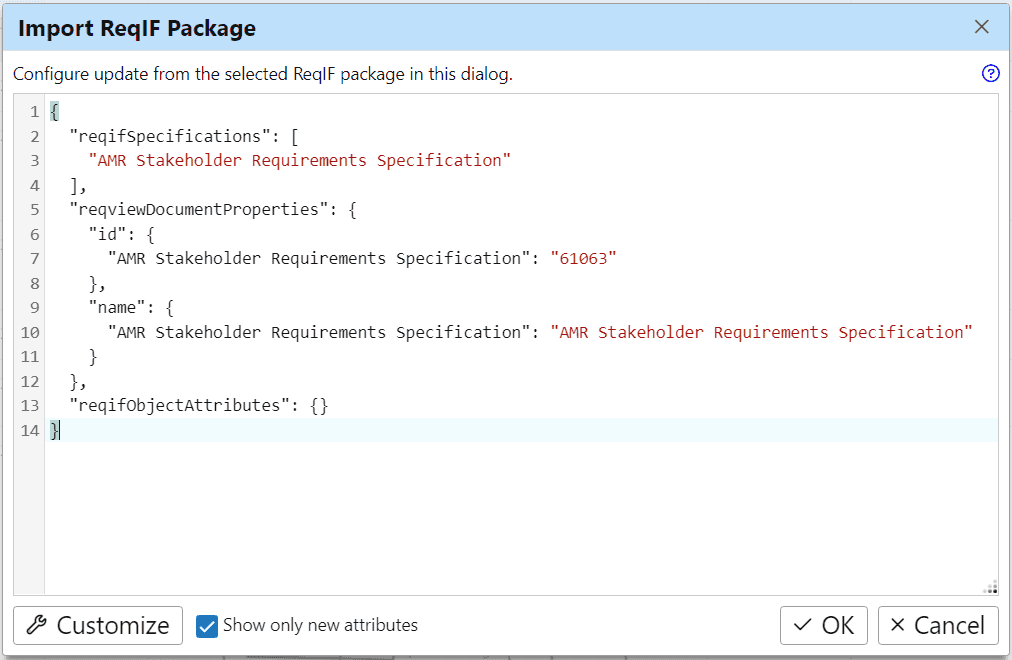
You can prevent updating of a specific subset of attributes, e.g., if the supplier status and comment attributes for stakeholder requirements have been updated in ReqView but not in the source RM tool yet. To prevent overwriting of values of a specific attribute, map the attribute to null in the Import ReqIF Package dialog, see Set Object Attributes.
The following rules are applied to modified, added or removed document objects during an update from ReqIF:
- New objects are added seamlessly because the entire hierarchy of new objects is taken from ReqIF.
- All existing objects are updated so their old attribute values that came from ReqIF are replaced with the new values from ReqIF unless the attribute is mapped to
nullas described above. - All objects added directly in ReqView before the update (i.e., not present in the ReqIF) are inserted to the new document hierarchy closest to its original place in the hierarchy (based on finding its sibling or parent objects).
- All removed objects (i.e., objects imported from ReqIF before but missing in the ReqIF now) are permanently removed from ReqView document.
Tip: Map the ReqIF attribute ReqIF.ForeignDeleted to the ReqView attribute deleted
to show objects marked as deleted in ReqView, see this Example.
Note: ReqView stores all ReqIF type information (IDs, datatypes, enum values etc. of attributes contained in SPECIFICATION-TYPE, SPEC-OBJECT-TYPE and SPEC-RELATION-TYPE tags) and maintains type consistency when ReqIF types are shared between ReqView entities (documents, objects, link types) – this implies that all ReqView entities that share any ReqIF type must be imported/updated together using one ReqIF package.
Compare ReqIF Files
To compare two versions of a ReqIF package, follow these steps:
- Create a project by importing the older ReqIF package. Click Project, select Create Project, choose From ReqIF option in the Create Project dialog, and finally select the older ReqIF package file.
- Save the project to a folder. Click File, select Save as Folder, choose the folder name, e.g. Baseline, and tick the Save History checkbox in the Save Project as Folder dialog.
- Save the project as another folder to store the updated project. Name the folder differently, e.g. Current.
- Update the project from the newer ReqIF package. Click File, then Import, select ReqIF Package, and finally choose the newer ReqIF package.
- Compare the project Current to the project Baseline:
- Side by side comparison — click Project, mouseover Compare Project, select Compare Folder, and finally choose the folder Baseline.
- Project history view — click Project and then History.
Note: The update from ReqIF and subsequent comparison will only work correctly if the two packages have the same underlying ReqIF identifiers. ReqView cannot match IDs if the newer ReqIF package was created from scratch separately from the baseline version in the source RM tool.
Merge ReqIF Files
To merge multiple ReqIF packages into one file, follow these steps:
- Create a project by importing the ReqIF packages. Click Project, select Create Project, choose From ReqIF option in the Create Project dialog, and select all the ReqIF packages by clicking on the *.reqif or *.reqifz files while holding the Ctrl key.
- Export the merged ReqIF package. Click File, then Export, select ReqIF Package, and choose All documents from the main project in the Documents form section. Finally, press OK and choose where to save the resulting merged ReqIF package file (*.reqifz).
Note: Multiple ReqIF packages can only be merged into one project if there is no conflict in the underlying ReqIF identifiers.
ReqIF SRC Round-trip
You can collaborate with your customers on Stakeholder Request Clarification (SRC) by exchanging ReqIF files, see Workflow for ReqIF Round-trip Between IBM DOORS and ReqView.
IBM DOORS is a legacy requirements management tool, which has been used widely for the development of complex HW/SW products in the aerospace & defense, automotive, and railway industries. IBM DOORS Next Generation (DNG) is its successor based on modern IBM Engineering Lifecycle Management (ELM) platform. All RDF URIs defined for artifact types, attributes etc. imported to ReqView from DOORS Next are persisted and used during round-trip export.
The original RM tool used by your customer can match updated requirements during ReqIF round-trip because ReqView stores ReqIF metadata (such as ReqIF IDs) in project files when you import a ReqIF package and reuses the saved ReqIF metadata when exporting a document back to the customer. For more information how to export ReqIF files from ReqView see Export Requirements to ReqIF.
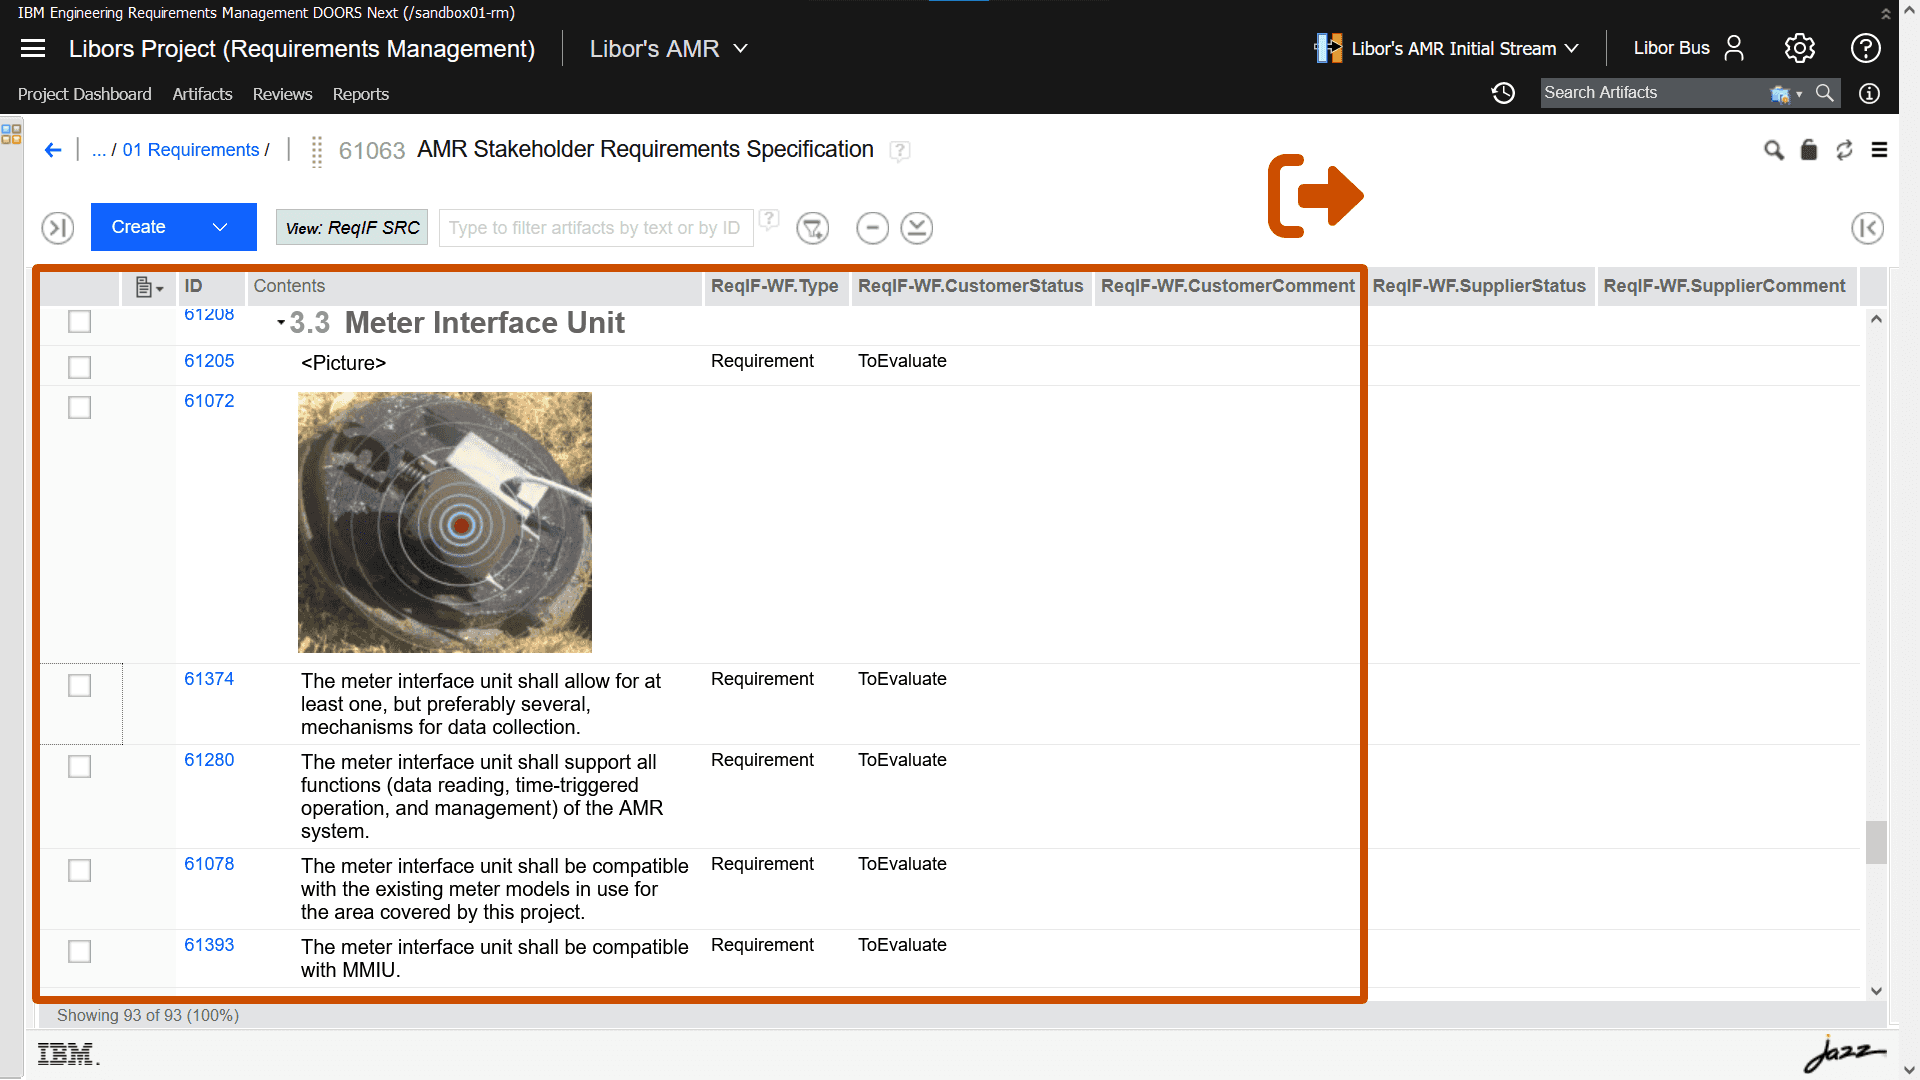
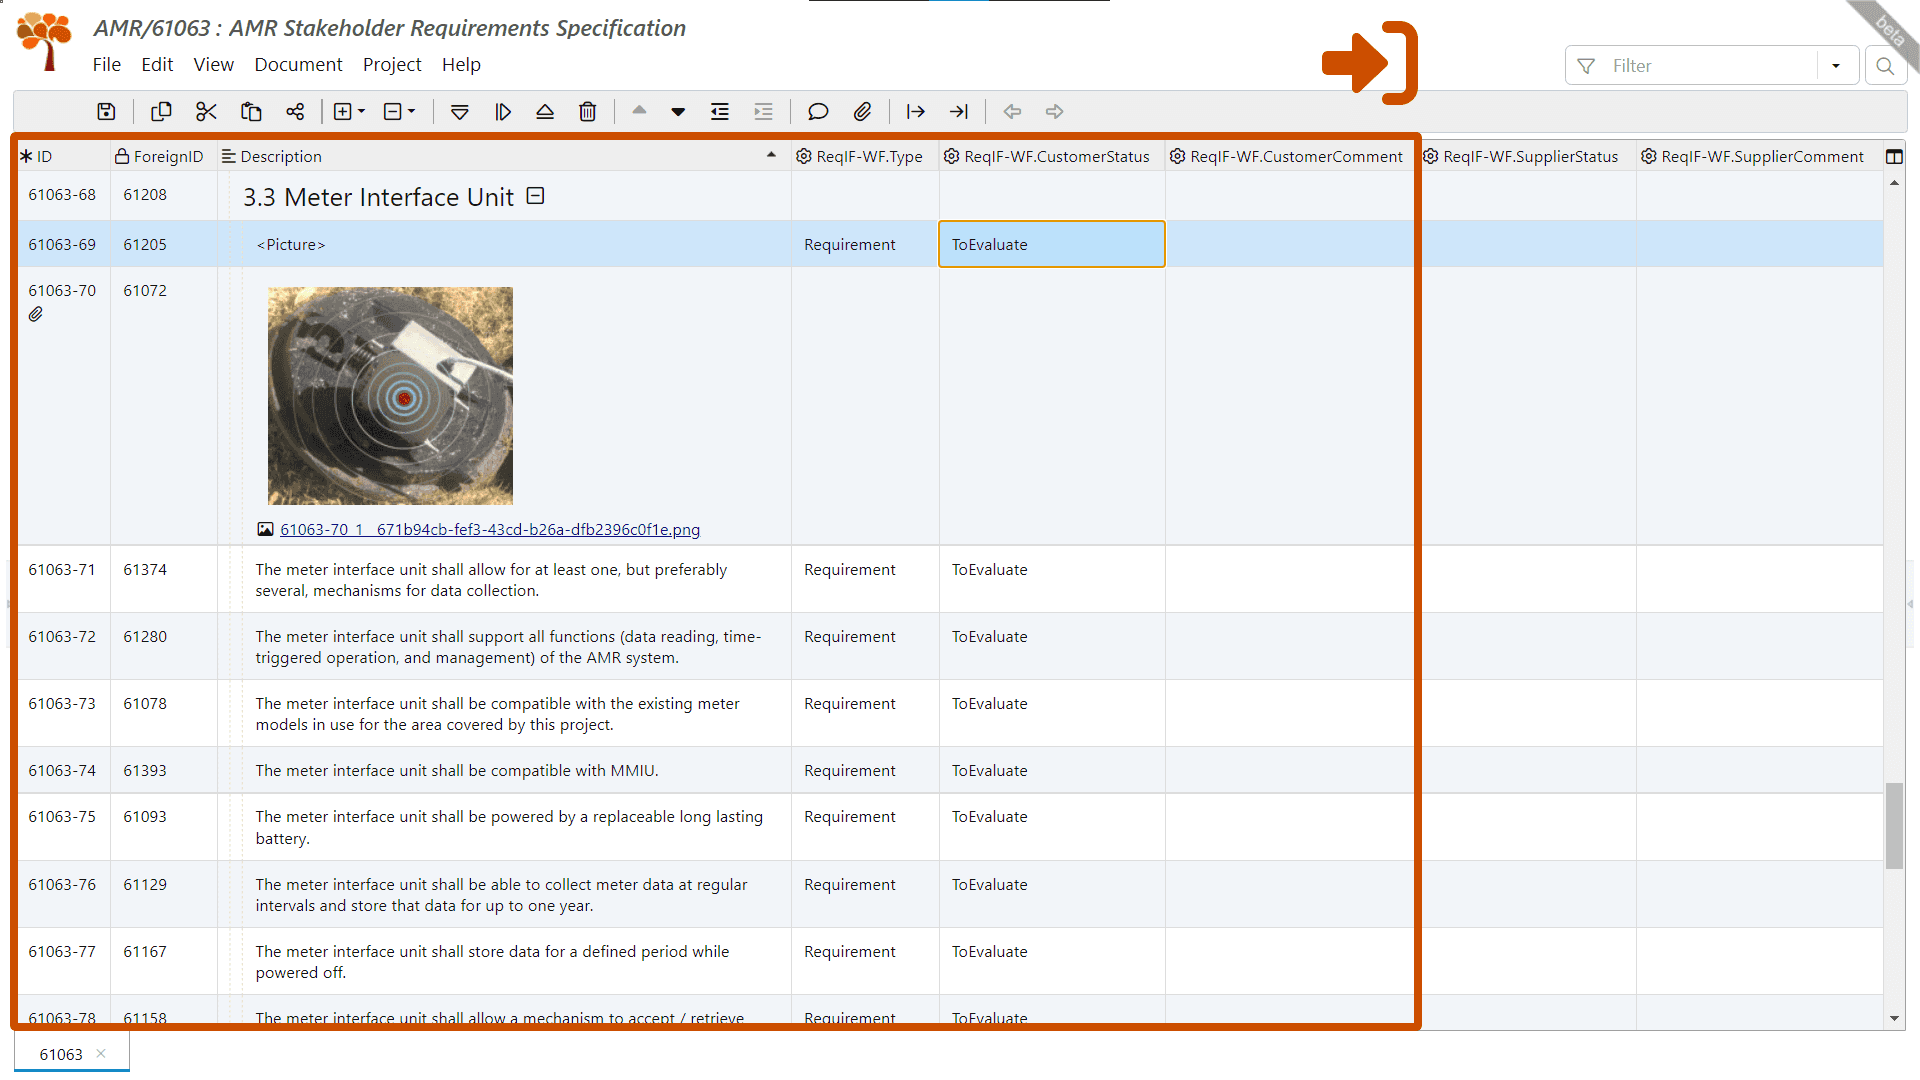
Example: Import initial version of AMR Stakeholder Requirements Specification from DNG to ReqView to provide supplier feedback via ReqIF round-trip.
Export ReqIF from DNG:
Import ReqIF to ReqView:
Delete ReqIF Metadata
You can delete all persisted ReqIF metadata – object and type identifiers that are needed for iterative update, export or round-trip sync. The main use cases for deleting ReqIF metadata are:
- When ReqView will become the new source of truth for all identifiers and attribute definitions after one-time data migration from another RM tool.
- To fix identifier conflicts or missing and inconsistent attribute or object type definitions after manual modification of ReqView JSON data files.
To delete all persisted ReqIF metadata, click Project, mouseover Maintenance and select Delete ReqIF Metadata.
Note: Deleting ReqIF metadata has the following consequences:
- If data was imported from ReqIF, updating it from the original source or exporting an update for the original source will not be possible.
- If data was created in ReqView and exported to ReqIF, updating the data from ReqIF or creating an updating (iterative) ReqIF export will not be possible.