You can export ReqView projects to DOCX files and open them in MS Word for reading, printing or conversion to PDF.
Summary of DOCX features:
- Preserve rich text formatting
- Preview image attachments
- Open file attachments by clicking
- Browse links by clicking (within one file)
- Set page layout for print
- Import changes
Note: Export HTML files if you need to browse links between documents or open file attachments by clicking.
Note: Exported DOCX files use specific OpenXML format features supported by MS Word but not by other text processors, such as LibreOffice.
Export DOCX Files
To export a DOCX file, click File, mouseover Export and click DOCX File. In the Export DOCX dialog, choose a Word template, layout and other options. After confirmation of the dialog, select a destination for storing the exported DOCX file.
Note: In the WebApp, the exported DOCX file is saved in the browser download folder.
Export Options
Word Template:
Choose a MS Word template to define title page, table of contents, page properties (size, orientation, headers, footers), paragraph styles, and selection of exported ReqView documents:
- Default MS Word template — use the default template to export the current ReqView document.
- Custom MS Word template — select a custom DOCX/DOTX template file or a custom DOCM/DOTM template file with macros, see MS Word Template.
You can download example MS Word templates from Download Templates.
Table View:
Select a table view defining which attributes or template columns will be exported:
- Current or default view — export open documents using the current table view and closed documents using the default view.
- <table view> — export documents using the selected table view. Documents without the selected table view are exported using the last used or the default table view.
For more information see Table Views.
Layout:
Select layout and styling of exported data:
- Book — export a single column (the displayed columns are stacked as paragraphs) using default styles.
- Table — export a table with the displayed columns using default styles.
- Custom — export content with custom layout and styles using a custom HTML template, see Export Using Custom Templates.
For more information how to customize layout see Export Using Custom Templates > Export HTML Format > HTML for DOCX Export.
You can download the default HTML templates for Book and Table layout from Export Using Custom Templates > Download Export Templates.
Options:
- Merge displayed custom attributes — if set then columns displaying custom attributes will be merged into a single column (for Table and Custom layouts).
- Ignore filter — if the exported table view is filtered then this options controls if the filter is preserved or ignored.
- Ignore sorting — if the exported table view is sorted by a selected column then this option controls if the sort order is preserved or ignored.
- Ignore links to invisible objects — if set then do not include links from / to document objects which are not visible in the exported file (for Book and Table layouts).
- Preserve section folding — if set then the content of collapsed sections will be ignored.
- Explore and load linked projects — if set then indirectly linked projects will be explored and loaded to display additional traceability links, see Manage Linked Project.
- Add custom export parameters – pass custom export parameters to your custom template from a selected JSON file, see
exportParamhelper (for Custom layout).
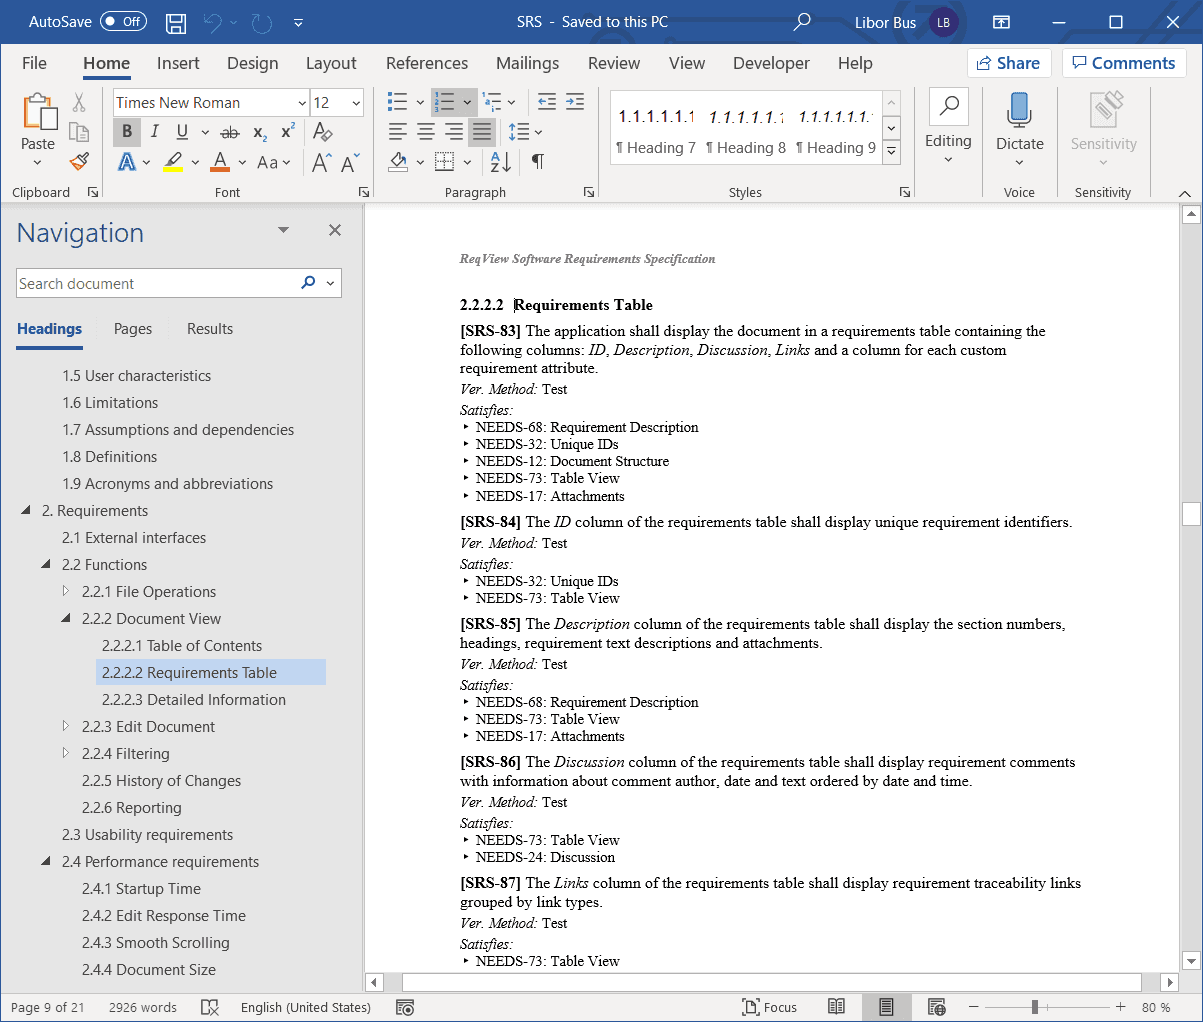
Example: Export the Software Requirements Specification (SRS) document from the Example project into a Word file using the Book layout. For each SW requirement output its ID, text description, verification method, and upstream traceability links to user needs.
Note: For more examples how to customize HTML export templates for MS Word see Export Using Custom Templates > Export HTML Format > HTML for DOCX Export documentation section. There you can find for example details about export a document with attachments list, export a document with portrait and landscape page mixture, custom template with vertical text in table header,...

Export Configuration
You can export documents to DOCX files easily using a shared export configuration storing all export options, see Export Configurations.
Export CLI
You can export documents to DOCX files using reqview export docx command, see Command Line > Export Documents.
MS Word Template
You can create custom MS Word templates to export DOCX documents with a title page, table of contents, page headers, footers and paragraph styles according to your company standards.
Content Controls
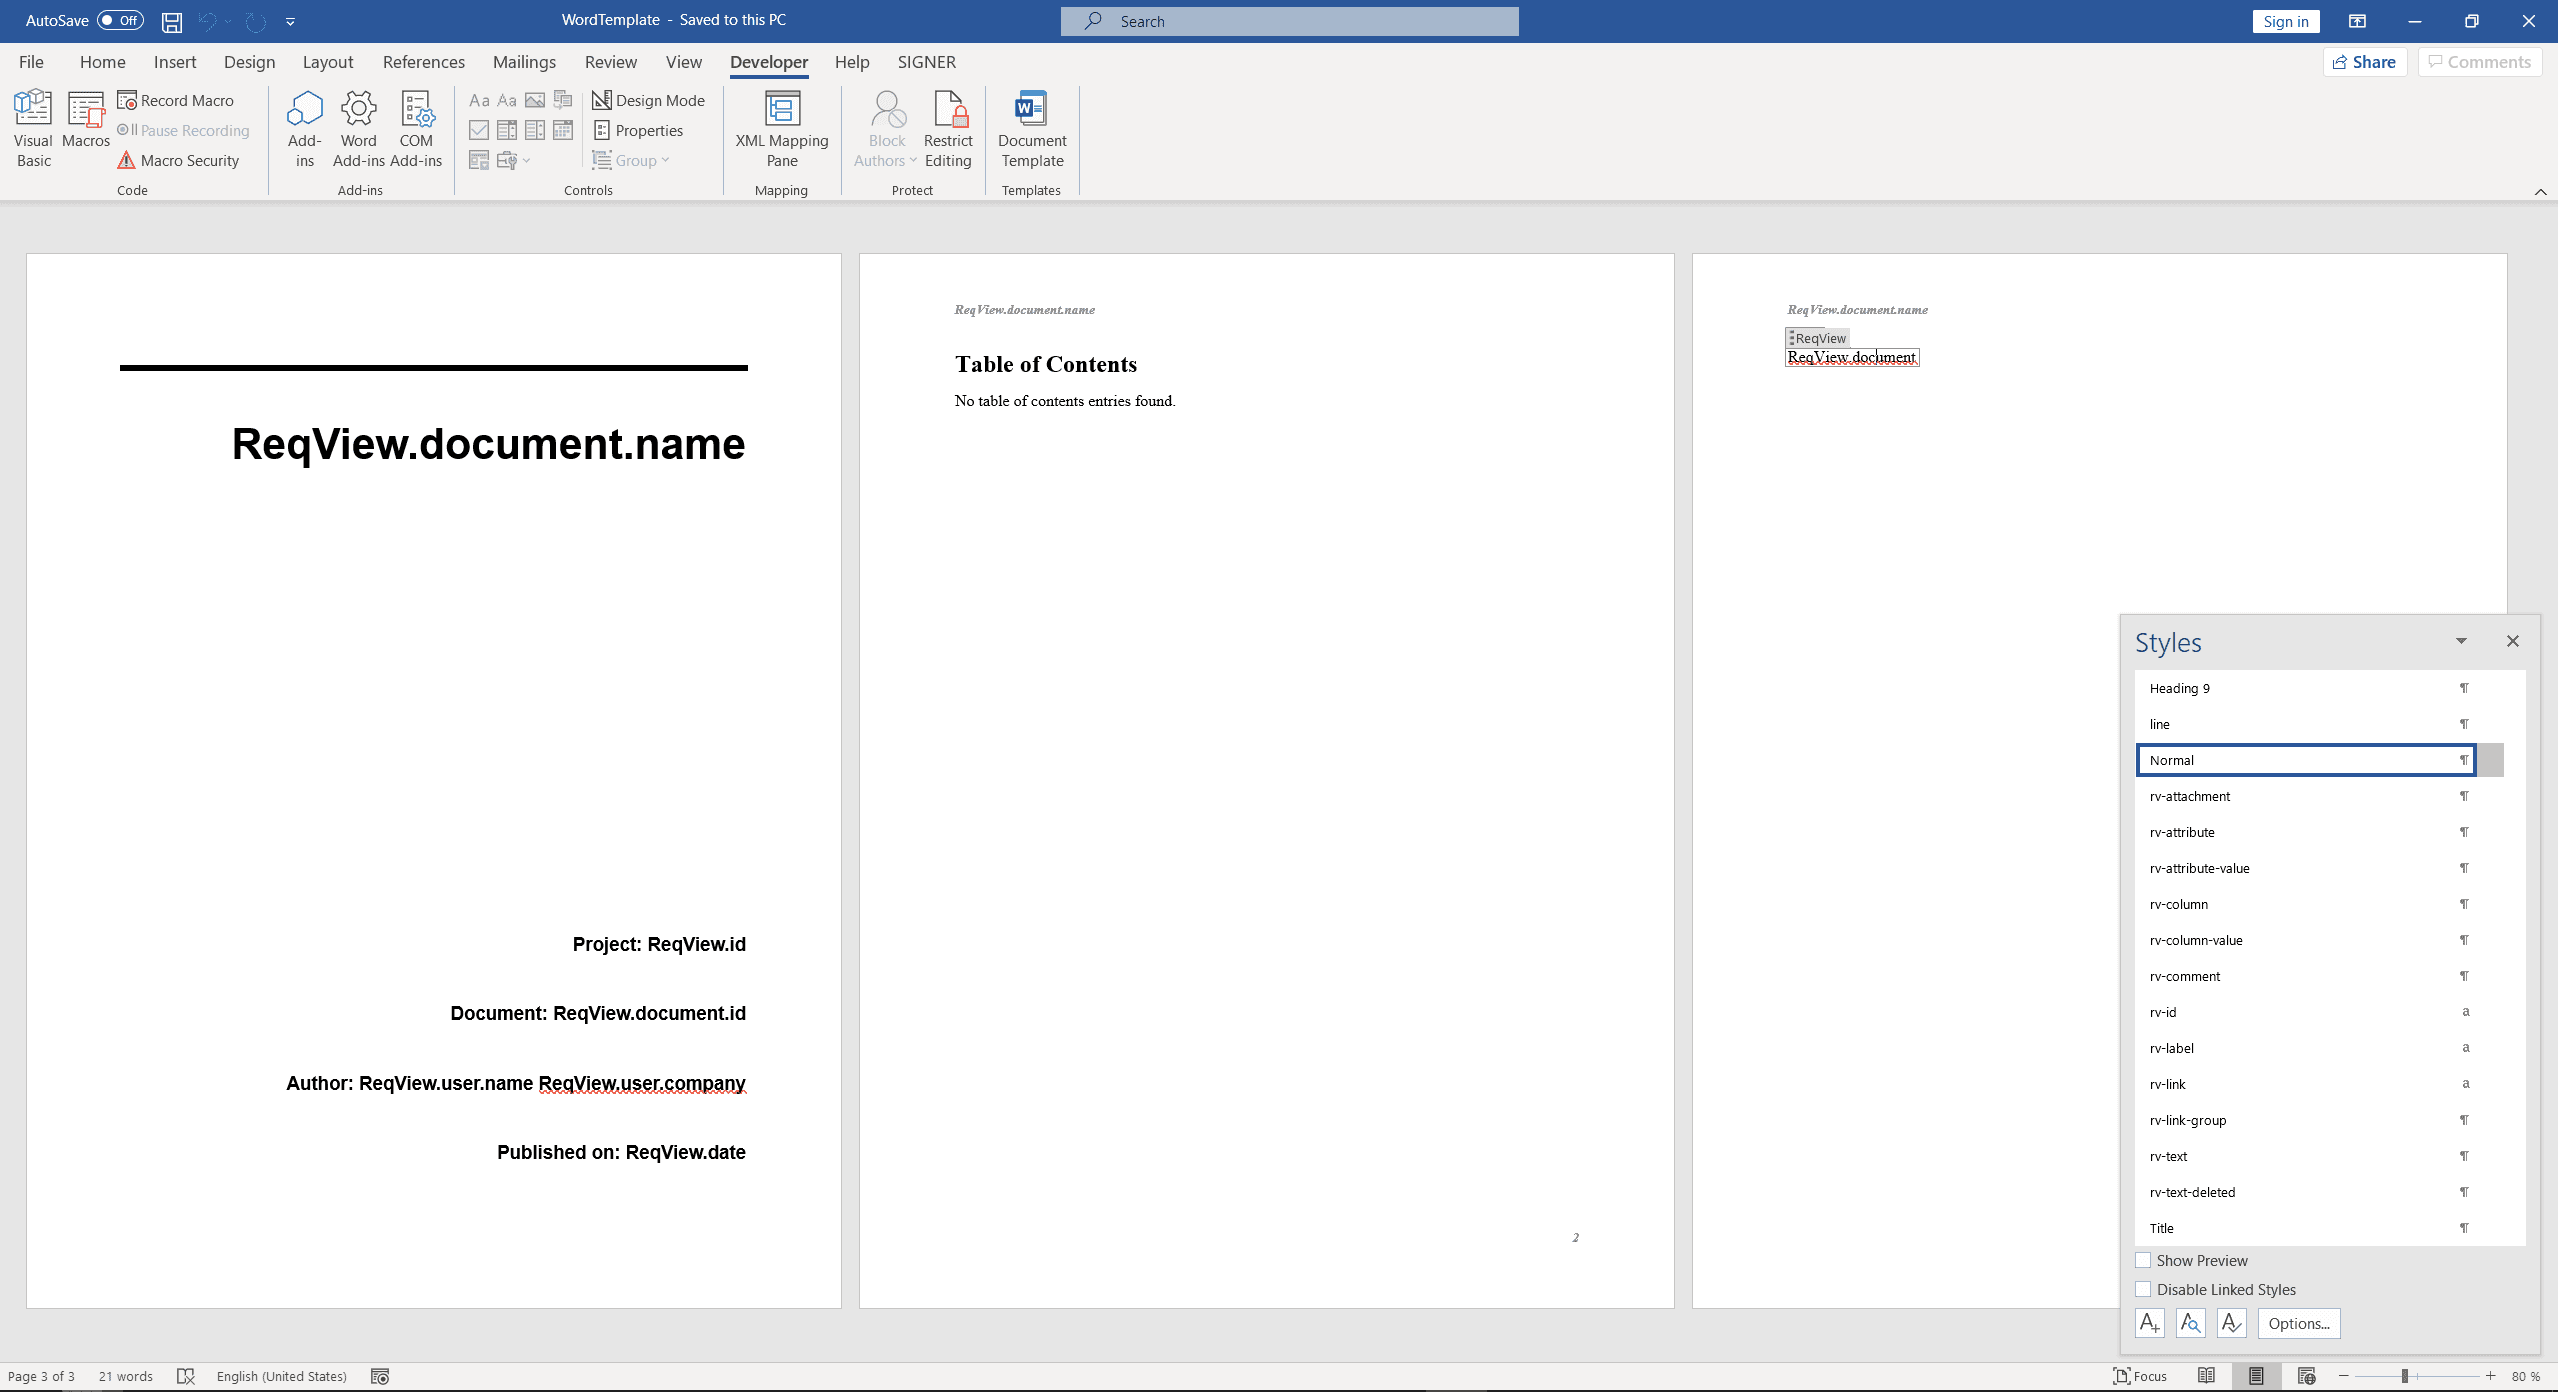
To export data from the current ReqView project, insert the following Word content controls in your custom MS Word template:
ReqView.id— export the project identifier.ReqView.user.name— export the name of the current ReqView user.ReqView.user.email— export the email of the current ReqView user.ReqView.user.company— export the company of the current ReqView user.ReqView.date— export the current date, e.g. "2020-02-19".ReqView.dateTime— export the current date, e.g. "2020-02-19 16:00".ReqView.document— export data from the current document using the selected layout.ReqView.document.id— export the current document identifier.ReqView.document.name— export the name of the current document.ReqView.document.exportSection[<sectionId>]— export the section sectionId of the current document, see Export Sections.ReqView.document[<docId>]— export data from the document docId using the selected layout.ReqView.document[<docId>].name— export the name of the document docId.ReqView.document[<docId>].exportSection[<sectionId>]— export the sectionId of the document docId, see Export Sections.ReqView.exportParam[<parameter>]— export the value of the given custom export parameter read from the JSON file selected in the Export dialog (see Export Options) or provided by argument--paramsto commandreqview export(see CLI).
You can insert Word content controls into a custom MS Word template as follows:
- Show the Developer tab, see how.
- Enable Design Mode on the Developer Tab.
- Move cursor to the place in the document where you want to insert the content control.
- Click on Plain Text Content Control on the Developer tab and type in a content control text, for example
ReqView.document[SRS]to export content of document SRS. - Optionally, set the content control title to "ReqView" by clicking on Properties on the Developer Tab.
Page Headers and Footers
You can insert a ReqView content control into a page header or footer. For example, to output the name of the exported ReqView document on page headers, open the DOCX template, double click on the page header, and insert ReqView.document.name content control as described in the previous section.
Note: You can experience a missing images in MS Word exported document when you place an image in the Word Template header. To avoid this buggy behavior of MS Word, place a picture in the Watermark. See how to insert a picture watermark.
Document Properties
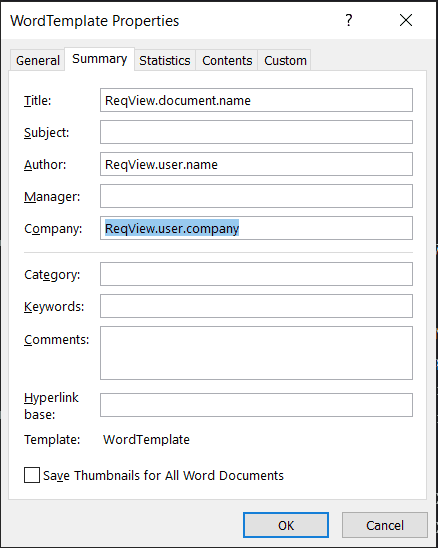
You can insert a Word content control also in Word document properties. For example, to set the current user company name in Company property, open the DOCX template, click File, click Info, click Properties, then choose Advanced Properties, and insert ReqView.user.company text in the Company text field:
Section Headings
You can customize the standard paragraph styles for section headings Heading 1, Heading 2, ..., Heading 9. For example, enable automatic numbering of section headings, adjust spaces before section headings, and insert a page break before each Heading 1 paragraph.
Note: MS Word supports automatically numbered multilevel lists up to 9 levels. Therefore will export sections below level 9 as level 9 and Word will number such section headings differently than ReqView.
Word Styles
You can customize the following Word styles if you select predefined Book or Table layout:
rv-attachment— attachment including images (paragraph)rv-attribute— custom attribute name (paragraph)rv-attribute-value— custom attribute value (paragraph)rv-column— template column name (paragraph)rv-column-value— template column value (paragraph)rv-comment— comment text (paragraph)rv-id— document object identifier (character)rv-label— custom attribute or template column label (character)rv-link— traceability link (character)rv-link-group— group of traceability links (paragraph)rv-text— text description of a document object (paragraph)rv-text-deleted— text description of a deleted document object (paragraph)
For custom layouts, you can define your own class names in HTML templates and customize the corresponding Word styles in Word templates, see Customize or create new styles in MS Word.
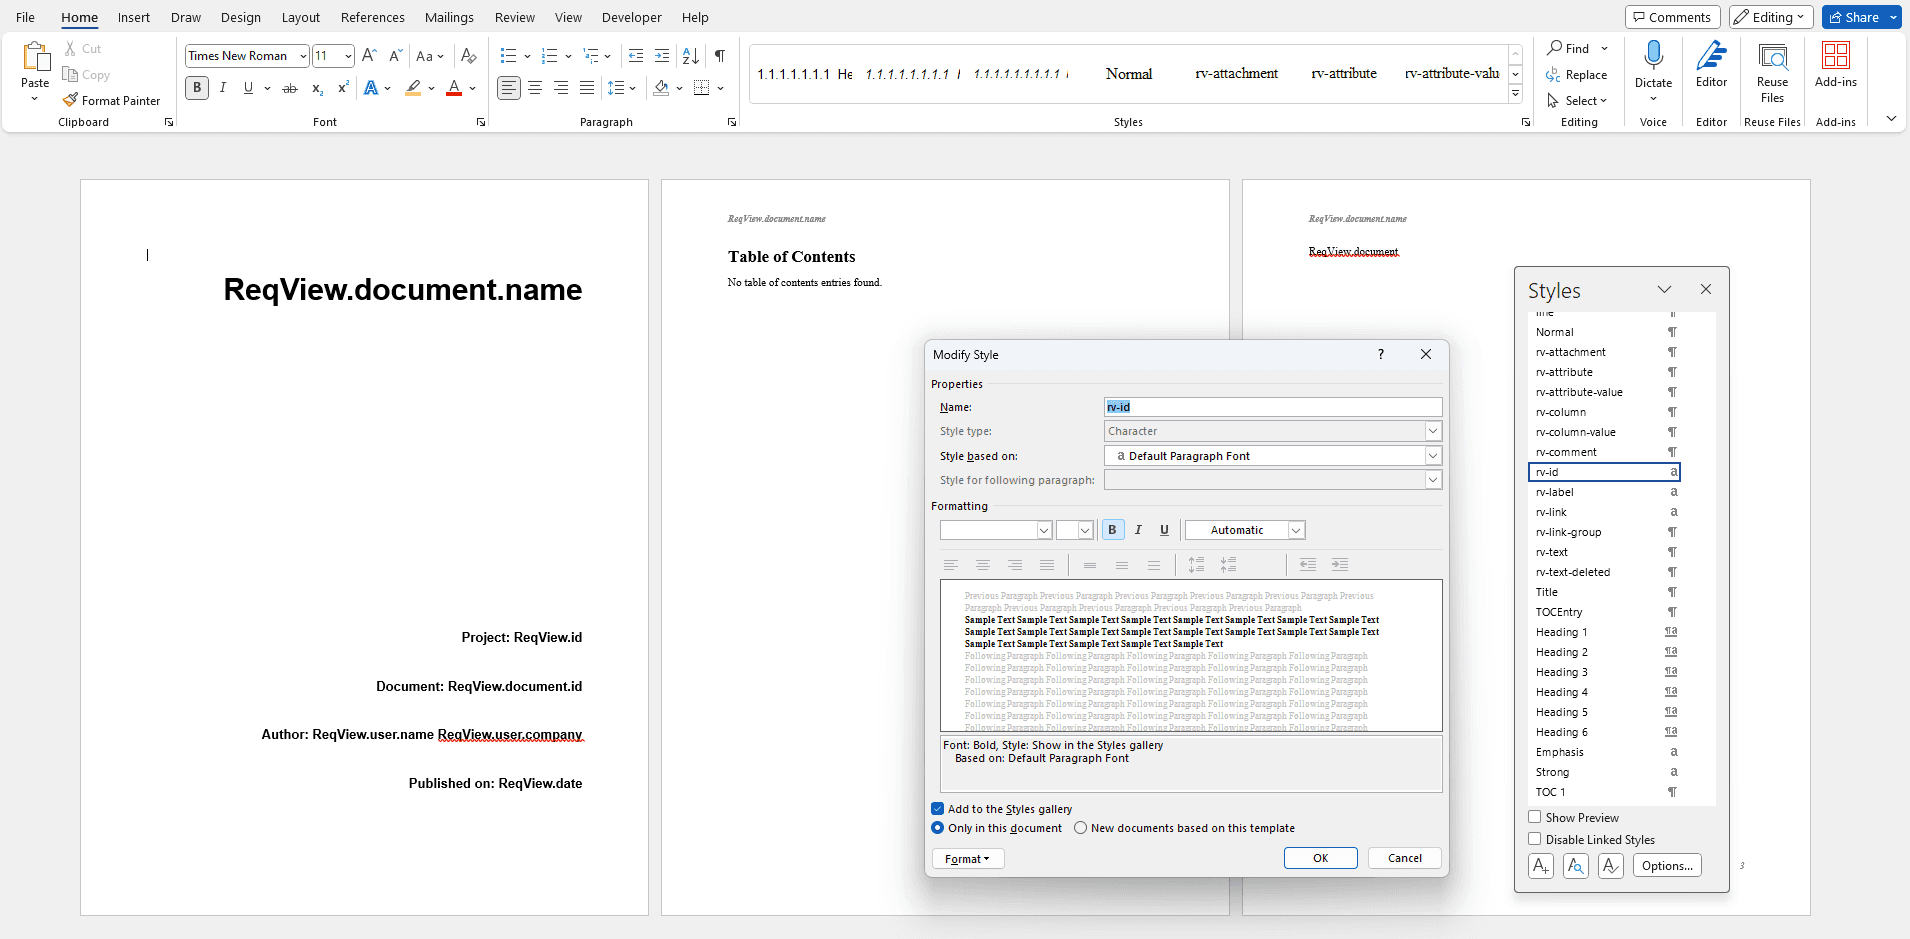
Example: Let’s see how to use bold formatting for document object IDs. The default Book and Table layouts outputs documents object IDs using export template <span class="rv-id">[{{docObjId}}]</span>. Because HTML tag <span> uses CSS class rv-id we need to customize Word character style rv-id in our MS Word template as follows:
-
In Word, open the DOCX file with our MS Word template.
-
Press CtrlAltShiftS to open the Styles pane.
-
In the pane, right-click rv-id in the pane, select Modify.
-
In the Modify Style dialog, click the icon enabling bold formatting:
![Customize Word styles in the default DOCX template for export from ReqView Customize Word styles in the default DOCX template for export from ReqView]()
Note: If you experience issue with larger numbers than heading text in the first heading after section break, please explicitly specify numbering format of corresponding heading style in custom DOCX template.
Note: Vertical text in your custom DOCX template can cause missing images. In that case use for vertical text banded sidebar text area.
Document Sections
You can insert in the DOCX template content controls ReqView.document.exportSection[<sectionId>] or ReqView.document[<docId>].exportSection[<sectionId>] to output ReqView document sections selected in a custom HTML template using exportOption helper with "exportSection" parameter.
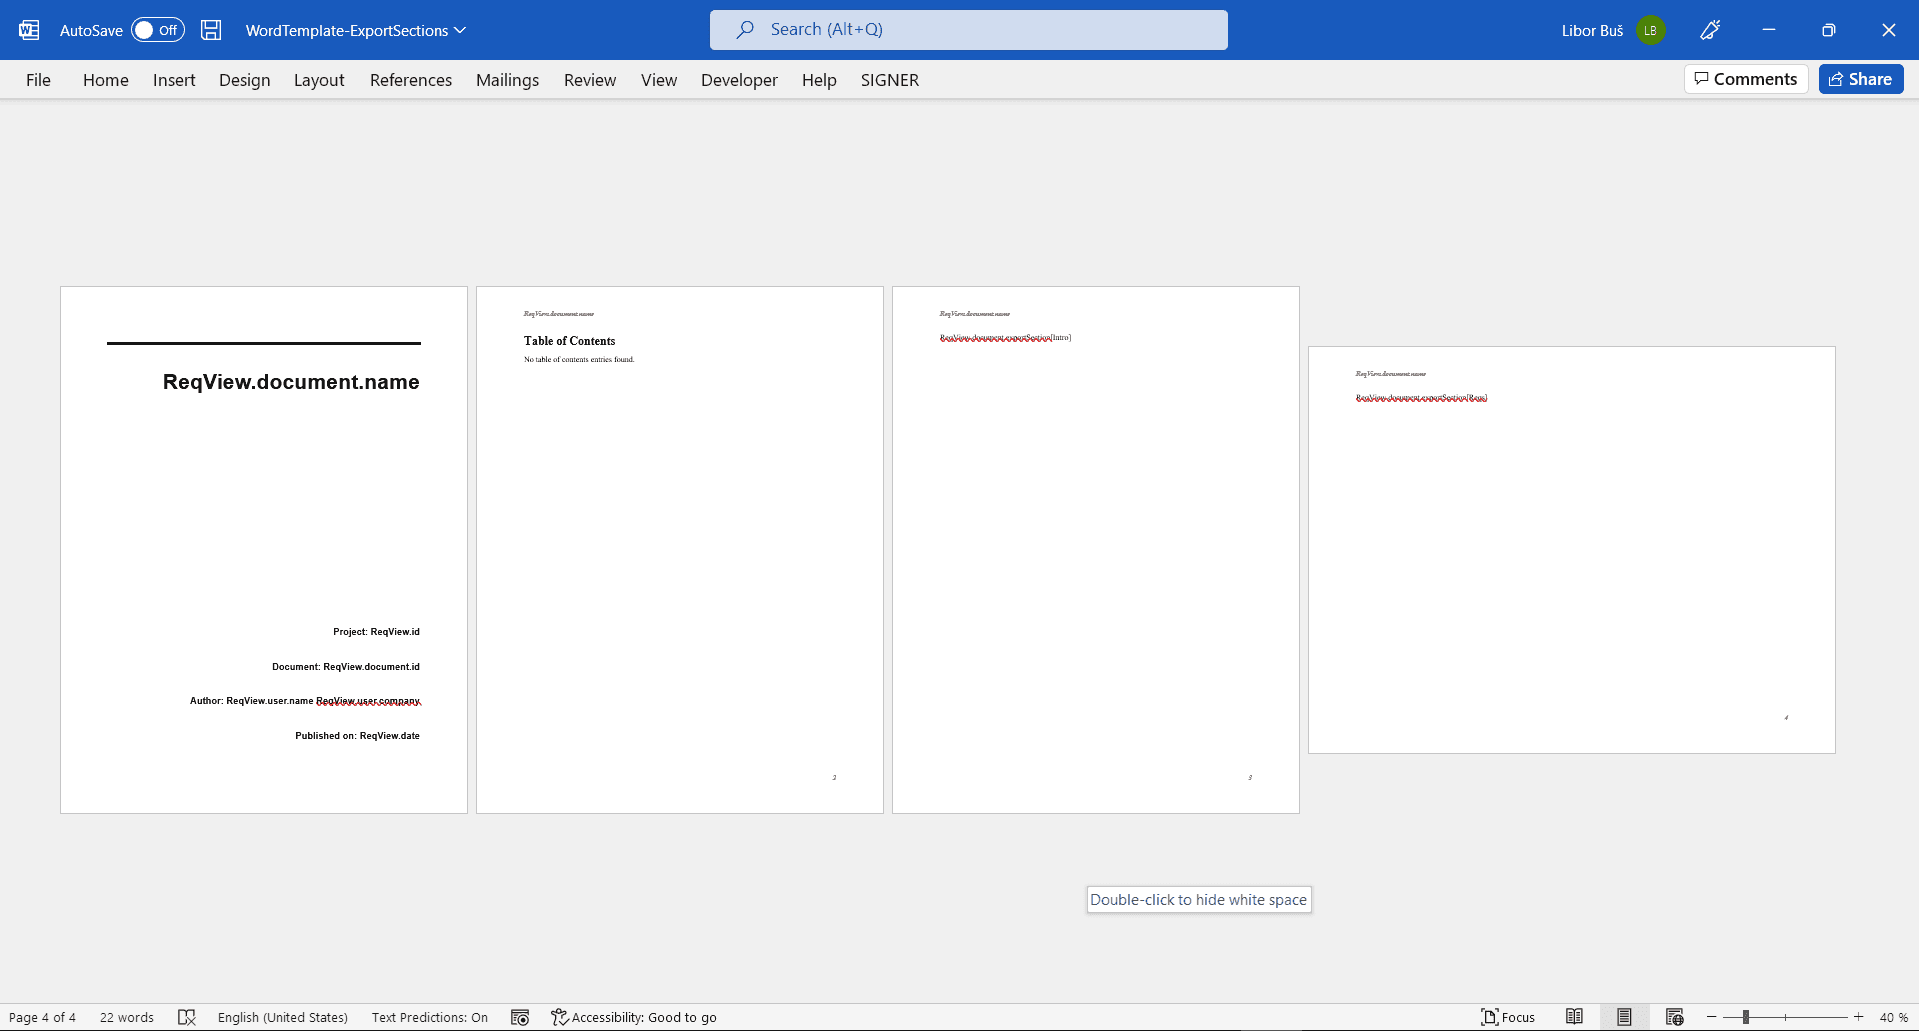
Example: Let’s see how to export document Software Requirements Specification (SRS) into a DOCX file, which contains document section Introduction using the book layout and portrait page orientation and document section Requirements using the table layout and landscape orientation.
-
In Word, open a DOCX template and insert content control
ReqView.document.exportSection[Intro]at a new page after the title page and table of contents having the portrait page orientation. -
In Word, click on Breaks on the Layout tab and select Next Page to insert a section break and start a new section on the next page. You can check section breaks in the Draft View. Then insert rich text content control
ReqView.document.exportSection[Reqs]at the new page and set its orientation to landscape.![Custom DOCX template for exporting introduction and requirements as separate sections from ReqView Custom DOCX template for exporting introduction and requirements as separate sections from ReqView]()
-
In ReqView, open the exported document SRS. Then define custom enumeration attribute exportSection:
{"exportSection": {"type": "enum","name": "Export Section","values": [{ "key": "Intro", "label": "Introduction" },{ "key": "Reqs", "label": "Requirements" }]}} -
In ReqView, set values of attribute exportSection for each top level document section:
![Set custom attribute storing export sections in ReqView document exported to DOCX Set custom attribute storing export sections in ReqView document exported to DOCX]()
-
Create a custom template exporting different content for both sections "Intro" and "Reqs":
<!DOCTYPE html><html lang="en-US"><head><meta charset="utf-8"><title></title></head><body><table><thead><tr><th>ID</th><th>Description</th><th>Rationale</th><th>Source</th></tr></thead><tbody><tr><td></td><td></td><td></td><td></td></tr></tbody></table></body></html> -
In ReqView, export the document SRS to DOCX. In the Export DOCX dialog choose Custom MS Word Template and select the DOCX template created in steps 1-2, and then choose Custom layout and select the HTML template created in step 5.
Note: The next section Word Macros explains another approach for changing page orientation using a macro processing custom string marks.
Word Macros
The MS Word template can contain macros or Visual Basic code to manipulate further the exported data from ReqView. For instance, you can implement a macro that updates the table of contents after opening the exported document.
Example: Let’s see how to export a requirements specification to DOCX and generate the table of figures with all image attachments using a macro.
-
Download the export template HTML / Book from section Export Using Custom Templates > Download Export Templates.
-
Alter the downloaded template to mark captions of exported attachments by string
[[Caption]]processed further by a Word macro as illustrated by the following template snippet:<p class="rv-attachment"><br><img class="attachment" src="" ></p>[[Caption]] -
Download the MS Word Template With Macros from section Download Templates below.
-
Export a requirements specification from ReqView to DOCX using the custom Word template and custom layout file.
-
Open the exported DOCX to run Word macro
Document_Openreplacing image captions, generating the table of figures, and updating the table of figures. See the following screenshot:![Result for exporting INF document of example project Result for exporting INF document of example project]()
Example: Let’s see how to export a requirements specification to DOCX and using landscape page orientation for image attachments and portrait page orientation for text.
-
Download the export template HTML / Book from section Export Using Custom Templates > Download Export Templates.
-
Alter the downloaded template to mark attachments by strings
[[PageOrientationLandscape]]and[[PageOrientationPortrait]]processed further by a Word macro as illustrated by the following template snippet:...[[PageOrientationLandscape]]<p class="rv-attachment"><br><img class="attachment" src="" ></p>[[PageOrientationPortrait]] -
Export a requirements specification from ReqView to DOCX using the custom Word template and custom layout file.
-
Open the exported DOCX to run Word macro
Document_Openreplacing the[[PageOrientationPortrait]]and[[PageOrientationLandscape]]strings with page section and desired page orientation.
Note: See the previous section Document Sections for another approach how to change page orientation according to a custom attribute.
Download Templates
Word Templates
You can download and reuse the following DOCX template:
-
Default MS Word Template — export a title page, table of contents, followed by content of the current document using the paragraph styles described in the previous section.
-
MS Word Template With Macros - similar as the Default MS Word template above but with added macros for caption creation and page orientation. For more information see Word Macros.
HTML Templates for Layout:
For an example HTML template, see Export Using Custom Templates > Export HTML Format > HTML for DOCX Export.
You can download the default HTML templates for Book and Table layout from Export Using Custom Templates > Download Export Templates.
