ReqView records history of changes automatically for projects saved with the Save History option, see Save Projects.
You can view changes of the selected document object in the History Pane or browse project changes in the Project History dialog.
View Object History
Change Indicator
You can see icon in the ID column for all changed document objects not yet saved into the open Project File or Project Folder.
Filter Document Changes
To filter all changed document objects with a changed attribute, choose History from the filter suggestions list. Then optionally select a specific attribute or enter a start date. See Filter History.
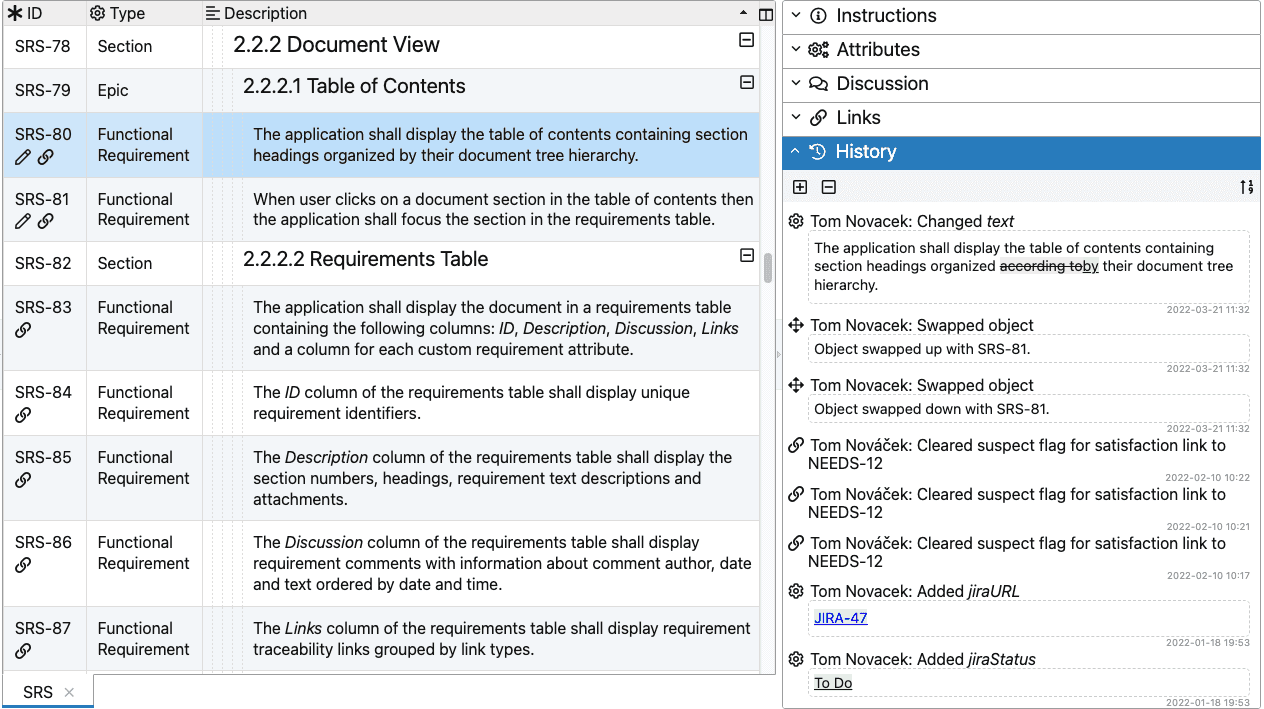
History Pane
To view changes of the selected document object in the History pane, click View, select Right Panes and then History Pane, or press CtrlAltH.
Browse Project History
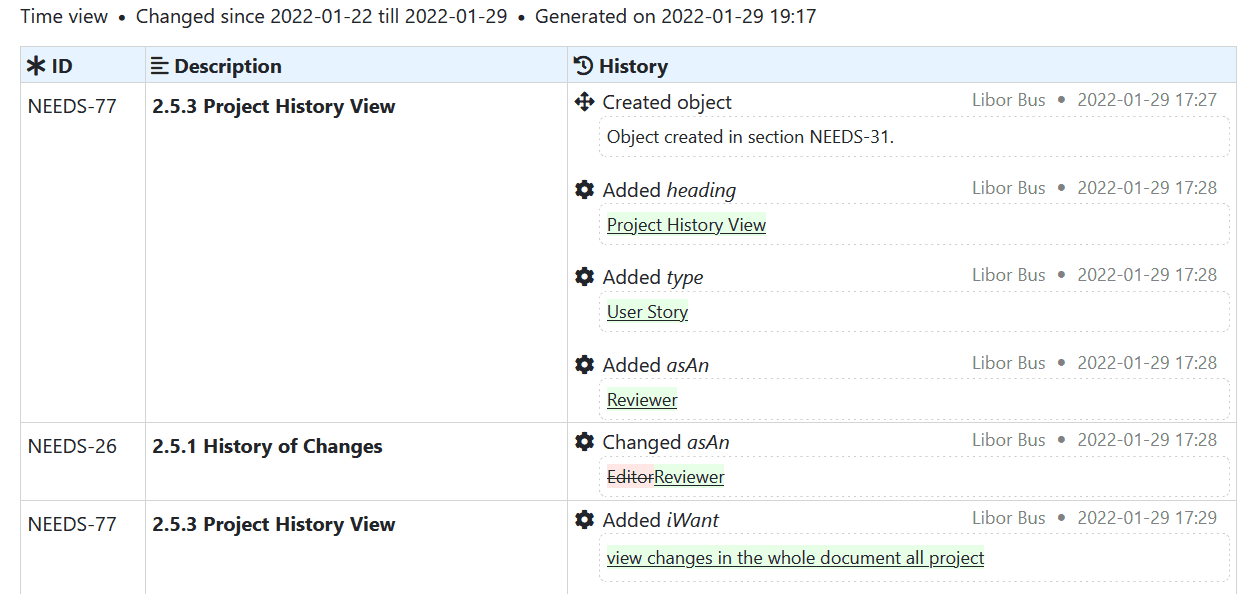
To see the audit trail (browse changes) of the current project in the Project History dialog, click Project and select History.
You can choose one of the following history views:
- Project Time View — display list of project changes ordered by time
- Document Time View — display list of document changes ordered by time
- Document Structure View — display document content with highlighted changes
You can filter the current view to display only changes made during a given time or by a specific user. You can also export the current view into an HTML report.
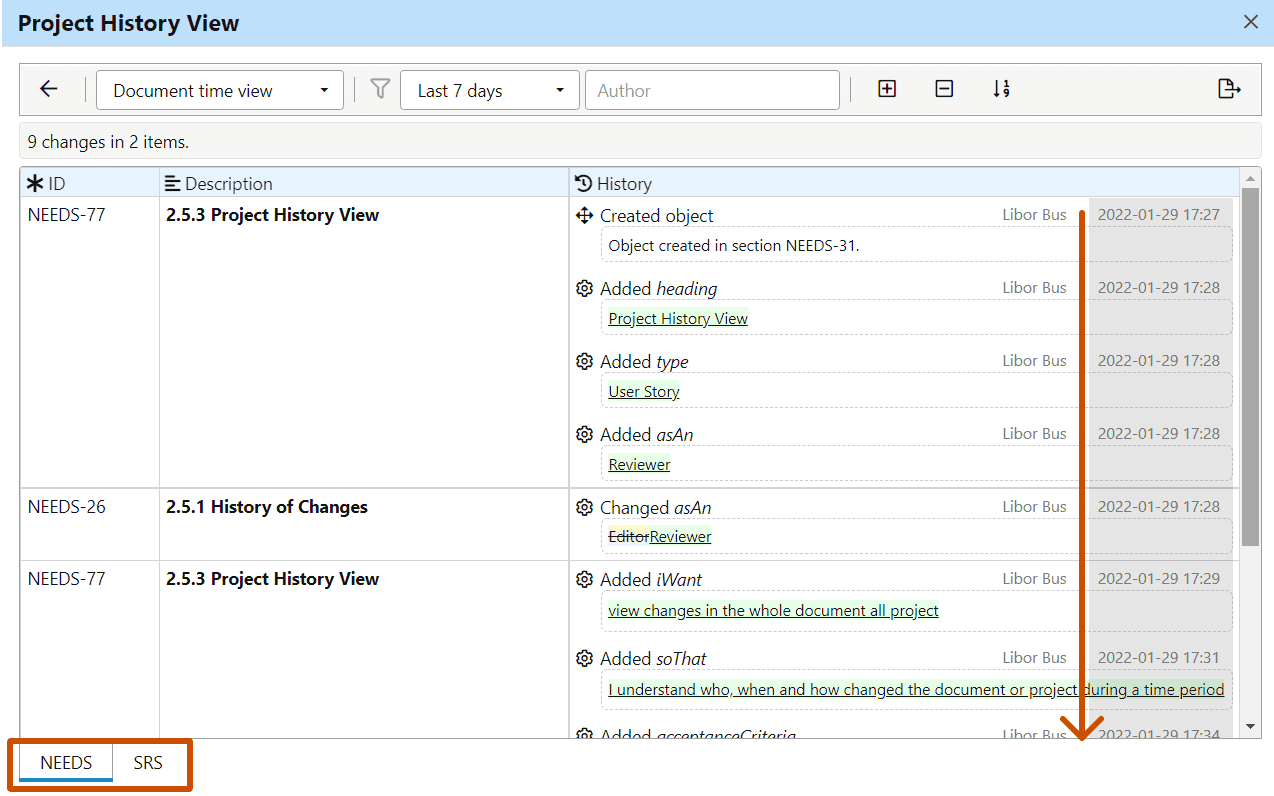
Document Time View
- Tabs separate changed documents
- Table displays changes of the given document ordered by time
- Rows represent consequent changes of the same document object
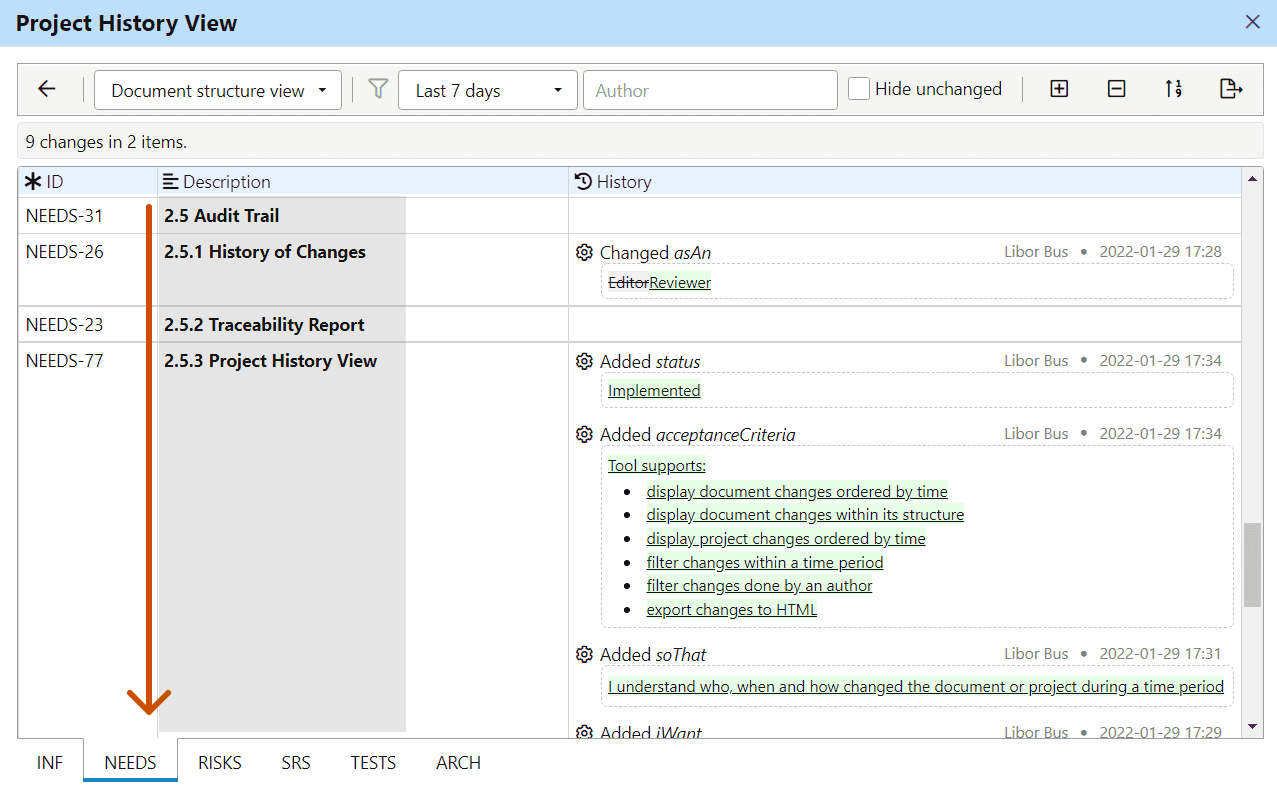
Document Structure View
- Tabs separate changed documents
- Table displays document tree hierarchy
- Rows represent document objects; check Hide unchanged in the toolbar to hide rows with unchanged objects
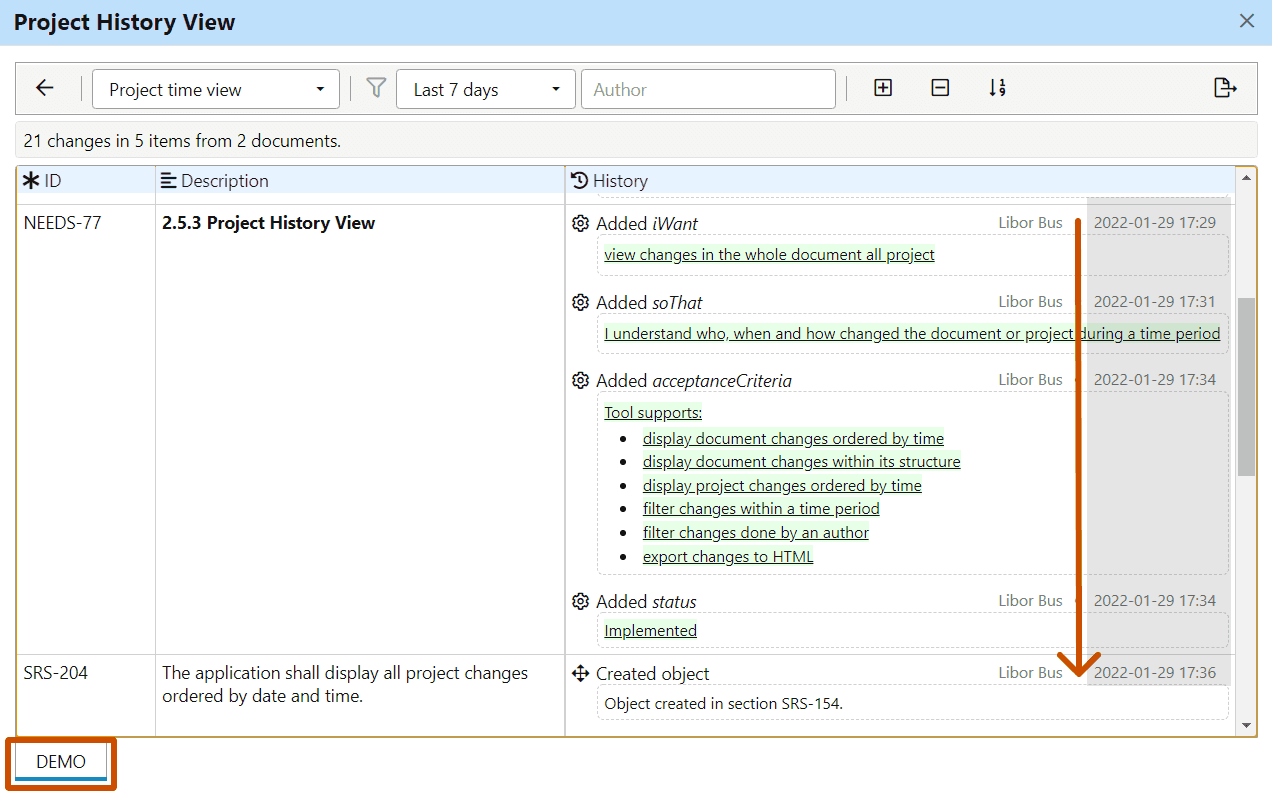
Project Time View
- Table displays changes from all documents ordered by time
- Rows represent consequent changes of the same document object
Filter Project Changes
To filter the most recent changes, select the Last 7 days, Last 14 days, or Last 30 days. To filter changes made between specific dates, select Custom period and enter the dates in the From and To fields.
To filter changes done by a user, enter a keyword matching the user name in the Author field.
Export HTML Report
To export the current view into an HTML report, click the button in the toolbar and select the output folder.
Manage Projects in VCS
You can manage ReqView projects using a Version Control System (VCS), such as Git or Subversion (SVN), to collaborate on editing the projects and to keep history of all project changes in a shared repository. For more information see:
- Git — Collaborate via Git and Git Administration.
- SVN — Collaborate via Subversion and Subversion Administration.
Compare Projects
You can compare a project with its previous version (baseline) saved as a Project File or Project Folder on your filesystem.
To compare the current project with a baseline, click Project, mouseover Compare Project, and select Compare File or Compare Folder.
The Compare Project dialog displays each changed document in Theirs and Mine side-by-side views:
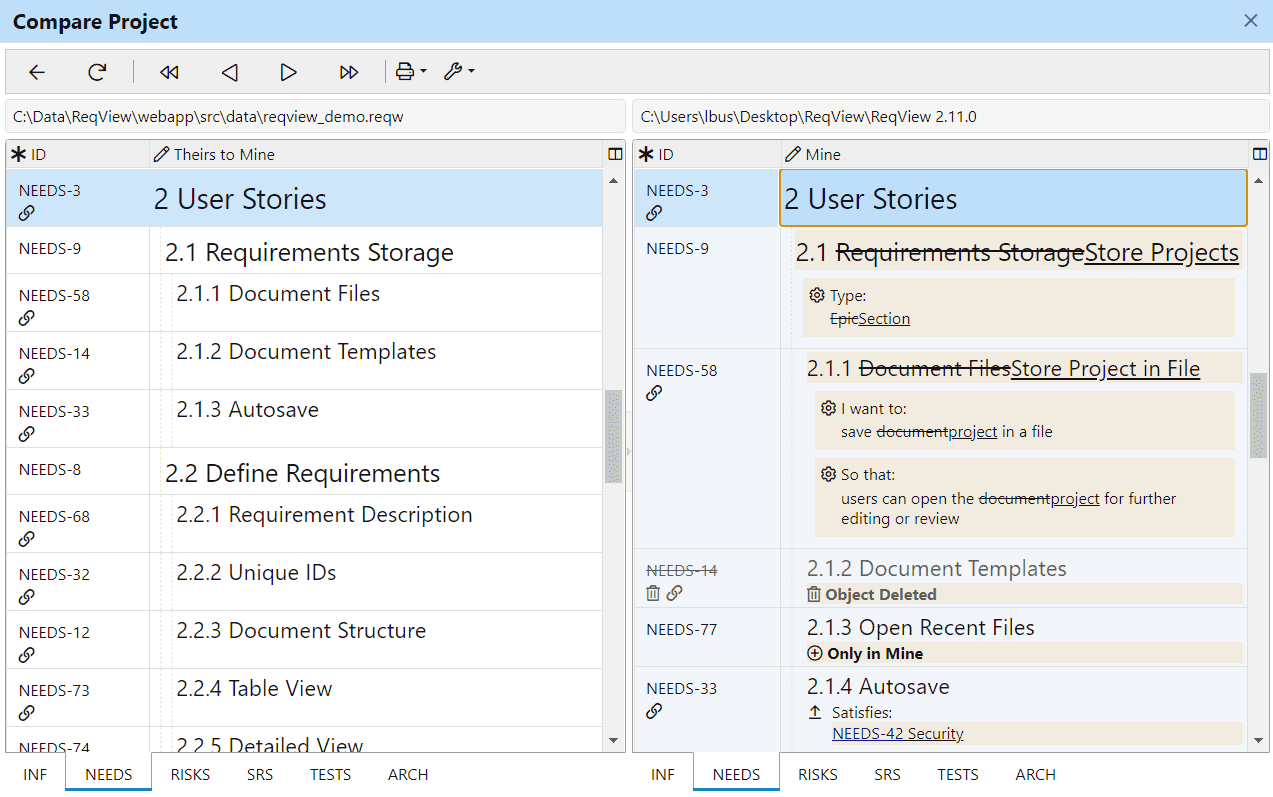
- Left view (Theirs): highlights changes of the compared project version not matched in the change history of the current project version, e.g., permanently removed requirements since the baseline
- Right view (Mine): highlights changes of the current project version not matched in the change history of the compared project version, e.g., updated requirements since the baseline.
By default, two columns are displayed in both the Theirs and Mine views:
- ID — document object ID
- Theirs to Mine / Mine — the text description followed by the summary of changes
To display additional columns, click icon.
To iterate over document changes, use the following buttons in the toolbar:
- — move to the first change
- — move to the previous change
- — move to the next change
- — move to the last change
To refresh the Mine view with changes done in another window, click the button in the toolbar.
To switch between Diff Theirs to Mine and Diff Theirs to Base modes, click icon. This is useful when your project history has diverged. For example, assume you opened file A, did some work on it and saved it as file B. Then you opened file A again and did further work, which you saved as file C. Using this example, the two panes of the Diff Their to Mine mode would compare files B and C, while the Diff Theirs to Base mode would compare B to A in the left pane and C to A in the right pane.
To print the current view or save it to a PDF, click the button in the toolbar.
To return from the Compare Project dialog, click the button in the toolbar.
Control Project Changes
You can follow a simple workflow for controlling project changes based on requirements comments and status attribute:
You can define custom enumeration attribute status with values: Draft, Ready, Reviewed, Approved, and Released, see Requirement Status. You can display and update status values in the Status column.
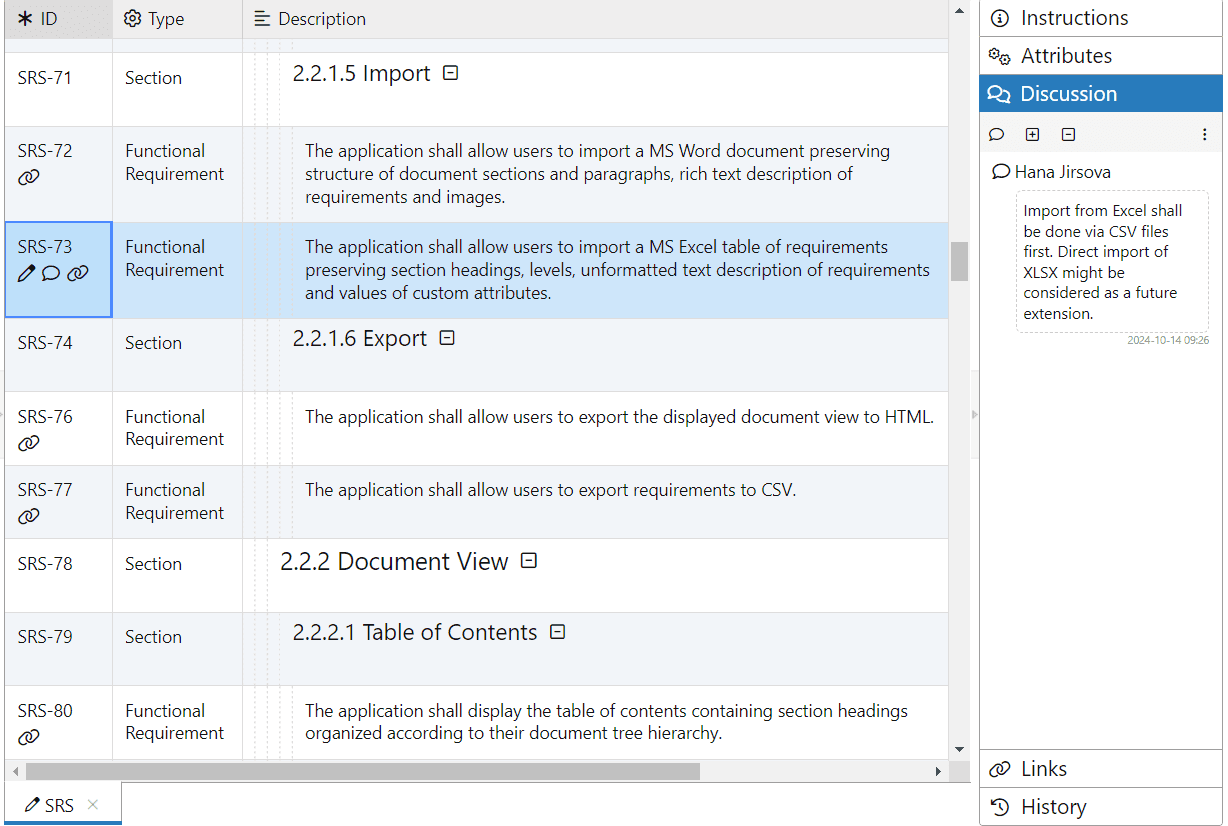
You can display and update requirement comments in the Discussion pane. To display the Discussion pane, click View, mouseover Right Panes, and select Discussion Pane, or press CtrlAltD.
Propose Changes
You can create new requirements as described in Create New Objects. Set status of new requirements to Draft.
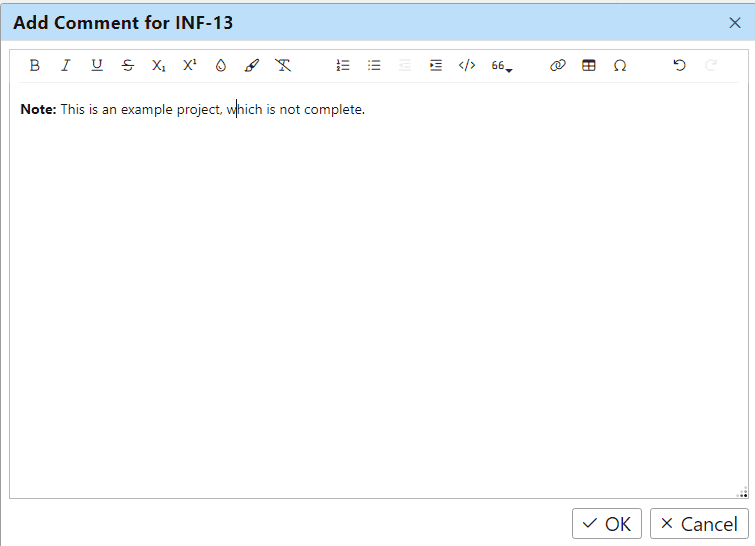
To add a new comment proposing a change to an existing document object, click Edit or right-click on the document object and then select Add Comment. You can also click the button in the toolbar or press CtrlD.
To update a comment, click the button above the corresponding comment in the Discussion pane and select Edit.
Set the status of a changed requirement to Ready when it is ready for review.
Review Change Proposals
To filter all requirements with status attribute set to Ready, enter Status: Ready as the document filter, see Filter Enumeration Values.
To filter all requirements with unresolved comments, enter Discussion: unresolved as the document filter, see also Filter Discussion.
To review only unresolved comments, open the Discussion pane, click the button in the toolbar and select Show Unresolved Only. To show all comments again, select Show All Comments from the same menu.
If a requirement change proposal is clarified and accepted then you can resolve the corresponding comment. To resolve a comment, click the button above the corresponding comment in the Discussion pane and select Resolve. To reopen a resolved comment, select Reopen from the same menu. To resolve all comments for the selected document object, click the button in the toolbar and select Resolve All.
Set the status of a changed requirement to Reviewed after resolving all comments with change proposals and updating the requirement as agreed.
You can also delete resolved or invalid comments. To delete a comment, click the button above the comment and select Delete. You can find deleted comments in the History Pane later.
Approve Requirements
To filter all requirements with status attribute set to Reviewed, enter Status: Reviewed in the filter input field. See Filter Enumeration Values.
To approve a changed requirement, set its status to Approved.
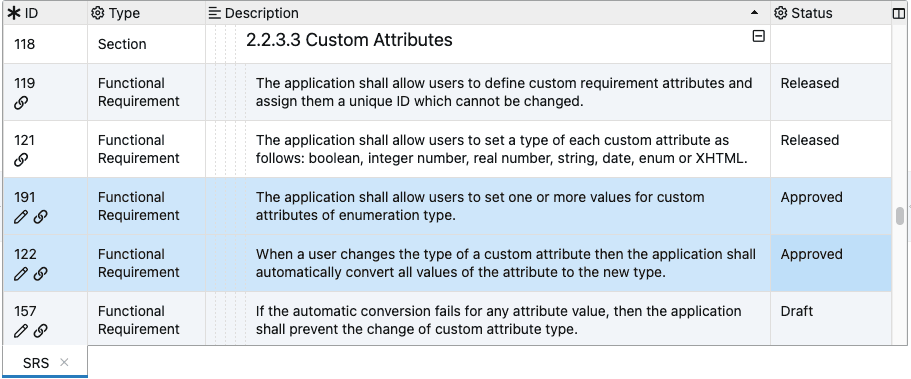
Example: Define the attribute status as described in Requirement Status. Display Status column in the table view. Select two requirements and set their status to Approved.
Analyze Impact of Changes
You can conveniently analyze impact of high-level requirement changes by displaying requirements coverage across multiple levels in an Impact Analysis View or Impact Analysis Report.
Impact Analysis View
Use the Traceability Column Wizard to add new traceability columns into the Requirements Traceability Matrix (RTM) view easily. Or, create advanced template columns with a custom template code.
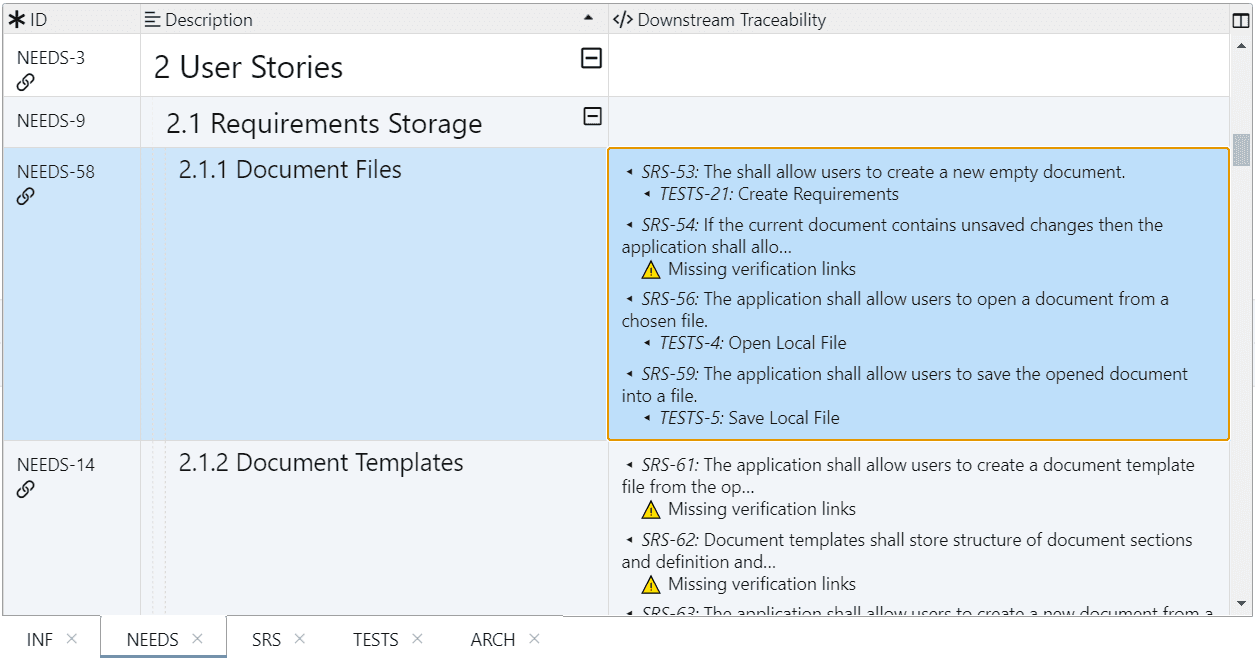
Example: Create a template column Downstream Traceability displaying for each top-level business need (NEEDS) the related SW requirements (SRS) and test cases (TESTS), and a warning if satisfaction or verification traceability links are missing.
Impact Analysis Report
If you need to export the impact analysis to an external document export the current traceability view to DOCX, XLSX, PDF, CSV, or other text formats. You can also create a traceability report with custom layout and styling.
Example: Create a traceability report displaying top-level business needs (NEEDS) in the left columns ID and Description and the related SW requirements (SRS) and test cases (TESTS) in the right Traceability column:
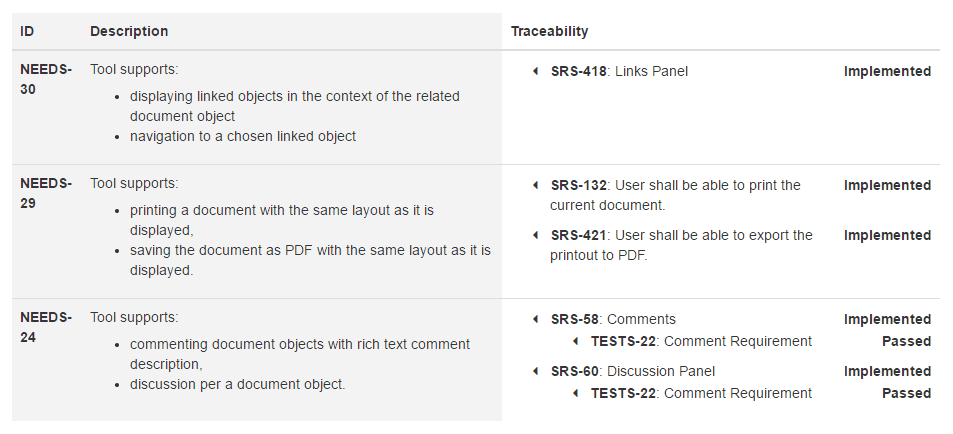
If the customer wants to change a user story (NEEDS-24) then you can immediately see in this report which implemented SW requirements (SRS-58 and SRS-60) and test cases (TESTS-22) needs to be updated.
Similarly, you can create an inverse bottom-up traceability report to reveal SW requirements not connected to any user need which indicates that these features were not possibly requested by the customer (gold-plating).
Download full example traceability report templates from the Export Using Custom Templates > Download Export Templates.
Manage Suspect Links
A common requirements management challenge is tracking changes in linked objects. You can propagate changes of high-level requirements downstream by maintaining suspect flag for traceability links.
Let’s assume that our software development project stores high-level user stories in a NEEDS document, SW requirements in a SRS document, and that SRS requirements are linked by satisfaction links to the corresponding high-level NEEDS. See also the Example Project.
How can be the author of the SRS document be informed about changes in the NEEDS document to keep the SRS document updated?
If you enable tracking suspect flags for satisfaction links then a change of a user story in the NEEDS document will set the suspect flag for all its incoming satisfaction links.
The author of the SRS document is notified about the change by an suspect flag indicator displayed in all linked SW requirements. He can review the change, update the linked SW requirements, end finally clear the link suspect flags to be notified about future changes.
Configure Suspect Links
You can enable tracking of suspect flags for a traceability link type by its suspect property in the Project Traceability dialog, see Link Type Definition. Set the value of the suspect property for a the link type to an array of suspect attributes. A link becomes suspect if any of the suspect attributes of its target object changes.
Permitted suspect attributes are: heading, text, deleted, attachments and custom attribute IDs.
Example: Configure the suspect property for satisfaction links to track heading, text and deleted suspect attributes:
{ "satisfaction": { "name": "Satisfaction", "source": "Satisfies", "target": "Is satisfied by", "suspect": ["heading", "text", "deleted"] }}Review Suspect Links
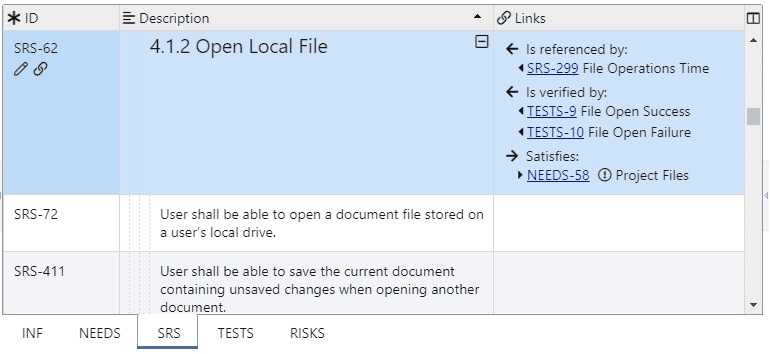
Suspect link flags are displayed as icons in the Links column or pane.
Example: Change user story NEEDS-58. You will be notified about the upstream change by icon when the row with the linked software requirement SRS-62 is displayed:
To filter all document objects with an outgoing suspect link, choose Suspect and then <link type> from the filter suggestion list, see Filter Links.
Clear Suspect Flags
To clear a suspect link flag, right-click a link in the Links column or pane and select Clear Suspect Link Flag from the context menu. The suspect link flag icon for the cleared link will disappear. It will show again after you change the link target object again.
To clear suspect flag of all outgoing links of selected document objects, click Edit, mouseover Clear Suspect Flags and then select Outgoing Links, or press CtrlJ. Similarly, to clear suspect flag of all incoming links of selected document objects, click Edit, mouseover Clear Suspect Flags and then select Incoming Links, or press CtrlShiftJ.
To clear suspect flag of all outgoing links in the project, click Project, mouseover Maintenance and then select Clear All Suspect Flags.